27
ENGLISH
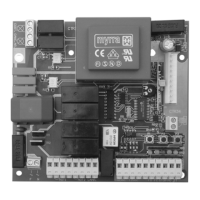
Terminal 6 - 12 Vdc power supply positive
Terminal 7 -
12 Vdc power supply positive
Terminal 8 - 12 Vdc power supply negative (common)
Terminal 9 – Aerial input (shield)
Terminal 10 –
Aerial input (signal)
Connection of the devices
230 Vac mains power supply cable and ground – Terminals 1,2 and 3 on J7
Warning: The cable’s ground pole must be connected to a good ground reference in the gate’s nearby area.
Motor 1 –
Terminals 1, 2 and 3 on J2
Motor 2 – Terminals 4, 5 and 6 on J2
Blinker – Terminals 7 and 8 on J2
Electric lock –
Terminals 1 and 2 on J5
Photo-cells power supply – Terminals 3 and 4 on J5
NC photo-cell contact – Terminals 5 and 7 on J5
NC stop push-button –
Terminals 5 and 8 on J5
NC photostop contact – Terminals 5 and 6 on J5
NO pedestrian start push-button – Terminals 5 and 9 on J5
NO start push-button – Terminals 5 and 10 on J5
Aerial –
Terminals 1 and 2 on J1
Courtesy light– Terminals 1 and 2 on J4
Open gate lamp – Terminals 3 and 4 on J4
Important
: Before starting the gate check all connections to the electronic card. Check also the electric contacts’ switching, which is
signalled by the leds’ operation.