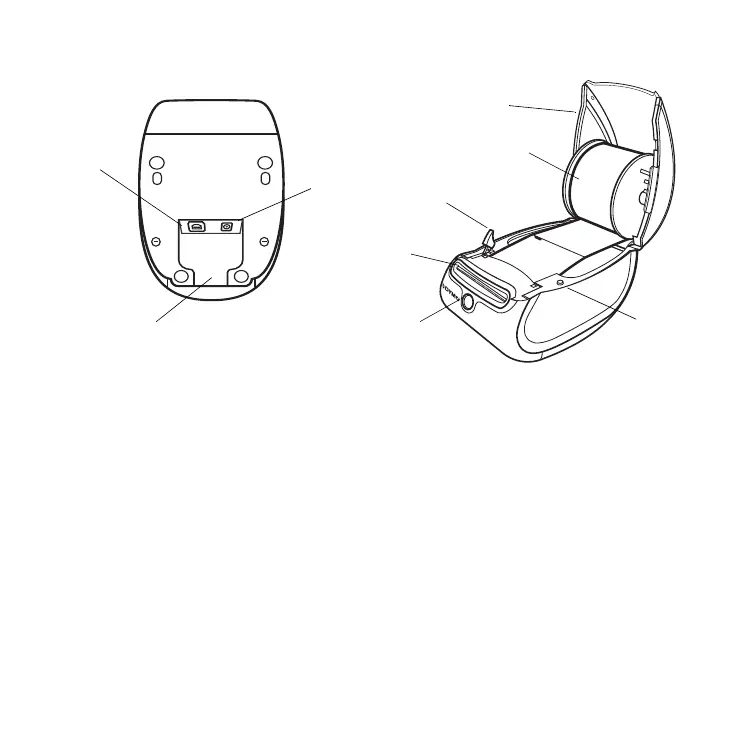
EasyManuals Logo

Dymo LabelWriter 400 User Manual

Dymo LabelWriter 400
8 pages
To Next Page IconTo Next Page
To Previous Page IconTo Previous Page
Page #3 background imageLoading...
Page #3 background image
3
Become familiar with the printers major components. See Figure 2.
LabelWriter Printer Features
The form-feed button on the front of the printer is used to advance a single label.
The label eject button is used to remove labels from the printer.
The LED status light allows you to visually determine the current state of the printer:
Solid blue - power is on and the printer is ready.
Flashing blue - labels are not loaded properly or label spool is empty.
Figure 2
Form-feed
Label feed path
and tear bar
Top
cover
USB
connector
DC power
connector
button and LED
Cable
channel
Label eject
button
Platen
release
Label roll

Other manuals for Dymo LabelWriter 400

Questions and Answers:

Question and Answer IconNeed help?

Do you have a question about the Dymo LabelWriter 400 and is the answer not in the manual?

Dymo LabelWriter 400 Specifications

General IconGeneral
PC connectedYes
Standard interfacesUSB
Tape size60 mm
CompatibilityPC & Mac
Product colorBlue, Silver
Built-in barcodesCode 39, ITF-14
Package depth593 mm
Package width255 mm
Package height238 mm
Weight and Dimensions IconWeight and Dimensions
Depth240 mm
Width149 mm
Height222 mm
Weight1540 g

Related product manuals