E8500 Instruction & Operations Manual
version 1.010
Page 6 of 45
PDAs located nearby using Bluetooth wireless technology. It has a library of 15 fuels. It
is designed to operate on its internal rechargeable battery pack as well as AC power.
The basic operation is as follows:
You insert the extraction probe in the stack of an operating combustion source such as
a boiler, furnace, or combustion engine. A pump located inside the instrument draws a
small sample of the stack gas. The sample is conditioned in a separate drawer
compartment located inside the unit. The gas sensors analyze the contents of the stack
gas and its temperature and calculate & display the results. In addition, an optional Pitot
tube measures the velocity of the stack gases, which allows for mass emissions
calculations. The results can also be stored in memory, printed out, or sent remotely to
a computer using the Bluetooth wireless communications. The source operator can
make the required adjustments on the combustion source based on the analysis of the
stack conditions to optimize performance of the combustion source.
A.
UNPACKING THE INSTRUMENT
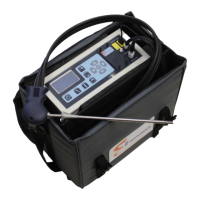
Every E INSTRUMENTS Model E8500 includes as standard equipment:
• Emissions Analyzer Model E8500 with integrated chiller conditioning system
and automatic condensate drain
• Stack sampling probe that includes the probe shaft, sample line/hose, and
thermocouple cable/connector
• Battery charger / AC adaptor for the analyzer
• EGAS
TM
Software for Windows
TM
CD-ROM
• Bluetooth module to connect to a computer via USB port
• Protective carrying case with shoulder strap
• Calibration certificate
• Instruction manual
B.
E8500 STARTING INSTRUCTIONS
1. Make sure the instrument is in a clean-air, room-temperature environment and
turn it on by pressing the POWER button on the keypad.
2. Press the OK button to begin an autozero countdown. Once the display shows
AUTOZERO COMPLETE, you are ready to use the instrument for your
measurements. You can also initiate the autozero the analyzer by first pressing
the CALIB button. The cursor will rest on the first line of the display, which states
Zero All Sensors. Press OK. The display will automatically switch to the
MEASURE mode and the last line will execute a countdown. At the end of the
countdown you are ready to use the instrument.