2 BASIC OPERATION
2.1 MENU NAVIGATION
When nGauge first starts up, a splash screen will appear. It will take a few seconds to start up.
The [√] button advances the screen to the next menu.
The [x] button returns the screen to the previous or main menu.
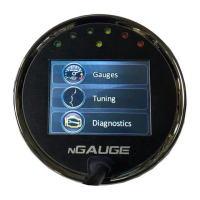
The home screen contains Gauges, Tuning and Diagnostics tabs.
2.2 NEW VEHICLE SETUP/FIND SIGNALS
The nGauge has been designed to be used on most 1996 and newer OBD II vehicles. Vehicles to which the nGauge is connected, will
typically offer a different set of parameters or signals available.
The New Vehicle setup:
1. Plug nGauge into the vehicle.
2. Turn the vehicle’s key to the on position. The engine does not need to be started.
3. From the nGauge main menu, Tap [Gauges], tap [connect].
4. Tap [Select the correct make and model for your vehicle].
5. Follow the on-screen instructions. When nGauge lists how many signals were found, nGauge has finished.
6. Tap the [√] button to confirm the selection once scanning has completed.
7. Repeat steps 1-6 every time nGauge is connected to a new vehicle.