Do you have a question about the EasyThreed K7 and is the answer not in the manual?
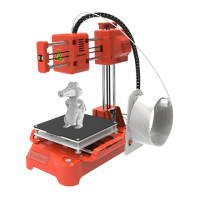
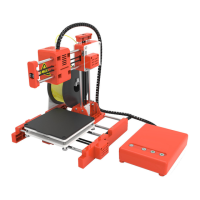
Identifies and labels the primary components of the 3D printer.
Details the technical specifications and operating conditions for the printer.
Lists all items included in the printer's packaging box.
Step-by-step instructions for assembling the printer's main components.
Guide to using the included Easyware slicing software for model preparation.
Explains the process of converting STL files to Gcode for printing.
Detailed steps for calibrating the print bed for optimal first layer adhesion.
Instructions for properly loading filament into the printer for extrusion.
How to initiate, pause, resume, and stop a print job.
Procedure for removing filament from the printer, especially for changes.
Advice on cleaning, care, and avoiding unauthorized modifications.
Crucial safety precautions for operating the printer, especially around hot parts.
Troubleshooting why models do not stick to the printing bed.
Diagnosing and resolving problems with filament not coming out of the nozzle.
Addressing issues where the printed model is shifted or misaligned.
Investigating causes for differences between the model and the printed object.
The EasyThreed K7 is a compact 3D printer designed for ease of use and accessibility, making it suitable for beginners and educational purposes. Its primary function is to create three-dimensional objects from digital designs using filament-based additive manufacturing (FDM) technology. The printer comes with an operation video on a TF card, providing visual guidance for setup and use.
The K7 printer operates by extruding heated thermoplastic filament through a nozzle, layer by layer, onto a build platform to construct a 3D object. It features a single print head and nozzle for precise material deposition. The printer supports common filament types like PLA and TPU, which are widely used for their ease of printing and versatility. Digital 3D models, typically in STL format, are processed by slicing software (such as Easyware KS, CURA, or S3D) into Gcode files, which the printer then reads to execute the print job. The printer includes a TF card slot for loading these Gcode files, and a USB port is available for connection to a computer, likely for firmware updates or direct control.
The printer's mechanical components include an X-axis, Z-axis, and a print head that moves along these axes to position the nozzle accurately. A filament holder is provided to manage the filament spool, ensuring a smooth feed into the extruder. The print button serves as the primary control for starting, pausing, and resuming print jobs. The "Feed/Retract" mechanism allows users to load and unload filament, a crucial step in preparing for a print or changing materials.
The K7 emphasizes a straightforward setup and operation process. Upon unboxing, users are guided to install the X.Z assembly onto the base using screws and then attach the filament holder. Crucially, cable connectors for the X-motor, Z-motor, and Z-switch need to be properly connected to ensure the printer's axes function correctly.
Before the first print, platform leveling is a critical step. The manual details a manual leveling process involving four points on the platform. Users are instructed to adjust the distance between the nozzle and the platform to the thickness of a sheet of A4 paper, ensuring a slight friction when pulling the paper. This adjustment is made by turning screw nuts beneath the platform. The manual advises against pressing on the platform during this process to maintain accuracy and recommends adult assistance for children.
Loading filament involves straightening the filament end and inserting it into the filament insert port. The "Feed" function, activated by shifting a gear and pressing the print button, heats the nozzle and draws the filament through. The process requires patience, as it takes about a minute, and users are advised to gently press the filament down to ensure it's caught by the gear. Successful feeding is indicated when filament extrudes from the nozzle. After feeding, the gear must be shifted back to the "PRINT POSITION." The manual also provides troubleshooting tips for feeding failures, such as ensuring the filament end is straight and maintaining pressure during feeding.
To initiate a print, a Gcode file must be loaded onto a TF card and inserted into the printer. The print button is then pressed, causing its light to flash as the printer reads the file and heats the nozzle. Once the temperature is reached, printing begins. The printer is designed to print the latest Gcode file on the TF card, and file names should consist only of English letters or numbers. A test Gcode file is included on the TF card for initial use.
During printing, the print button also functions as a pause/restore control. Pressing it once will pause the print, indicated by the button light stopping its flash. Pressing it again will resume the print. To stop a print entirely, the print button needs to be pressed and held for three seconds. Unloading filament follows a similar process to loading, but with the gear shifted to "RETRACT," allowing the heated nozzle to pull the filament back out.
Maintaining the K7 printer ensures its longevity and consistent print quality. Regular cleaning is recommended, especially when the power is off. Users should wipe the machine with a cloth to remove dust and residue, avoiding inflammable liquids near internal circuits. After each print, it's good practice to clean any residue from the nozzle and extruder to prevent clogging, which can affect subsequent prints.
The manual also provides troubleshooting for common printing issues. For models not adhering to the print bed, the primary solution is to re-level the platform, ensuring the correct nozzle-to-bed distance. If filament fails to extrude, users should check the filament feeder, nozzle temperature, and for any blockages in the nozzle. Nozzle blockages may require heating the nozzle to 230°C and gently pushing the filament, or even disassembling and cleaning/replacing the nozzle.
Print model misplacement issues can stem from improper slicing, file problems, or external factors like touching the nozzle during printing or filament residue accumulating on the model. An unstable power supply can also cause dislocations, suggesting the use of a voltage stabilizer if large electrical equipment is operating concurrently. If these solutions don't work, changing the mainboard might be necessary.
Regarding print accuracy, issues like excessive filament on the model surface can be addressed by adjusting the nozzle temperature (if too high) or reducing the filament flow setting in the slicing software. Correctly setting the filament diameter in the slicer (e.g., 1.75mm for 1.75mm filament) is also crucial. For poor surface quality after removing supports, reducing support density (e.g., to 10%) and using grinding tools with acetone for finishing are suggested. The manual also highlights the importance of using high-quality filament to prevent issues like breakage or nozzle jams.
A safety warning advises users to keep fingers away from the hot nozzle and black insulator during operation, as temperatures can exceed 200°C, and to avoid moving parts while the printer is working. The recommended operating environment is a temperature range of 5°C to 35°C and a relative humidity of 30% to 90%. The manual explicitly states that users should not disassemble or modify the machine in ways not described in the manual to prevent damage or accidents.
| Build Volume | 100 x 100 x 100 mm |
|---|---|
| Nozzle Diameter | 0.4 mm |
| Filament Diameter | 1.75 mm |
| Supported Filaments | PLA |
| Frame Material | Plastic |
| Feeder System | Bowden |
| Printing Technology | FDM |
| Connectivity | USB |
| Power Supply | 12V |