Troubleshooting
Eaton Advanced ePDU Troubleshooting Guide P-164000140—Rev 1 www.eaton.com/ePDU 7
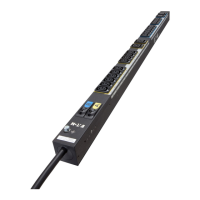
Chassis and Installation
This section provides chassis and hardware installation troubleshooting for the Advanced ePDU models.
Table 3 lists fault conditions, potential causes, and possible troubleshooting actions you can take in response
to problems.
Table 3. Chassis and Hardware Installation Troubleshooting
Problem Possible Root Cause Actions
Keyhole button: Does not fit
inte
nded rack (cannot insert or
support product)
l
Keyhole button is designed for most
standard
19-inch racks, but the rack
used is different and the wall thickness
does not match the keyhole design
l
Keyhole part is defective
1 - Check rack wall thickness and compare to the
sta
ndard
19-inch rack. Verify the proper installation for
this ePDU.
Indirect mounting using plastic clip
feet on the ePDU
back rails (with
keyhole button or cage nut
systems): ePDU is sliding inside the
rack
l
Safety screw may have been installed
incorrectly
l
A safety screw has been designed to
prevent sliding
NOTE Rea
d the Eaton Advanced ePDU
User’s Guide for further details
abo
ut the installation procedure.
l
Clip foot issue
1 - Insert the safety screw in one
of the tapped holes
just above the top-most plastic clip foot on the ePDU to
prevent the ePDU from sliding inside the rack.
Indirect mounting using plastic clip
feet (with keyhole button system):
D
ifficulty aligning the keyhole
buttons with the rack keyholes
l
Clip feet and keyhole buttons were
incorrectly pre-assembled on the ePDU
before rack installation
1 - First, try to assemble the clip feet and keyhole
buttons. Then, place the two subassemblies in the rack
keyholes. Finally, clip the ePDU inside the installed clip
feet. (You should hear a clicking sound.)
2 - If the subassembly is mounted on the ePDU, you can
als
o align the keyhole button with the ePDU back tapped
holes. These holes have the right pitch for
standard
19-inch racks.
NOTE If the actions listed in this table do not resolve the problem, contact customer service or a local representative for guidance and/or
replacement (see “Contacting Service and Support” on page 5).
Circuit Breakers
This section provides CB troubleshooting for the Advanced ePDU models. Table 4 lists fault conditions,
potential causes, and possible troubleshooting actions you can take in response to problems.
Table 4. Circuit Breaker Troubleshooting
Problem Possible Root Cause Actions
CB makes vibration noise during
curren
t overloading state before
tripping
l
Due to the impact of the
electromagnetic field on the CB
inter
nal parts
1 - This is normal behavior if overload is present.
Reduce the current load on the breaker. This action
should reduce or eliminate the noise.
NOTE If noise persists at or under nominal current, power off your ePDU and contact customer service or a local representative for
guidance and/or replacement (see “Contacting Service and Support” on page 5).
 Loading...