English
English
7
DESCRIPTION OF THE APPLIANCE
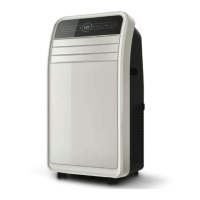
Main components [A]
1. Handle
2. Air intake (left side)
3. Control panel
4. Slats directing the airow
5. Wheels
6. Warm air exhaust
7. Air intake (right side)
8. Remote controller
9. Drain plug
10. Grille
11. Exhaust hose assembly
12. Window sealing strip assembly including seal
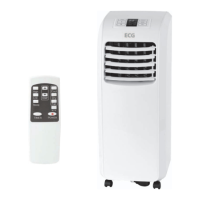
Front panel [B] and Remote controller [C]
1. On/O switch
Press the button to turn the air conditioner on or o.
2. “Sleep" button (night mode)
This button only works in cooling mode. Pressing this button automatically reduces the fan speed to
aminimum. However, their speed cannot be manually controlled.
3. Fan speed button
Use this button to select high or low air ow speed.
4. Up/down buttons to set temperature or time.
Set temperature using these buttons in the cooling mode. In timer mode, you set the on/o time By
simultaneously pressing both buttons (on the panel) you can switch between displaying the temperature
in Celsius or Fahrenheit.
5. Mode selection button
Press the specic button on the remote control to select between cooling, air ow and dehumidication
modes.
6. Timer button
In standby mode, press to set the time the appliance is switched on. Press the button in the switched-on
state to set the switch-o time of the appliance.
7. Display showing temperature/time (appliance panel)
This window shows the set temperature and time.
8. Remote control sensor (appliance panel)
The sensor receives signals transmitted by remote control.
9. Button to switch between Celsius and Fahrenheit scale (remote controller)
Press the button to switch between temperature scales.
PLACEMENT AND INSTALLATION
Placement
Place the appliance on alevel oor near awindow.
To ensure good air circulation and optimum performance, there
should be at least 50 cm of free space around the appliance.