The ECHO SRM-4300 is a high-performance, petrol-engined unit designed for heavy-duty grass trimming and brush cutting in areas difficult to control by any other means. This operator's manual provides essential information for assembly, operation, and maintenance of the device.
Function Description
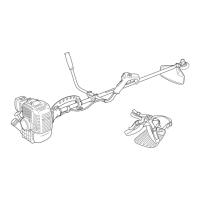
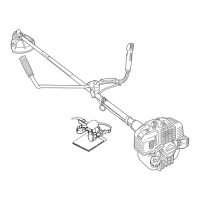
The ECHO SRM-4300 functions as a grass trimmer and brushcutter. It is designed to efficiently cut grass and clear brush in challenging terrains. The device operates with a cutting attachment that rotates to perform the trimming and cutting tasks. It is powered by a two-stroke engine that requires a specific fuel mixture.
Important Technical Specifications
Mass:
- Unit without fuel, cutting attachment, and shield: 7.9 kg
Dimensions:
- Length: 1800 mm
- Width: 640 mm
- Height: 450 mm
Engine:
- Type: Air-cooled two-stroke single cylinder
- Displacement: 42.7 cm³
- Maximum shaft brake power, measured in accordance with ISO 8893: 1.51 kW
- Engine speed at maximum engine power: 8000 r/min
- Recommended maximum engine speed: 10500 r/min
- Recommended engine idling speed: 2700 r/min
- Carburettor: Diaphragm type
- Ignition: Flywheel magneto - CDI system
- Spark plug: NGK BPM7A
- Starter: Recoil starter
- Clutch: Automatic centrifugal clutch
Fuel:
- Type: Regular grade petrol. Minimum 89 Octane unleaded petrol is recommended.
- Fuel mixture: 50:1 (2%) for ISO-L-EGD Standard (ISO/CD 13738), JASO FC, FD grade and ECHO Premium 50:1 oil or 25:1 (4%) for JASO FB grade oil. Do not mix directly in engine fuel tank.
- Fuel consumption at maximum engine power: 1.22 L/h
- Specific fuel consumption at maximum engine power: 601 g/(kW·h)
Cutting Attachment (option):
- Blade centre hole diameter: 25.4 mm
- Blade rotational speed at maximum allowable engine speed: 10000 r/min
Gear Ratio and Lubrication:
- Rotational direction of output shaft seen from above: Anticlockwise
- Lubricant: Good quality lithium multi grease for angle transmission.
Usage Features
Safety First:
- Always read the Operator's Manual carefully before operation.
- Never allow anyone to use the unit without proper instruction.
- Wear appropriate personal protective equipment (PPE) including eye protection, hearing and ear protection, protective clothing, and foot protection.
- Maintain a safe distance of 15 meters from bystanders during operation.
- Never operate the unit indoors or where there is poor ventilation.
- Do not start the engine in the air or from the harness.
- Avoid contact with hot surfaces to prevent burns.
Assembly:
- Drive shaft: Stand engine upright on a level surface. Fit drive shaft assembly ensuring that the drive shaft is correctly engaged. Tighten four bolts (M5x20) to fasten drive shaft assembly.
- Handle: Install the handle so that it does not hide any of the safety decals. Loosen handle bar support bolts. Locate handle bar in a comfortable operating position and tighten four bolts (M5x25).
- Throttle cable: Adjust the play of wire end on carburettor side to 1-2 mm.
- Installation of shield: Ensure that the shield is installed onto the shaft tube before operation. Install the shield as follows: Match tightening boss of angle transmission with shield. Crimp shaft tube with bracket from above and drive two bolts (M6x28) through into the threaded holes of the shield and tighten the bolts. Install the clog prevention plate with three screws (M5x20).
- Installing blade: Inspect blades before installation. Check for sharpness. Dull blades increase the risk of blade kickback reactions. Discard cracked blades. Use a locking tool to prevent the output shaft from turning during blade installation. Install blade retainer, blade, lower blade retainer and nut finger tight. Tighten the nut (turn anticlockwise) using a socket wrench. Never bend while applying your weight. Otherwise the thread of nut could be broken. Replace nut and retainers with new ones no matter how small the wear is.
- Check positions of attached cutting blade: If attached eccentrically, cutting blade is dangerous. Attach it correctly. If cutting blade is not correctly attached, it can cause abnormal vibration, injury and unit failure. Turn cutting blade with hand to check if cutting blade is in position.
- Check positions of attached shield: Cutting blade must be inside shield. Check if cutting blade is inside shield. If not, correct the position of shield.
Fueling:
- Use a mixture of regular grade petrol and an air-cooled 2-stroke engine oil of reputable brand name.
- Minimum 89 Octane unleaded petrol is recommended.
- Do not use fuel containing methyl alcohol or more than 10% of ethyl alcohol.
- Do not mix directly in engine fuel tank.
- Avoid spilling petrol or oil. Spilled fuel should always be wiped up.
- Handle petrol with care, it is highly inflammable.
- Always store fuel in approved container.
- Never smoke or allow flame or sparks near fuel.
- Always fill the fuel tank outdoors.
- Never fill fuel indoors.
- Always remove the fuel cap slowly to relieve any pressure buildup in the tank.
- Never refuel the engine when it is hot or running.
- Always use an approved, safe fuel container.
- It is not permitted to fill fuel above the shoulder level of fuel tank.
- After fuelling, always wipe away spilled fuel.
- Always move at least 3 m away from the fuelling spot before starting the engine.
- Never store the unit with fuel in the tank a fuel leak could start a fire.
Starting and Stopping:
- Starting cold engine: When engine starts, the cutting attachment may rotate, even with throttle trigger in low-speed position. When engine fails to start, confirm if there is not any abnormal vibration or sound, ask your dealer to repair. When starting engine using throttle latch, cutting attachment rotates. After engine starts, pull throttle trigger slightly to release throttle latch immediately. Never use throttle latch for operation.
- Starting warm engine: If engine does not start after 4 pulls, use cold starting procedure.
- Stopping engine: If engine does not stop, close choke to stall engine. Have your ECHO dealer inspect and repair ignition switch before using the unit. Release throttle trigger and allow engine to idle. Place ignition switch in "STOP" position.
Using Shoulder Harness:
- ECHO trimmers and brushcutters are designed to fit a wide variety of body sizes but may not be adjustable for extremely tall persons.
- Do not use the unit if your feet can reach the cutting attachment when the unit is attached to the harness.
- In case of an emergency, use detaching button on harness to free yourself from unit.
- A person's size can affect the balancing adjustment.
- Use a shoulder harness when provided or when recommended in this Manual.
- Adjust both harness and suspension point on the unit so the unit hangs with the cutting attachment a few centimetres above ground level.
- The cutting attachment and shield should be level in all directions.
- Harness the unit on the right side as shown.
- Place shoulder harness over the both shoulders and adjust straps so the hook suspension point rests just below the waist.
- Buckle waist belt. Belt should be snug.
- Attach grasstrimmer / brushcutter to harness.
- Check for correct adjustment by moving cutting attachment along ground.
- Re-adjust position of suspension point if necessary.
Cutting Techniques:
- Always stop the engine when a cutting attachment jam occurs. Do not attempt to remove an object causing a jam if the engine is running. Severe injury can occur if a jam is removed and the cutting attachment suddenly starts.
- Serious injury may result from the improper use of blades.
- Read and comply with all safety instructions listed in this Manual.
- The metal blade is designed specially to cut weeds and grass. To avoid injury due to kickback or blade fracture, do not use the metal blade to cut brush or trees.
- Use only cutting attachments recommended by ECHO.
- Pieces from a cracked metal blade can fly off during operation. Inspect metal blades for cracks before each use. Discard cracked blades no matter how small the crack. Cracked blades can be the result of misuse or improper sharpening.
- Always use the blade suited for the job.
- Do not hit rocks, stones, tree stumps, and other foreign objects with the blade.
- Do not cut into the ground with the blade.
- If blade strikes an obstruction, stop engine immediately and inspect blade for damage.
- Do not operate with a dull, bent, fractured or discoloured blade and worn or damaged nut.
- Do not run engine at full throttle without a load.
- Remove all foreign objects from work area.
- Do not operate brushcutter without shoulder harness and shield.
- Scything is swinging the cutting attachment in a level arc.
- Easily clear areas of field grass and weeds.
- Scything should not be used to cut large, tough weeds or woody growths.
- If a jolting shrub blocks the cutting attachment, do not use the cutting attachment as a lever to free the bind, because this will cause cutting attachment failure. Instead, shut off the engine and push the sapling or shrub to free the blades.
- Do not use a cracked or damaged blade.
Blade Selection:
- Use only ECHO approved attachments. Serious injury may result form the use of a non-approved attachment combination.
- ECHO will not be responsible for the failure of cutting devices, attachments or accessories which have not been tested and approved by ECHO.
- Read and comply with all safety instructions listed in this manual.
- The type of blade used must be matched to the type and size of material cut. An improper or dull blade can cause serious personal injury.
- Blade must be sharp.
- Dull blades increase the chance of kick-out and injury to yourself and bystanders.
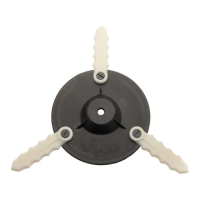
- Plastic grass / weed blade: May be used wherever the nylon line head is used. Do not use this blade for heavy weeds or brush!
- 8 tooth weed / grass blade: Is designed for grass, garden debris and thick weeds. Do not use this blade for brush or heavy woody growth, 2 cm diameter or larger.
- 80 tooth brush blade: Is designed for cutting brush and woody growth up to 2 cm diameter.
- 22 tooth clearing blade: Is designed for dense thickets and saplings up to 6.5 cm diameter.
Maintenance Features
Service Maintenance Guide:
- Air Filter: Clean / Replace (every 18 hours)
- Fuel System: Inspect (every 18 hours)
- Fuel Filter: Inspect / Clean / Replace (every 18 hours)
- Spark Plug: Inspect / Clean / Adjust / Replace (every 18 hours)
- Cooling System: Inspect / Clean (every 18 hours)
- Carburettor: Adjust / Replace and adjust (every 18 hours)
- Silencer: Inspect / Tighten / Clean (every 20 hours)
- Angle Transmission: Grease (every 20 hours)
- Shafter Tube (SRM-4300R): Oil (every 20 hours)
- Starter Rope: Inspect / Replace (as needed)
- Screws, Bolts and Nuts: Inspect, Tighten / Replace (as needed)
Cleaning Air Filter:
- If filter is excessive dirty or no longer fits properly, replace it.
- Close choke. Release the cleaner cover latch, and remove air cleaner cover.
- Remove pre-filter. Brush off dust lightly, or wash them in a non-inflammable solvent if necessary, or replace the air filters. Do not wash the felt air filter.
- Dry them completely before installation.
- Reinstall air filters and cover, and engage latch.
Check Fuel System:
- Check before every use.
- After refuelling, make sure fuel does not leak or exude from around fuel pipe, fuel grommet or fuel tank cap.
- In case of fuel leakage or exudation there is a danger of fire. Stop using the machine immediately and request your dealer to inspect or replace.
Replacing Fuel Filter:
- Use a piece of steel wire or the like to pick up fuel filter through fuel tank opening.
- Pull old filter from fuel line.
- Install new fuel filter.
Check Spark Plug:
- Check plug gap. Correct gap is 0.6 to 0.7 mm.
- Inspect electrode for wear.
- Inspect insulator for oil or other deposits.
- Replace plug if needed and tighten to 15-17 N·m (150 to 170 kgf·cm).
Cooling System Maintenance:
- Maintain proper engine operating temperature, cooling air must pass freely through the cylinder fin area. This flow of air carries combustion heat away from the engine.
- Overheating and engine seizure can occur when: Air intakes are blocked, preventing cooling air from reaching the cylinder, or Dust and grass build up on the out side of the cylinder. This build-up insulates the engine and prevents the heat from leaving.
- Removal of cooling passage blockages or cleaning of cylinder fins is considered "Normal Maintenance". Any resultant failure attributed to lack of maintenance is not warranted.
- Remove dust and dirt from between fins.
- Before each use, remove accumulated debris from bottom engine intake grille located between the fuel tank and starter.
Carburettor Adjustment:
- Every unit is test run at the factory and the carburettor is fine tuned for maximum performance. Any change from this setting should be performed only with the aid of an accurate tachometer (see Specification for r/min setting).
- If carburettor adjustment is performed without a tachometer, only the Basic Setting adjustment is recommended.
- Before adjusting carburettor, clean or replace air filter, start engine and run several minutes to bring it to operating temperature.
- Idle Speed Adjustment: Turn idle speed adjuster clockwise until cutting attachment begins to turn, then turn screw out anticlockwise until cutting attachment stops turning. Turn screw out, anticlockwise, and additional 1/4 turn.
- Basic Setting: Do not over tighten (L) / (H) adjusters. Forcing them to tighten will damage the carburettor. Stop engine and turn both low (L) and high (H) speed mixture adjusters in, clockwise until they stop and are lightly seated. Turn high speed mixture adjuster (L) out, anticlockwise 1 and 1/2 turn.
- Final Tuning (Requires Accurate Tachometer): Start engine and allow to run at high idle, until warm. Adjust idle speed to necessary (2500 to 3000 r/min). Always begin fine tuning with low speed mixture adjuster (L). Slowly turn (L) adjuster clockwise, try to reach maximum idle speed. Turn (L) adjuster anticlockwise 1/8 to 1/4 turn. Turn idle speed adjuster clockwise until cutting attachment begins to turn. Turn idle speed adjuster anticlockwise 1/2 turn or until cutting attachment stops.
- High Speed Adjustment: Improper high speed mixture adjustment can result in lean operation and frequent severe engine damage. Do not run engine at full throttle longer than 5 to 6 seconds during high speed mixture adjuster (H) adjustment to avoid damage to engine. The engine will overheat when the high speed mixture adjuster (H) is adjusted to the lean condition reducing engine life. While engine running at throttle, turn (H) adjuster slowly clockwise until engine runs smoothly under no load. Turn (H) adjuster anticlockwise 1/8 turn to obtain optimum fuel for full power under the load conditions. After the high speed adjustment has been completed, and should the engine hesitate during acceleration from idle to full throttle, turn (H) adjuster anticlockwise until smooth acceleration is obtained. Make sure that the final engine speed does not exceed 11000 r/min.
Cleaning Silencer:
- Clean deposits from silencer and tighten two bolts.
Angle Transmission:
- Use good quality lithium multi grease.
- Remove the plug and drain screw from the angle transmission.
- Add grease into the transmission until old grease is pushed out. If necessary, use a low pressure pump.
- Reinstall the drain screw and plug.
Lubricating Shaft Tube (SRM-4300R):
- Remove screw from shaft tube housing.
- Add machine oil.
- Reinstall screw.
Storage (Long term storage over 30 days):
- Do not store in an enclosure where fuel fumes may accumulate or reach an open flame or spark.
- Drain the fuel tank completely, start the engine and run it at idle speed until it comes to a fuel-less stop.
- Always store fuel in approved container.
- Place the ignition switch in the "STOP" position.
- Remove accumulation of grease, oil, dirt and debris from exterior of unit.
- Perform all periodic lubrication and services that are required.
- Tighten all the screws, bolts and nuts.
- Remove the spark plug and pour 10 ml of fresh, clean, two-stroke engine oil into the cylinder through the spark plug hole.
- Apply a clean cloth over the spark plug hole.
- Pull the recoil starter handle 2 or 3 times to distribute the oil inside the cylinder.
- Observe the piston location through the spark plug hole. Pull the recoil starter handle slowly until the piston reaches the top of its travel and leave it there.
- Install the spark plug (do not connect spark plug cap).
- Once the unit is sufficiently cool and dry, fit the blade cover onto the trimmer blade and wrap the engine section in a plastic bag or other covering before putting them in storage.
- Store unit in a dry, dust free place, out of the reach of children and other unauthorized persons.