Do you have a question about the EchoStar Hughes HT2010W and is the answer not in the manual?
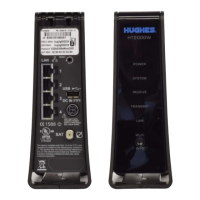
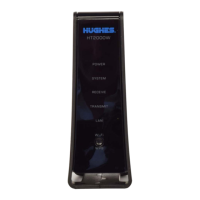
Explanation of the indicator lights (LEDs) on the HT2000W/HT2010W modem front panel.
How to check the status of your return shipment online using your site account number or RMA number.
The Hughes HT2000W and HT2010W Satellite Modems are designed to provide internet connectivity via satellite. This replacement guide outlines the process for replacing an existing modem with a new HT2000W or HT2010W model, ensuring a smooth transition for users.
These modems serve as the central hub for satellite internet service, connecting your devices to the HughesNet network. They receive and transmit data over the satellite, enabling internet access for various devices such as laptops, smartphones, and other smart home equipment. The modems are equipped with Wi-Fi capabilities, allowing multiple devices to connect wirelessly to the internet. They also feature LAN/Ethernet ports for wired connections, providing flexibility for different network setups. The HT2000W and HT2010W models are specifically designed to work with the HughesNet satellite system, ensuring optimized performance and reliable connectivity.
The replacement process for these modems is designed to be straightforward, with clear instructions provided to guide users. Upon receiving a new modem, users are given a 30-day window to replace their old unit. This timeframe is crucial as the replacement authorization expires after 30 days, and failure to return the old modem may result in unreturned equipment fees.
The new modems come with default Wi-Fi settings, including new network SSIDs and passwords, which are conveniently located on a white label at the back of the modem. This ensures that each new modem has unique and secure default settings. For users who prefer to maintain their customized Wi-Fi configurations from their old modem (such as specific SSIDs, passwords, or other network settings), the guide recommends taking note of these settings before disconnecting the old modem. This allows for easy replication of the preferred setup on the new modem, preventing the need to manually re-enter new SSIDs and passwords on all connected devices.
Connecting the new modem involves a few simple steps. Users are instructed to first unplug the power plug from the power outlet to prevent static electricity discharges. Following this, the remaining cables from the old modem, including the satellite coax and LAN/Ethernet cables, are disconnected. The old modem and its power supply are then set aside for return.
When connecting the new modem, users should refer to the provided diagrams to ensure correct cable placement. The satellite coax cable must be properly aligned and hand-tightened to the connector on the modem; the use of a wrench is discouraged to avoid damage. The power supply is then connected to the DC IN port on the modem's rear panel. A key feature of the HT2000W and HT2010W power cord connector is its locking mechanism, designed to ensure a snug and secure connection. Users must ensure the flat side of the plug faces the modem's side panel nearest to the port when plugging it in, creating a secure lock. Once all connections are made, the power supply is plugged directly into the electrical outlet.
After powering on the new modem, an automatic installation process begins. During this period, which can take approximately 60 minutes, the modem's front panel indicator lights will blink on and off. Users are advised to wait for the installation to complete and to avoid unplugging the modem's power cord during this critical phase. Once all LED lights on the front of the modem are solid, indicating a successful connection to the network and the internet, users can test the internet connection by accessing any website using a device connected directly to the modem. If internet access is not immediately available, troubleshooting steps include checking the LED lights, ensuring power, and waiting a bit longer for the installation to fully complete. If issues persist, rebooting any customer-provided wireless router or the connected computer is recommended.
The modem's built-in Wi-Fi settings can be managed by accessing a web interface through a browser. By typing "192.168.0.1" into the browser on a connected device, users can access the Wi-Fi Settings link in the side panel. The default administrative password "admin" allows access to the Wi-Fi Settings home screen, where various options can be configured. These options include modifying the default SSIDs and passwords for both 2.4GHz and 5GHz bands, enabling or naming guest networks, disabling Wi-Fi, viewing connected devices, and managing parental control features or port forwarding. After making any desired changes, users can connect their devices to the modem's network using the updated or default Wi-Fi settings.
The guide emphasizes the importance of returning the old HT2000W or HT2010W modem, its power supply, and any unused cables within 30 days of receiving the new unit. This is crucial to avoid unreturned equipment fees. The return process is made convenient with a prepaid UPS shipping label included in the new modem's packaging. Users are instructed to pack the old modem and accessories in the box the new modem came in, place the packing slip on top, and tightly seal the box with packaging tape. The prepaid UPS return label should then be affixed over the old shipping label on the box.
For returning the package, users have two options: dropping it off at a staffed UPS location (not a UPS drop box, as the package will not fit) or calling UPS for a home pickup. The guide provides the UPS customer service number for scheduling pickups. Users are also advised to make a note of the Return Material Authorization (RMA) number and the UPS tracking number, both of which are found on the return label. These numbers are essential for tracking the return package online via www.ups.com and for checking the return shipment status on http://rmastatus.hughesnet.com.
A critical distinction is made for older modem models: HT1000 or HT1100 modems should NOT be returned to Hughes. Instead, users are instructed to dispose of these older models according to their local waste management guidelines for electronic equipment. This ensures proper environmental disposal and prevents unnecessary returns of non-returnable equipment.
In case of any questions or difficulties during the replacement procedure, users are encouraged to contact HughesNet Customer Care. The guide provides a toll-free number and advises users to have their RMA number, Site Account Number (SAN) from their HughesNet bill, and the serial number of the new modem (found on the box label) ready when calling for assistance. This ensures that customer service representatives have all the necessary information to provide efficient support. The guide also mentions that if the replacement procedure cannot be completed, it might be due to the replacement not being authorized or the 30-day authorization period having expired.
| Type | Satellite Modem |
|---|---|
| Model | HT2010W |
| Modulation | QPSK |
| Interface | Ethernet (RJ45) |
| Technology | DVB-S2 |
| Manufacturer | EchoStar/Hughes Network Systems |