8
4.0 Start-Up And Adjustment
Step 1: Initial Settings
NOTE: Use the following set-up procedure when factory settings have been disturbed, or when chamber pres-
sures are outside the range of +1" to -1" w.c. (+2.5 to -2.5 mbars).
Factory Settings The following parameters are set at the factory: 1) Pilot input, 2) Low and high
fire air flow, and 3) Low fire gas flow. Because of this, the burners should ignite
and burn reasonably well at low fire, but the high fire gas setting will need to be
adjusted as described below under Step 4.
Control Panel Settings Pilot Adjustment: Some provision should be made to operate only the pilot during
pilot adjustment. See the literature included with the flame monitoring relay and/
or control panel for information on operation with pilot only. Eclipse flame moni-
toring relays have a front panel pilot test button that will hold the start-up sequence
on pilot during pilot adjustment.
High/Low Fire Control: During burner adjustment, you will need to drive the
control motor to high and low fire several times. You may do this with the pro-
cess temperature control, setting it to a higher temperature for high fire or a lower
temperature for low fire; or your equipment may be fitted with a manual override
attached to the control motor. Before attempting to adjust the burner, determine
how you will control the motor position and become familiar with the method.
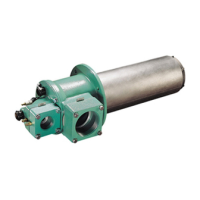
Regulator Settings The main and pilot gas regulators must be adjusted to supply the minimum gas
pressures listed in Figure 1.
Do not operate Ratiomatic burners with less gas inlet pressure than the
minimum listed in Figure 1.
Lower gas inlet pressures may cause the proportionator to remain fully
open as the burner turns down from high fire, causing excess fuel opera-
tion and the possible accumulation of unburned fuel in the chamber. In
extreme cases, this may cause explosions or fires.
Gas Valves Close all manual and automatic gas valves, including the main gas butterfly and
the pilot gas cock.
Combustion Air Blower Start the blower and check the impeller for correct rotation. If it’s running back-
wards, have a qualified electrician change the motor wiring.
Duct or Circulating Fan If the burner is to fire into a duct or chamber with a circulating fan, start the fan to
produce full process air flow past the burner.
WARNING
9
4.0 Start-Up And Adjustment (continued)
Step 2: Adjust Low Fire Air Setting
Measure differential air pressure as shown below.
Low Fire Air Differential Pressure Must be a minimum of 0.2" w.c. (0.5 mbar), which is obtained with the air butterfly
valve in the fully closed position under neutral conditions.
Cycle the control motor several times, checking high and low fire differential
pressures. If they don’t repeat, check for a loose valve shaft coupling or binding
of the motor or valve.
Tap “A”
Measure air differential pressure
between this tap and a tap
in the chamber wall
50 through 600 Sizes 750 through 2500 Sizes
Low Fire Air Adjustment
1. Drive the control motor to fully closed or 1" w.c. (2.5 mbars).
50-600 Sizes: The slot on the end of the shaft is parallel to the plane
of the butterfly.
750-2500 Sizes: A roll pin embedded in the shaft is parallel to the
plane of the butterfly.
2. Loosen the setscrew on the motor side of the flexible coupling.
3. Measure air differential pressure as shown above. Differential pres-
sure will be approximately 0.2" w.c. (0.5 mbar) with neutral chamber
pressure. Differential pressure will vary with changes in chamber
pressure, but should never be less than 0.1" w.c. (0.25 mbar).
4. Hold the shaft firmly in place and tighten the setscrew. To avoid
backlash in two-piece couplings, put slight pressure on the motor
side of the coupling in the direction shown by the arrow before
tightening the setscrew.
Note: Arrows apply to motors which rotate counterclockwise to low fire. Reverse all arrows for clockwise motors.
Loosen This
Set Screw
50 thru 600 RM:
Slot Parallel
To Butterfly
750 thru 2500 RM:
Roll Pin Parallel
To Butterfly
Coupling
Control Motor
Air Butterfly
Inside Burner
Low