Do you have a question about the ECS H67H2-M2 and is the answer not in the manual?
Provides an overview of the motherboard and its main features.
Details the key features of the motherboard, including processor, chipset, memory, and audio capabilities.
Lists the technical specifications of the motherboard's CPU, chipset, memory, I/O, and other components.
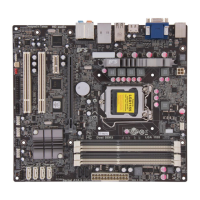
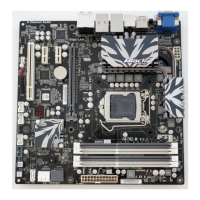
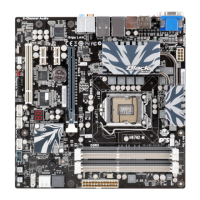
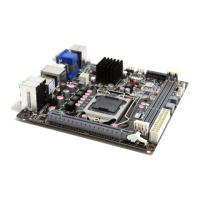
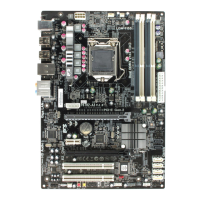
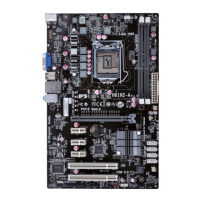
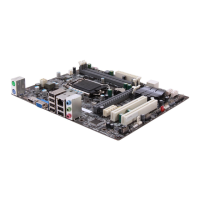
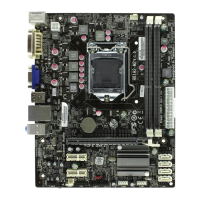
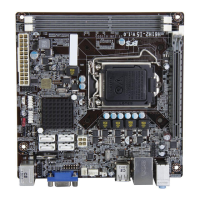
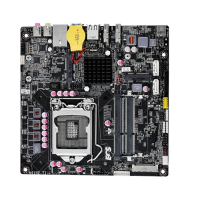
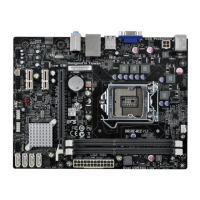
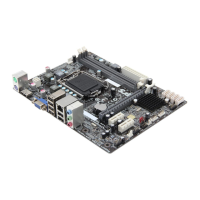
Identifies and labels the various physical components located on the motherboard.
Outlines essential safety guidelines for handling and installing computer hardware.
Guides users on selecting an appropriate computer case that fits the motherboard's form factor.
Provides step-by-step instructions for physically mounting the motherboard into a computer case.
Explains how to set motherboard jumpers for correct system configuration and operation.
Covers the process of installing internal hardware components like CPU and memory modules.
Details the procedure for safely installing the CPU into its socket on the motherboard.
Guides users on correctly installing RAM modules into the motherboard's DIMM slots.
Describes the different expansion slots (PCI, PCIe) and how to install add-on cards.
Explains how to connect internal devices and headers like SATA, USB, and front panel connectors.
Details how to connect external input/output devices to the motherboard's back panel ports.
Guides on connecting internal case components, including fans, power supply, and front panel headers.
Introduces the BIOS Setup Utility and its role in system configuration and parameter settings.
Explains how to access the BIOS Setup Utility during the system's Power-On Self Test (POST).
Lists the essential keyboard keys used for navigating and interacting within the BIOS setup interface.
Describes the initial BIOS screen, displaying system information and main menu options.
Covers the extensive settings for CPU, chipset, storage, USB, and other system configurations.
Configures and manages the onboard LAN controller settings within the BIOS.
Monitors critical system parameters like voltages, temperatures, and fan speeds for hardware health.
Configures system power management features, including wake-up events and EUP support.
Sets the ACPI sleep states (e.g., Suspend to RAM) for system power saving modes.
Displays and allows modification of CPU-specific settings like speed, stepping, and technologies.
Configures Serial ATA controller modes (IDE, AHCI, RAID) and port settings for storage devices.
Manages USB controller settings, including enabling all USB devices and legacy support.
Configures serial and parallel port settings for legacy I/O devices.
Allows adjustments for North/South bridge settings, graphics adapter, and memory configuration.
Manages Intel ME (Management Engine) subsystem settings and version information.
Provides access to clock speed, bus settings, and performance tuning options.
Configures integrated clock chip settings and overclocking library versions.
Adjusts CPU performance parameters like ratios, power limits, and speed technologies.
Sets boot device priorities and keyboard NumLock state for system startup.
Configures administrator and user passwords for system security and access control.
Provides options to save changes, discard, reset, or exit the BIOS setup utility.
Allows temporary selection of boot devices without changing permanent priorities.
Guides on downloading and installing BIOS updates for improved system stability and features.
Describes the contents of the support disc and guidelines for installing drivers and utilities.
Explains the automated software installation process for supported operating systems.
Provides instructions for manually installing drivers and software if the auto-install fails.
Lists and describes the available utility software included on the support disc.
Lists the necessary items and preliminary steps required before configuring a RAID set.
Guides on accessing the Intel Matrix Storage Manager utility during system POST.
Details the step-by-step process for creating a RAID volume using the utility.
Explains how to remove an existing RAID volume and its associated data.
Describes how to revert configured RAID disks back to a non-RAID state, losing data.
Addresses common issues encountered when assembling the PC for the first time.
Helps diagnose and resolve startup issues that may occur after extended PC usage.
Provides advice on maintaining the motherboard for longevity and optimal performance.
| Brand | ECS |
|---|---|
| Model | H67H2-M2 |
| Category | Motherboard |
| Language | English |