EasyManua.ls Logo

Edgetec TRIFLO - User Manual

Edgetec TRIFLO
12 pages
Print Icon
To Next Page IconTo Next Page
Loading...
Owner's Manual
Triflo Spa Bath Pump
Question and Answer IconNeed help?

Do you have a question about the Edgetec TRIFLO and is the answer not in the manual?

Summary

Diagram 1 Correct Spa Bath Pump Installations

Installation Requirement

Mandatory requirement for pump installation to ensure service access and easy removal for maintenance.

Diagram 2 Incorrect Spa Bath Pump Installations

Diagram 3 Air Tube Connections

Activating Air Bleed

Procedure for activating the air bleed valve, distinguishing between older and newer models.

Diagram 5 Touch Pad Connection

TriFlo Models and Operation Guide

Auto-Heat Model

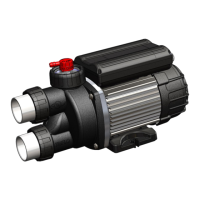
Details the Auto-Heat TriFlo model for maintaining spa water temperature via heat transfer.

Xtra-Heat Model

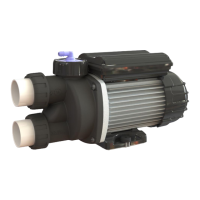
Describes the Xtra-Heat TriFlo model with a 700W heater for maintaining spa water temperature.

EEZI-Touch Model

Explains the EEZI-Touch TriFlo with a 700W heater and bath-mounted touchpad control.

Spa-Key Model Operation

Installation Instructions

Electrical Connection

Guidelines for safely connecting the spa bath pump to the power supply.

Start Up Procedures

Activating Air Bleed Details

Trouble Shooting Guide

Product Warranty and Safety

Overview

The Edgetec Triflo Spa Bath Pump is designed for optimal spa jet performance and trouble-free operation in spa bath applications. Its internal design allows for self-draining of water, preventing residue build-up in the pump, which aligns with local health regulations. The pump should not be used with chemically treated water or for any other purpose without written approval from Edgetec Systems Pty Ltd.

Important Installation Requirements:

  • The pump must be installed with access for servicing the pump or pipe work. A service access panel is required to allow easy removal of the pump for maintenance.
  • Use 40mm or 25mm UPVC Pressure Pipe for plumbing, with 40mm pipe preferred for both suction and return lines.
  • The pump should be located as close as possible to the spa bath to ensure optimum performance and high efficiency, minimizing pipe fittings.
  • Water should drain from the pipework to the pump and from the pump to the self-drain suction fitting in the bath.
  • The pump can be installed internally or externally. If external, it requires a protective cover with adequate ventilation (minimum 50cm²). Internal installations also require a minimum 50cm² ventilation for the motor to prevent overheating and thermal overload cut-out.
  • The suction line must be installed with a minimum 5° gradient to allow water to drain when the bath is emptied.
  • The pump return line should be installed below the water level of the bath to prevent air locks and ensure proper jet operation. If an air lock occurs, the air bleed valve on the pump may need to be activated.
  • The pump must be fixed to the frame or support using its mounting points and appropriate fasteners, with two anti-vibration isolation washer buttons provided.
  • Barrel unions should only be hand-tightened to avoid damage to the unions or O-rings.
  • Before connecting, ensure all pipework is clear of debris to prevent blockages in spa jets or the pump impeller.

Electrical Connection:

  • Installation must comply with national wiring rules and electrical standards, particularly AS 3000 or equivalent.
  • The pump is fitted with a standard lead and three-pin plug for 240-220V 50Hz power supply.
  • The power connection must be accessible for independent switching off in emergencies but not by the bath user.
  • Edgetec highly recommends supplying the pump via an isolating transformer or a residual current device (RCD) with a rated residual operating current < 30 mA.
  • Damaged power cords must be replaced by Edgetec or an authorized service agent.

Technical Specifications (TriFlo Spa Bath Pump Models):

Pump Model Supply Voltage (volts) Power (watts) Heater (watts) Current (amps) Max Head (m) Width (mm) Height (mm) Length (mm)
TF060-AH-50 230-240 600 0 3.7 11 148 198 384
TF075-AH-50-HF 230-240 750 0 4.4 11 148 198 384
TF110-AH-50 230-240 1100 0 5.4 11 148 198 406
TF060-XH, ET, ST, SK-50 230-240 600 700 6.8 11 148 198 384
TF075-XH, ET,ST, SK-50-HF 230-240 750 700 7.5 11 148 198 384
TF110-XH, ET,ST, SK-50 230-240 1100 700 8.6 11 148 198 406

Usage Features:

Air Tube Connections (Auto-Heat & Xtra-Heat Models):

  • A 4-meter roll of 3mm clear air tube is supplied.
  • Connect one end to the air button on the spa bath and the other to the air switch nipple at the rear of the pump motor.
  • Ensure the air tube is uncoiled, not kinked, wrapped, or looped around the bath frame or pipework, as this can prevent the air button from operating correctly.

Touch Pad Cable Connection (Sensa-Touch Model):

  • The Sensa Touch Pad comes with a 4-meter data cable, pre-connected to the touch pad.
  • Connect the other end of the data cable to the pump, ensuring the clip "clicks" into position.
  • Push the protective rubber cap over the circular housing to protect the connection. Failure to do so may void the warranty.
  • A "Green" indicator light on the touch pad confirms a correct connection and power supply.

Activating Air Bleed:

  • Prior to August 2012 models: The air bleed valve was sealed and required drilling out a blind hole inside the elbow (using a 4mm or 3/16 drill bit) to activate.
  • From August 2012 models: The Air Bleed features a Twist Cap. Rotate it fully anticlockwise to open and activate the air bleed. Rotate fully clockwise to close. The pump is shipped with the air bleed in the closed position.
  • If the pump fails to prime, activating the air bleed may resolve an air lock.
  • It is common for air bleed valves to "squirt" water when sealing; this stops once the internal valve is seated.
  • To prevent water damage, connect a 10mm drain tube (not supplied) over the air bleed barb and direct the water to a drain or outside.

Start-Up Procedure:

  • Fill the spa bath to approximately 50mm above the spa jets.
  • Check for any leaks in the pump and pipe connections.
  • Ensure the pump power outlet is switched "on."
  • Auto-Heat & Xtra-Heat pumps: Press the air button on the spa bath to start the pump, purge air, and operate the spa. Press again to stop.
  • Sensa-Touch pump: Press the pump symbol on the touch pad to start the pump, purge air, and operate the spa. Press again to stop.
  • Spa-Key: Press the pump symbol on the hand set to start the pump, purge air, and operate the spa. Press again to stop.
  • If the pump fails to prime, refer to the "Activating Air Bleed" section.

Operation Guide (TriFlo Models):

  • Auto-Heat: Maintains spa bath water temperature via heat transfer. Activated by the air button.
  • Xtra-Heat: Features a revolutionary flat plate 700-watt Stainless Steel heater built into the pump, maintaining water temperature even in large spa baths. Activated by the air button.
  • EEZI-Touch: Features a flat plate 700-watt Stainless Steel heater and a bath-mounted touch pad.
    • Depressing the touch pad button turns the pump "on" or "off." A blue LED lights up during operation.
    • The heating function automatically activates once the pump is primed and water is detected.
    • A green indicator light on the touch pad confirms the communication cable is correctly fitted and power is supplied.
  • Sensa-Touch: Integrates a flat plate 700-watt Stainless Steel heater and a bath-mounted touch pad.
    • Depressing the Pump button turns the pump "On or Off." If there's no water or insufficient water, the pump automatically shuts down to prevent dry running damage.
    • The heating function automatically activates once the pump is primed and water is detected.
    • Red heater indicator lights flash in sequence while heating. Once the set temperature is reached, the lights (L, M, or H) remain on.
    • To reduce heating, press the heater button; each press turns off an indicator light, reducing the set temperature. When all lights are off, the heater is inactive.
    • To reactivate the heater, press the heater button, and it will come on at the highest setting.
    • A green indicator light confirms the communication cable is correctly fitted and power is supplied.
  • Spa-Key: A unique radio-operated remote control system with an integral flat plate 700-watt Stainless Steel heater. Housed in an immersible casing, it operates the pump and heater, and has additional buttons for a Spa Blower and Light (if fitted).
    • The Spa-Key can be removed from its housing and carried around the bathroom. It functions underwater, though submersion is not encouraged.
    • It uses a replaceable long-life battery.
    • Depressing the Pump button turns the pump "On or Off." If no water is detected, the pump automatically shuts down to prevent damage.
    • The heating function activates once the pump is primed and water is detected.
    • To turn the heater "On or Off," depress the heater button on the remote control.
    • To turn the Spa Blower (if fitted) "On or Off," depress the Spa Blower button.
    • To turn the Light (if fitted) "On or Off," depress the Light button.
    • Extra or Replacement Hand Sets can be programmed by pressing the reset button at the back of the pump and then pressing the PUMP key on the SPA-KEY handset within 30 seconds. (Refer to www.spakey.com.au for more information).
    • The provided handset is pre-programmed and ready to use.

Maintenance Features:

  • Troubleshooting Guide: Provides solutions for common issues like the pump not starting, air tube problems, power issues, communication cable disconnections, and priming failures.
  • Air Bleed: The air bleed mechanism helps resolve air locks, a common issue if the pump fails to prime.
  • Warning: Never run the spa pump without water, as this can cause serious damage to the mechanical seal and void the warranty.

Warranty Information:

  • Edgetec Systems Pty Ltd warrants products to be free from defects in material and workmanship for one (1) year from the original purchase date for the original purchaser.
  • Warranty Void Conditions:
    • Failure to install or operate according to instructions.
    • Fair wear and tear, negligence, misuse, or abuse.
    • Incorrect installation or running the pump dry.
    • Water damage from external sources or inadequate ventilation.
    • Cement or other building debris blocking pipework or impeller.
    • Chemically treated water.
    • High voltage spikes or acts of nature.
    • Repairs by unauthorized persons.
    • Incorrect voltage.
  • Edgetec Systems Pty Ltd provides service agents across Australia for warranty service.
  • Products come with guarantees under Australian Consumer Law, allowing for replacement or refund for major failures, and repair or replacement for non-major failures.
  • No unauthorized personnel can make warranty representations without written permission from Edgetec Systems Pty Ltd.
  • Commercial Installation Warranty: Limited to six (6) months from the purchase date for installations in hotels, motels, caravan parks, health clubs, etc.

Edgetec TRIFLO Specifications

General IconGeneral
BrandEdgetec
ModelTRIFLO
CategoryWater Pump
LanguageEnglish

Related product manuals