GB
- 14 -
2. Layout and items supplied
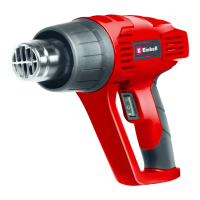
2.1 Layout (Fig. 1/2)
1. Nozzle
2. 3-setting ON/OFF switch
3. Power cable
4. Reducer nozzle
5. Wide nozzle
2.2 Items supplied
•
Open the packaging and take out the equip-
ment with care.
•
Remove the packaging material and any
packaging and/or transportation braces (if
available).
•
Check to see if all items are supplied.
•
Inspect the equipment and accessories for
transport damage.
•
If possible, please keep the packaging until
the end of the guarantee period.
Danger!
The equipment and packaging material are
not toys. Do not let children play with plastic
bags, foils or small parts. There is a danger of
swallowing or suff ocating!
•
Original operating instructions
•
Safety instructions
3. Proper use
The hot air blower is designed for heating shrink-
fi t hoses, for removing paint and for welding and
shaping plastics.
The equipment is to be used only for its prescri-
bed purpose. Any other use is deemed to be a
case of misuse. The user / operator and not the
manufacturer will be liable for any damage or inju-
ries of any kind caused as a result of this.
Please note that our equipment has not been de-
signed for use in commercial, trade or industrial
applications. Our warranty will be voided if the
machine is used in commercial, trade or industrial
businesses or for equivalent purposes.
4. Technical data
Mains voltage: ......................... 230/240 V~ 50 Hz
Power input: ............................................ 2000 W
Temperature: ............................ 350°C / Setting 1
.................................................. 550°C / Setting 2
Air volume: ........................... 300 l/min / Setting 1
.............................................. 500 l/min / Setting 2
Protection class: ............................................ II/
Weight: .......................................................0.7 kg
5. Before starting the equipment
Before you connect the equipment to the mains
supply make sure that the data on the rating plate
are identical to the mains data.
6. Operation
Important!
After you use the equipment for the fi rst time,
some smoke may escape from it. This is nor-
mal.
6.1 3-setting ON/OFF switch (Figure 3)
Select the required working temperature and air
volume with the ON/OFF switch (2).
Within a very short space of time the hot air
gun will reach operating temperature.
Switch position 1:
1. Setting – 350°C / 300 liters/min.
Center position:
Equipment is switched off .
Switch position 2:
2. Setting – 550°C / 500 liters/min.
6.2 Possible uses for the hot air pistol:
•
Removal of paint and lacquer. Attention!
Hazardous or poisonous gasses may be
produced while removing paint or lac-
quer. Be sure to provide adequate venti-
lation.
•
Removal of stickers and decorations.
•
Loosening of rusted or tightly fastened nuts
and metal screws.
•
Thawing of frozen pipes, door locks, etc.
Attention: no not attempt to thaw plastic or
synthetic pipes.
Anl_TC_HA_2000_1_SPK9.indb 14Anl_TC_HA_2000_1_SPK9.indb 14 10.12.2019 09:17:2710.12.2019 09:17:27