GB
- 16 -
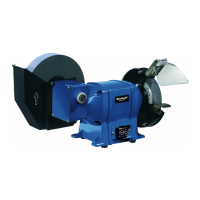
5.2 Assembling the workpiece support
(Fig. 2/6)
Fit the workpiece support (7) to the workpiece
support holder (15) using the workpiece support
fastening screw (6), washer (12), lock washer
(13) and workpiece support locking knob (14), as
shown in Fig. 6.
5.3 Adjusting the workpiece supports
(Fig. 6 / Item 7)
•
Adjust the workpiece support (7) using the
locking button (14) so that the distance bet-
ween the dry grinding wheel (5) and the work-
piece support (7) is as small as possible and
certainly does not exceed 2 mm.
•
Adjust the workpiece supports (7) periodically
to compensate for wear on the dry grinding
wheel.
6. Operation
6.1 On/Off switch (1)
To switch on the equipment set the On/Off switch
(1) to position 1.
Move the On/Off switch (1) to position 0 to switch
off the equipment.
After switching on, wait for the equipment to reach
its maximum speed of rotation. Only then should
you begin with the grinding.
6.2 Dry grinding
•
Place the workpiece onto the workpiece
support (7) and slowly guide the workpiece
towards the grinding wheel (5) at the desired
angle to the point where workpiece and grin-
ding wheel make contact.
•
Move the workpiece slightly back and forth to
produce an optimal grinding result. This way
the grinding wheel (5) will be evenly worn. Al-
low the workpiece to cool down occasionally.
6.3 Wet grinding
Before beginning with the wet grinding, check that
there is enough water in the water container (9) (a
third of the wet grinding wheel must be standing
in water!). Switch on the grinder with the On/Off
switch (1) and stand in front of the wet grinding
wheel. Grip the workpiece with both hands and
lower it carefully onto the wet grinding wheel.
You can also rest the workpiece on the teeth on
the water container and lower it onto the grinding
wheel.
6.4 Changing the grinding wheel
If the grinding wheel for this equipment becomes
damaged or worn, it must be replaced by the
manufacturer or its after-sales service or similarly
trained personnel in order to avoid danger.
7. Replacing the power cable
Danger!
If the power cable for this equipment is damaged,
it must be replaced by the manufacturer or its
after-sales service or similarly trained personnel
to avoid danger.
8. Cleaning, maintenance and
ordering of spare parts
Danger!
Always pull out the mains power plug before star-
ting any cleaning work.
8.1 Cleaning
•
Keep all safety devices, air vents and the
motor housing free of dirt and dust as far as
possible. Wipe the equipment with a clean
cloth or blow it with compressed air at low
pressure.
•
We recommend that you clean the device
immediately each time you have finished
using it.
•
Clean the equipment regularly with a moist
cloth and some soft soap. Do not use
cleaning agents or solvents; these could at-
tack the plastic parts of the equipment. Ensu-
re that no water can seep into the device. The
ingress of water into an electric tool increases
the risk of an electric shock.
8.2 Maintenance
There are no parts inside the equipment which
require additional maintenance.
8.3 Ordering replacement parts:
Please quote the following data when ordering
replacement parts:
•
Type of machine
•
Article number of the machine
•
Identification number of the machine
•
Replacement part number of the part required
For our latest prices and information please go to
www.isc-gmbh.info
Anl_TC_WD_150_200_SPK9.indb 16Anl_TC_WD_150_200_SPK9.indb 16 28.03.2017 07:29:3928.03.2017 07:29:39

 Loading...