GB
- 24 -
Danger!
It must be impossible for the cable and the coo-
ling water hose to get into the cutting area.
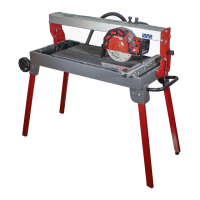
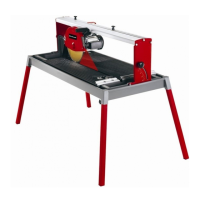
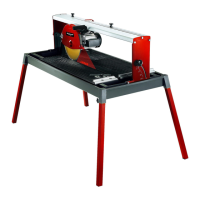
Fitting the handle (Fig. 5)
Fit the handle (9) with the screws (a) as shown in
Fig. 5.
Fitting the side tables (Fig. 6)
Fit the side tables (23) as shown in Fig. 6.
6. Operation
6.1 ON/OFF switch (Fig. 3/4A)
•
To switch on, press the “I” on the ON/OFF
switch (16).
•
Before you begin cutting, wait until the cutting
wheel has reached maximum speed and the
cooling water pump (13) has started supply-
ing the cutting wheel with water.
•
To switch off, press the “0” on the switch (16).
6.2 Fitting the transport aids (Fig. 7 - 9)
•
Fit the transport wheels (19), the parking foot
(20) and the transport handle (18) as shown
in Figs. 7/8/9.
6.3 Fitting the stop rail and the angle stop
(Fig. 10)
•
First push the stop rail (6) onto the guides (a)
as shown and fasten.
•
Then you can push the angle stop (5) into the
guide (b) and fasten in any position.
6.4 Making 90° cuts (Fig. 11/12)
•
Slacken the handle screw (24) and push the
angle stop (5) into the required position and
set the angle to 0° degrees, then tighten the
handle screw (24) again in order to secure
the angle stop (5).
•
Then slacken the clamping screw (12) and
push it to the required position.
•
You can now move the machine head by the
handle (9) to the rear.
•
Place a tile against the stop rail (6) and the
angle stop (5).
•
Switch on the machine.
•
Notice! Wait until the cooling water has
reached the cutting wheel (2).
•
Move the machine head by the handle (9)
slowly and smoothly forward through the tile.
6.5 45° Diagonal cut (Fig. 11/13)
•
Set the angle stop (5) to 45°.
•
Cut as described in 6.4.
6.6 45° Lengthwise cut, “jolly cut” (Fig.14/15)
•
Slacken the clamping screw (10).
•
Tilt the guide rail (7) to the left to 45° on the
angle scale (17).
•
Retighten the clamping screw (10).
•
Make the cut as described in 6.4.
6.7 Changing the diamond cutting wheel
(Fig. 16A-16B)
•
Pull out the power plug!
•
Remove the screw (25).
•
Swing up the cutting wheel guard (8).
•
Place the wrench (26) on the motor shaft and
hold.
•
Using the wrench (27), loosen the flange nut
in the direction of rotation of the cutting wheel
(2). (Caution: Left-hand thread.)
•
Remove the outer flange (28) and the cutting
wheel (2).
•
Clean the mounting flange (28) thoroughly
before fitting the new cutting wheel.
•
Install the new cutting wheel and cutting
wheel guard in reverse order and tighten.
•
Important: Pay attention to the direction of
rotation of the cutting wheel!
6.8 Operating the laser (Fig. 18)
To switch on: Move the ON/OFF switch (22) to
the “I” position.
To switch off : Move the ON/OFF switch (22) to
the “0” position.
Switch on the laser (21). A laser line is projected
onto the material you wish to process, providing
an exact guide for the cut. You can additionally
adjust the laser with the screw (29).
7. Replacing the power cable
Danger!
If the power cable for this equipment is damaged,
it must be replaced by the manufacturer or its
after-sales service or similarly trained personnel
to avoid danger.
Anl_TE_TC_920_UL_SPK7.indb 24Anl_TE_TC_920_UL_SPK7.indb 24 02.12.2020 09:53:0002.12.2020 09:53:00