EasyManua.ls Logo

ekwb EK-Vector RTX 2080 FTW3 - User Manual

ekwb EK-Vector RTX 2080 FTW3
2 pages
Print Icon
To Next Page IconTo Next Page
Loading...
All disclosures, notices and warranty conditions are being written on the EKWB website. Please read terms of use. Released on 12
th
of April, 2019; Revision 1
Installation manual for EK-Vector RTX 2080 FTW3 water block
This product is intended for installation only by expert users. Please consult with a
qualified technician for installation. Improper installation may result in damage to your
equipment. EK Water Blocks assumes no liability whatsoever, expressed or implied, for
the use of these products, nor their installation. The following instructions are subject
to change without notice. Please visit our web site at www.ekwb.com for updates.
Before installation of this product please read important notice, disclosure and
warranty conditions printed on the back of the box.
Before you start using this product please follow these basic guidelines:
1. Please carefully read the manual before through before beginning with
the installation process!
2. Please remove your Graphics card from the computer to assure safest
mounting process in order to prevent any possible damages to your GPU
and/or graphics card circuit board (PCB).
3. The EK-HFB and EK-ACF type fittings require only a small amount of
force to screw them firmly in place since the liquid seal is ensured by the
rubber O-ring gaskets.
4. The use of corrosion inhibiting coolants is always recommended for any
liquid cooling system.
BAG CONTENT: Bag content is universal for all water blocks, you may not need all screws.
STEP 1: PREPARING YOUR GRAPHIC CARD
STEP 1 cont: PREPARING YOUR GRAPHICS CARD.
1. REMOVING STOCK COOLER: Remove all encircled screws. All heat sink assembly screws should
be removed, including self-adhesive washers on both sides of the PCB (if present). After you remove the
housing do not forget to unplug the fans and RGB LED panel.
2. REMOVING FACTORY PROVIDED BACKPLATE: Remove all encircled screws using Phillips
screwdriver. All heat sink assembly screws should be removed, including self-adhesive washers on both sides of
the PCB (if present).
STEP 1 cont.: PREPARING YOUR GRAPHIC CARD
1. CLEANING THE PCB: Carefully detach the original stock cooler after removing all screws securing
it to the board. Wipe off the remains (by using nonabrasive cloth or
q-tip
, as shown on sample photo) of
the original thermal compound until the components and circuit board are completely clean. EKWB
recommends the use of denatured alcohol for removing TIM leftovers.
2. APPLYING THERMAL COMPOUND: Wipe off the remains (by using nonabrasive cloth or
q-tip
) of the
original thermal compound until the components and circuit board are completely clean. Apply thermal compound:
lightly coat
NVIDIA
GPU chip with enclosed EK-TIM Ectotherm thermal grease. EKWB recommends to apply thermal
grease in cross form for best performance (see sample picture).
3. CUTTING THERMAL PADS: Your block comes with thermal pads, some of which are already pre-
cut. Others have to be cut to smaller chunks in order to cover all the VRM components such as MOSFETs
and drivers. PLEASE REMOVE THE PROTECTIVE FOIL FROM BOTH SIDES OF THE THERMAL PADS PRIOR
TO INSTALLATION.
Replacement thermal pads:
Thermal Pad E 0.5mm (RAM 8x) (EAN: 3830046996688)
Thermal Pad F 1.0mm (120x16mm) (EAN: 3830046996732)
4. PLACING THERMAL PADS ON PCB. Place thermal pads on the circuit board as shown on the picture
below. Refer to numbering in previous picture when applying thermal pads of different sizes or thicknesses. EK
made sure to provide customers with more than adequate quantity of thermal pads to complete this step.
1: Thermal pad E 0.5mm
(for memory IC):
1
2
2: Thermal pad F 1mm
(for Mosfet):
Remove four screws on the IO
bracket using Phillips screwdriver
1
1
1
1
1
1
1
1
2
2
2
2
2
2
2
2
2
Question and Answer IconNeed help?

Do you have a question about the ekwb EK-Vector RTX 2080 FTW3 and is the answer not in the manual?

Summary

Preparing Your Graphics Card

Removing Stock Cooler

Remove all screws securing the stock cooler, unplug fans and RGB LED panel.

Removing Factory Backplate

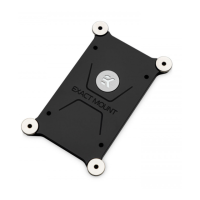
Remove all screws and self-adhesive washers securing the factory backplate.

Cleaning the PCB

Clean the PCB after removing the stock cooler using non-abrasive cloth or denatured alcohol.

Applying Thermal Compound

Apply thermal grease lightly to the NVIDIA GPU chip in a cross form for best performance.

Cutting Thermal Pads

Cut thermal pads to cover VRM components and remove protective foil from both sides.

Placing Thermal Pads on PCB

Place thermal pads on the circuit board referring to numbering and thickness for VRM and memory.

Installing the Water Block

Placing the Block on Graphics Card

Carefully position the water block with preinstalled standoffs onto the graphics card.

Attaching the Block to Graphics Card

Attach the block using enclosed screws and plastic washers, tightening around the GPU core.

Installation of Fittings and Tubing

Inserting Card into PC Case

Connecting the RGB LED Strip

Overview

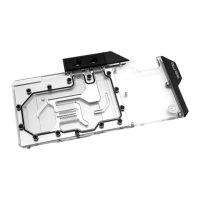
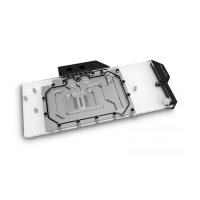
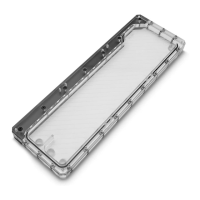
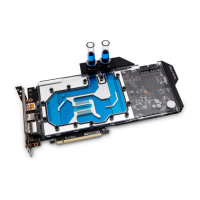
The EK-Vector RTX 2080 FTW3 water block is a specialized cooling solution designed for expert users to enhance the thermal performance of NVIDIA GeForce RTX 2080 FTW3 graphics cards. This installation manual provides detailed instructions for replacing the stock cooler with the water block, ensuring optimal cooling and stable operation for the graphics processing unit (GPU) and other critical components.

Function Description:

The primary function of the EK-Vector RTX 2080 FTW3 water block is to provide superior liquid cooling to the NVIDIA GeForce RTX 2080 FTW3 graphics card. By replacing the factory-installed air cooler, the water block directly cools the GPU die, RAM modules, and the Voltage Regulator Module (VRM) components. This direct contact with a liquid cooling loop allows for more efficient heat dissipation compared to air cooling, leading to lower operating temperatures, increased overclocking potential, and reduced noise levels. The water block is designed to be part of a custom liquid cooling system, requiring additional components such as a pump, radiator, reservoir, and tubing to function. It also features an integrated RGB LED strip, allowing users to synchronize lighting effects with their motherboard or other RGB components for aesthetic customization.

Important Technical Specifications:

The water block is specifically designed for the EK-Vector RTX 2080 FTW3 series graphics cards. Mounting hardware included:

  • M2.5x4 AX1 screws (16 pcs)
  • M2.5x6 AX1 screws (13 pcs)
  • M2.5x8 AX1 screws (2 pcs)
  • M3x4 DIN7985 screws (2 pcs)
  • M2.5 helix nuts (6 pcs)
  • PVC Washers (16 pcs)
  • Thermal grease (1 pc)
  • EK plug G1/4 (2 pcs)
  • 6mm Allen key (1 pc)
  • 2.5mm Allen key (1 pc)
  • Replacement mounting mechanism: FC - Tip F (M2.5 x AX1) (EAN: 3831109872215) Thermal pads included:
  • Thermal Pad E - 0.5mm (RAM 8x) (EAN: 3830046996688)
  • Thermal Pad F - 1.0mm (120x16mm) (EAN: 3830046996732) Fittings: The water block utilizes G1/4 threaded ports, compatible with standard liquid cooling fittings. A maximum allowed G1/4" thread length of 5mm is specified for connectors other than EK-series compression fittings to prevent damage. RGB LED: The integrated RGB LED strip connects to a 4-pin RGB_HEADER on the motherboard, requiring a +12V G R B pin layout. Incorrect connection (+12V line) can damage the motherboard or LED strip.

Usage Features:

  • Expert Installation: The product is intended for installation by expert users due to the complexity and potential for damage if improperly handled. Users are advised to consult a qualified technician if unsure.
  • Comprehensive Cooling: The water block provides full-cover cooling for the GPU die, RAM modules, and VRM components, ensuring all critical heat-generating parts are efficiently cooled.
  • Optimized Thermal Contact: The installation process emphasizes proper application of thermal grease (EK-TIM Ectotherm) in a cross pattern for best performance and precise placement of thermal pads on RAM and MOSFETs to ensure optimal heat transfer.
  • Secure Mounting: The mounting mechanism involves multiple screws and plastic washers to ensure secure and even pressure distribution across the components, preventing damage to the PCB and ensuring good thermal contact.
  • Compatibility with Liquid Cooling Systems: The G1/4 threaded ports allow for integration into any standard custom liquid cooling loop, offering flexibility in system design. EK-series fittings are recommended for optimal compatibility and secure connections.
  • Aesthetic Customization: The integrated RGB LED strip allows users to personalize the lighting of their graphics card, synchronizing it with other RGB components in their PC build via a motherboard RGB header.
  • Pre-cut Thermal Pads: Some thermal pads are pre-cut for convenience, while others require manual cutting to fit specific components, streamlining the installation process.
  • Detailed Instructions: The manual provides step-by-step instructions, including visual aids, for disassembling the stock cooler, preparing the PCB, applying thermal materials, mounting the water block, installing fittings, and connecting the RGB LED.

Maintenance Features:

  • Cleaning the PCB: Before installation, the manual instructs users to thoroughly clean the PCB of any original thermal compound using a non-abrasive cloth or q-tip and denatured alcohol, which is crucial for proper thermal pad and grease adhesion.
  • Checking for Contact: After initial mounting, users are advised to temporarily remove the water block to check for uniform surface contact between the block and the components, especially the VRM section. This allows for adjustments to thermal pad thickness or contact if necessary, ensuring long-term performance and preventing hotspots.
  • Corrosion Inhibiting Coolants: The manual recommends the use of corrosion inhibiting coolants for any liquid cooling system, which is essential for maintaining the integrity of the water block and other loop components over time, preventing corrosion and extending the lifespan of the system.
  • Regular Inspection: While not explicitly detailed as a maintenance feature, the nature of liquid cooling systems implies regular inspection of fittings, tubing, and coolant levels to ensure leak-free operation and optimal performance. The robust design of the water block, when properly installed, contributes to a reliable and low-maintenance cooling solution.
  • Disassembly for Cleaning: Although not covered in this installation manual, the water block is designed to be disassembled for periodic cleaning of the internal micro-fins and channels to maintain cooling efficiency, a common practice in custom liquid cooling loops.

In summary, the EK-Vector RTX 2080 FTW3 water block is a high-performance, full-cover liquid cooling solution for the NVIDIA GeForce RTX 2080 FTW3 graphics card, designed for experienced users seeking superior thermal management, overclocking potential, and aesthetic integration into their custom PC builds. Its detailed installation process, robust design, and compatibility with standard liquid cooling components make it a premium choice for enthusiasts.

ekwb EK-Vector RTX 2080 FTW3 Specifications

General IconGeneral
Brandekwb
ModelEK-Vector RTX 2080 FTW3
CategoryComputer Hardware
LanguageEnglish

Related product manuals