EVID
EVID
TMTM
Owner’s ManualOwner’s Manual
1010
Product DescriptionProduct Description
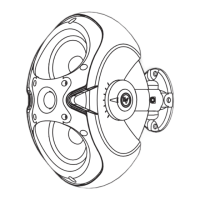
Mounting through a suspendedMounting through a suspended
ceiling gridceiling grid
On the rear of the enclosure install andOn the rear of the enclosure install and
tighten two 3/8-16-thread forged steeltighten two 3/8-16-thread forged steel
eyebolts (one is included) with a 3/8" flateyebolts (one is included) with a 3/8" flat
washer under each. Cut two pieces ofwasher under each. Cut two pieces of
ordinary drop ceiling L angle (wall track)ordinary drop ceiling L angle (wall track)
23 3/4" long and screw them to the top23 3/4" long and screw them to the top
and bottom of the enclosure with 3/4"-and bottom of the enclosure with 3/4"-
lomg sheet metal screws, as shown inlomg sheet metal screws, as shown in
Figure 26. Connect all the wires andFigure 26. Connect all the wires and
suspend the enclosure, face down, by thesuspend the enclosure, face down, by the
eyebolts in accordance with accepted safeeyebolts in accordance with accepted safe
rigging practice. Adjust the length of therigging practice. Adjust the length of the
rigging cables so the tips of the installed Lrigging cables so the tips of the installed L
angles just rest on the ceiling cross-tees.angles just rest on the ceiling cross-tees.
This stabilizes the enclosure from rocking.This stabilizes the enclosure from rocking.
Trim the ceiling panel to fit the newTrim the ceiling panel to fit the new
opening(s) and drop into place. It is theopening(s) and drop into place. It is the
installer's responsibility to assure that theinstaller's responsibility to assure that the
chosen rigging points are strong enough tochosen rigging points are strong enough to
support the load.support the load. Warning: Never try toWarning: Never try to
install this speaker in a suspendedinstall this speaker in a suspended
ceiling without proper rigging support!ceiling without proper rigging support!
Floor MountingFloor Mounting
The EVID™ 12.1 may be placed directlyThe EVID™ 12.1 may be placed directly
on the floor in a corner or on its side alongon the floor in a corner or on its side along
a straight wall by simply attaching the foura straight wall by simply attaching the four
rubber mounting feet to the side that willrubber mounting feet to the side that will
sit on the floor.sit on the floor.
Step 5: TStep 5: Test Sysest System Opertem Operationation
After all connections are made test theAfter all connections are made test the
complete system operation. Appendix Ccomplete system operation. Appendix C
on p. 14 contains a troubleshooting guideon p. 14 contains a troubleshooting guide
to assist in locating a variety of speakerto assist in locating a variety of speaker
related problems.related problems.
Safety Agency ComplianceSafety Agency Compliance
The EVID™ 12.1 bracket system hasThe EVID™ 12.1 bracket system has
successfully passed EIA 636 at a safetysuccessfully passed EIA 636 at a safety
factor of 8:1. The bracket system isfactor of 8:1. The bracket system is
intended to support the EVID™ 12.1 only.intended to support the EVID™ 12.1 only.
Do not use it for any other purpose. NeverDo not use it for any other purpose. Never
set anything on, or hang anything from,set anything on, or hang anything from,
the EVID™ 12.1 enclosure when usingthe EVID™ 12.1 enclosure when using
this bracket.this bracket.
For a copy of the model-specific CEFor a copy of the model-specific CE
Declaration of Conformity, contact Electro-Declaration of Conformity, contact Electro-
Voice at the address listed at the end ofVoice at the address listed at the end of
this manual.this manual.
MaintenanceMaintenance
Your EVID™ system has been designedYour EVID™ system has been designed
and manufactured to provide years ofand manufactured to provide years of
durability and reliable service. No routinedurability and reliable service. No routine
maintenance is necessary. Units may bemaintenance is necessary. Units may be
cleaned by wiping with a soft, damp cloth.cleaned by wiping with a soft, damp cloth.
Never use solvents or harsh cleaningNever use solvents or harsh cleaning
agents of any kind.agents of any kind.
Figure 25:Figure 25: Midwall MountingMidwall Mounting Figure 26:Figure 26: Attach L-Angles toAttach L-Angles to
SpeakerSpeaker
11
33
22
RungsRungs
This side towards wallThis side towards wall
LLaannggllee CCeeiilliinngg
tiletile
RiggingRigging
cablescables
Acoustic portAcoustic port
EyeboltsEyebolts
 Loading...