EasyManua.ls Logo

Electrolux EIFLS60LT0 User Manual

Electrolux EIFLS60LT0
56 pages
To Next Page IconTo Next Page
Page #1 background imageLoading...
Page #1 background image
|nsta||afion |nstrucfions
Electro[u× Front-Load Washer
Instructions d'insta||afion
Laveuse chargement frontal Electro[ux
lnstrucciones de lnstalaci6n
Lavadora de carga frontal Electrolux
iiiliii!i!i!iiiili!iii!ilili!iliiiiliiiiiliiiiiilliiiii!iiiiii!iliii!ii!f!iiiiiiiiiiii!ilii!iililliiiili!Iiiiii!iiiliiiili!Ii!iii!iiiililiii!ii!ili!iiiliiiiii!ii!iii!iiiiiiiili!Ii!ili!iIiiiilili!ii!iiiiiiiiiiliii!ii!ili!iiiiliiiii!ii!iii!iilliiiili!ii!iiiilIiiiilili!ii!iii!iiiililiii!ii!iii!iiiiliiiii!ii!iiiiiliiiiiili!ii!iii!iIiiiilili!ii!ili!iiiililiii!ii!iiiiiliiiiiiii!ii!iii!iiiiiiiili!Ii!ili!iIiiiilili!ii!iiiiiiiiiiliii!ii!ili!iiiiliiiii!ii!iii!iilliiiili!ii!iiiilIiiiilili!ii!iii!iiiililiii!ii!iii!iiiiliiiii!ii!iiiiiliiiiiili!ii!iii!iIiiiilili!ii!ili!iiiililiii!ii!iiiiiliiiiiiii!ii!iii!iiiiiiiili!Ii!ili!iIiiiilili!ii!iiiiiiiiiiliii!ii!ili!iiiiliiiii!ii!iii!iilliiiili!ii!iiiilIiiiilili!ii!iii!iiiililiii!ii!iii!iiiiliiiii!ii!iiiiiliiiiiili!ii!iii!iIiiiilili!ii!ili!iiiililiii!ii!iiiiiliiiiiiii!ii!iii!iiiiiiiili!Ii!ili!iIiiiilili!ii!iiiiiiiiiiliii!ii!ili!iiiiliiiii!ii!iii!iilliiiili!ii!iiiilIiiiiliii!!ii!i_!ii!_i!_Ii_ iii_i_!_ _!i iii!ili_ii!i!iii!i!i!!!iiii!_Iii!!!!_ilifill!iiiii!iiiii!i!iii!i!ili!ilili!i!iIi!i!ili!i!iilI!iiii!iiiii!iilii!i!iliIiiili!iiili!iiiii!i!iil!iiililliiiiiiiii!i!iilI!iiiiilliiiiliiii!iiillI!iiiii!i!IilillIi!ill!!I!i!iiiliiIililiIi!iiilf!iiiiiliiIililiiiiiililI!iiililiiIilillIi!iili!!i!ililiiIilillIi!iili!!i!ililiiIilillIi!iili!!i!ililiiIilillIi!iili!!i!ililiiIilillIi!iili!!i!ililiiIilillIi!iili!!i!ililiiIilillIi!iili!!i!ililiiIilillIi!iili!!i!ililiiIilillIi!iili!!i!ililiiIilillIi!iili!!i!ililiiIilillIi!iili!!i!ililiiIilillIi!iili!!i!ililiiIilillIi!iili!!i!ililiiIilillIi!iili!!i!ililiiIilillIi!iili!!i!ililiiIilillIi!iili!!i!ililiiIilillIi!iili!!i!ililiiIilillIi!iili!!i!ililiiIilillIi!iili!!i!ililiiIilillIi!iili!!i!ililiiIilillIi!iili!!i!ililiiIilillIi!iili!!i!ililiiIilillIi!iili!!i!ililiiIilillIi!iili!!i!ililiiIilillIi!iili!!i!ililiiIilillIi!iili!!i!ililiiIilillIi!iili!!i!ililiiIilillIi!iilil!ili!i!!!i!i
Question and Answer IconNeed help?

Do you have a question about the Electrolux EIFLS60LT0 and is the answer not in the manual?

Electrolux EIFLS60LT0 Specifications

General IconGeneral
BrandElectrolux
ModelEIFLS60LT0
TypeFront Load Washer
Loading TypeFront Load
Capacity4.4 cu. ft.
ColorTitanium
Width27 in
Energy Star CertifiedYes
Spin Speed (Max)1300 RPM
Steam FunctionYes
Sanitize CycleYes
Voltage120 V
Frequency60 Hz
Water ConnectionHot and Cold
Wash CyclesNormal, Delicates, Heavy Duty, Quick Wash, Sanitize, Rinse+Spin
Height38 in
Depth32 in

Summary

Important Safety Instructions

Recognize Safety Symbols, Words, and Labels

Understand safety symbols and labels for risk identification and prevention.

Installation Requirements

Tools and Materials for Installation

Lists essential tools and materials required before beginning washer installation.

Electrical System Requirements

Details electrical circuit, power supply, and outlet specifications for proper washer operation.

Water Supply Requirements

Specifies faucet type, pressure, and connection requirements for water supply.

Drain System Requirements

Defines drain pipe diameter, height, and flow rate specifications for waste water.

Grounding Requirements

Emphasizes proper grounding for electrical safety and shock prevention.

Clearance Requirements

Specifies minimum installation clearances for alcoves, counters, and closets.

Installed Washer Dimensions

Unpacking Washer

Removing Foam Packaging

Instructions for safely removing foam packaging and preventing suffocation hazards.

Removing Shipping Hardware

Steps to remove shipping fork, clamps, spacers, and bolts.

Installing Hole Plugs

Guidance on inserting hole plugs into the washer back panel.

Installation Instructions

Leveling Your Washer

Steps to properly level the washer for stability and to prevent noise and vibration.

Connecting Inlet Water

Instructions for connecting hot and cold water hoses, including checks for washers and leaks.

Connecting Drain and Electrical

Steps for connecting the drain hose and plugging the power cord into a grounded outlet.

Performing Installation Cycle

Guide to running an installation cycle for diagnostic checks and proper setup.

Reversing Door

Preparing to Reverse Door Swing

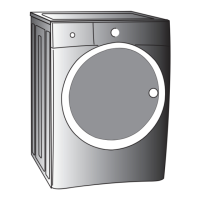
Ensuring adequate space and safety precautions before starting door reversal.

Removing Door and Hardware

Detailed steps for removing the door trim ring and the door itself from the hinges.

Removing Hinge from Front Panel

Steps to detach the door hinge assembly from the front panel of the washer.

Removing Door Lock from Front Panel

Procedure to remove the door lock mechanism and its electrical harness.

Reattaching Door Lock to Front Panel

Steps to reattach the door lock mechanism and its harness to the front panel.

Reattaching Hinge to Front Panel

Procedure for reattaching the door hinge assembly to the front panel.

Removing Striker Plate

Steps to remove the door striker plate from the washer.

Removing Latch Indicator

Procedure for removing the door latch indicator.

Reinserting Latch Indicator

Steps to reinsert the door latch indicator into its correct position.

Reinserting Hole Plug

Procedure for reinserting the hole plug into the door.

Reattaching Door Assembly

Steps to reattach the door to the hinge pins and secure it.

Reversing Trim Ring

Instructions for reversing the orientation of the door trim ring.

Reinstalling Trim Ring

Procedure for reinstalling the door trim ring correctly.

Reinstalling Trim Plug

Steps to reinstall the trim plug with its screw.

Options and Accessories

Matching Storage Pedestal

Information on optional pedestals for elevating the washer and dryer.

Dryer Stacking Kit

Details on kits for stacking a dryer on top of the washer.

Drain Hose Extension Kit

Information about extension kits for the drain hose.

Mobile Home Installation Kit

Kit required for installing the washer in a mobile home.

Universal Appliance Wrench

Details about the included or optional universal appliance wrench.

Touch Up Paint Pens

Information on touch-up paint pens for washer color matching.

Replacement Parts

Contact information for ordering replacement parts and technical support.

Related product manuals