EasyManua.ls Logo

Electrolux GHS607S - User Manual

Electrolux GHS607S
16 pages
Print Icon
To Next Page IconTo Next Page
Loading...
GAS COOKTOPS
User and Installation Manual
MODELS
GHS607W, GHS607S, GHC607W, GHC607S, GHC617W,
GHC617S, GHS917W, GHS917S, GHC937W, GHC937S,
72K315W, 72K315S, GHR12W, GHR12S, GHR92W,
GHR92S, WHG640WA, WHG640SA

Other manuals for Electrolux GHS607S

Questions and Answers

  • C
    Curtis BryantAug 20, 2025
    What to do if flames are uneven on my Electrolux GHS607S Cooktop?
    • B
      Brian WilliamsAug 20, 2025
      If you're experiencing uneven or lifting flames on your Electrolux Cooktop, start by ensuring the burner cap/crown is correctly fitted. Check that the control knob is set between ‘HIGH’ and ‘LOW’. Also, make sure you're using a cooking pot or pan that's suitable for use and is centrally located on the burner.
  • J
    Julie MaxwellAug 22, 2025
    What to do if my Electrolux Cooktop flames won't stay on when I release the knob?
    • D
      David MccartyAug 22, 2025
      If the flames on your Electrolux Cooktop won't stay on when you release the knob, first ensure the control knob is turned on. Also, check that the burner cap/crown is correctly fitted, the knob is set between ‘HIGH’ and ‘LOW’, and the pot or pan is centrally located on the burner.
  • P
    Patrick WolfeAug 26, 2025
    Why is my Electrolux Cooktop giving low heat and slow cooking?
    • S
      Sandra FitzgeraldAug 26, 2025
      If your Electrolux Cooktop is producing low heat and cooking slowly, start by ensuring the burner cap/crown is correctly fitted. Check that the control knob is set between ‘HIGH’ and ‘LOW’. Also, make sure you're using a cooking pot or pan that's suitable for use and is centrally located on the burner.
  • T
    Todd MooreAug 28, 2025
    Why is there no spark when I turn the Electrolux Cooktop control knob?
    • C
      Cheryl WilkinsAug 28, 2025
      If you're not getting a spark when you activate the control knob on your Electrolux Cooktop, the injector might be blocked, so ensure it is clear of any foreign material. Also, check that the electricity supply is connected and the fuses are working. If your cooktop uses a battery, try replacing it or reorienting it to the correct polarity.
  • C
    Christopher CastroAug 30, 2025
    Why won't my Electrolux Cooktop burner light even though it sparks?
    • L
      Lynn ReevesAug 30, 2025
      If your Electrolux Cooktop burner won't light despite the spark, several factors could be at play. First, check if the gas supply valve is turned on. Ensure the control knob is turned on and corresponds to the burner you're trying to light. Hold the knob down for 5 seconds in the ‘High’ position during the lighting procedure. Also, make sure the ports in the ignition area are clean and dry, and that the ignition electrode is clean. Finally, verify the burner crown is correctly fitted so the spark fires correctly and the injector is clear of any blockage.
  • E
    elizabeth94Sep 1, 2025
    What to do if flames are not staying on when knob is released on Electrolux GHS607S Cooktop?
    • A
      Amanda DorseySep 2, 2025
      If the flames on your Electrolux Cooktop aren't staying on when you release the knob, ensure the knob is set between the ‘HIGH’ and ‘LOW’ positions. Also, when lighting, hold the knob down for 5 seconds in the ‘High’ position to allow the flame safeguard to engage.
  • Z
    Zachary BlackburnSep 4, 2025
    What to do if my Electrolux GHS607S doesn't spark when I turn the knob?
    • T
      Theresa MoraSep 4, 2025
      If your Electrolux Cooktop isn't sparking when you turn the control knob, check if the electricity supply is connected and the fuses are working. If it uses a battery, ensure it isn't flat and is correctly oriented. Also, verify that the ignition electrode is clean and dry.
  • K
    krobertsonSep 7, 2025
    Why are the flames uneven on my Electrolux GHS607S Cooktop?
    • S
      swolfSep 7, 2025
      Uneven or lifting flames on your Electrolux Cooktop may be due to blocked or wet flame ports; try cleaning or drying them. Also, ensure the burner cap/crown is correctly fitted.
  • J
    jhopkinsSep 9, 2025
    Why is my Electrolux Cooktop stainless steel discoloured?
    • W
      wlandrySep 9, 2025
      Discoloration of the stainless steel on your Electrolux Cooktop might be because the pot or pan you're using is too large. Make sure the pot sizes used are as per user manual requirements. Clean with STEEL POWER (available through spare parts).
  • J
    Joshua MartinSep 12, 2025
    Why is my Electrolux Cooktop benchtop or knobs overheating?
    • J
      Jessica HigginsSep 12, 2025
      If the benchtop or knobs on your Electrolux Cooktop are overheating, it could be due to using an incorrect cooking pot or pan. Also, make sure the pot or pan is centrally located on the burner.

Summary

Appliance Models

Introduction and Usage Guidelines

Appliance Identification and Symbols

Instructions for recording appliance details and understanding safety symbols.

Usage Conditions and Disposal

Details on intended applications and environmentally responsible disposal methods.

General Safety Information

General Warnings and Prohibitions

Essential safety advice and actions to avoid during operation and installation.

Cooktop Operation Safety

Specific safety precautions for using the cooktop, including burner use.

Installation, Servicing, and Cleaning Safety

Safety guidelines for installing, servicing, and cleaning the appliance.

Using Your Cooktop

Hotplate Selection and Cookware

Guidance on choosing appropriate hotplates and cookware for efficient cooking.

Burner Lighting and Control

Step-by-step instructions for safely lighting and controlling the cooktop burners.

Cleaning and Maintenance

Surface Cleaning Procedures

Recommended methods for cleaning enamel and stainless steel surfaces.

Cleaning Removable Parts

Instructions for cleaning trivets, burner caps, and crowns separately.

Ignition and Injector Care

Maintenance guidance for ignition electrodes and gas injectors.

Troubleshooting Guide

Common Cooktop Problems and Solutions

A table detailing common issues and their respective solutions for the cooktop.

Installation Requirements

Dimensional Specifications for Installation

Tables and figures detailing cooktop and cut-out dimensions for installation.

Installation Procedure and Clearances

Step-by-step guide and required safety clearances for fitting the appliance.

Installation Details and Gas Types

Securing the Cooktop and Gas Lines

Instructions on how to secure the cooktop in place and connect gas lines.

Natural Gas and LPG Operation Guidelines

Information regarding operation with Natural Gas and the possibility of LPG conversion.

LPG Conversion - DONG YANG Regulator

Gas Supply Check and Conversion Tips

Procedures for checking gas supply and general advice for LPG conversion.

DONG YANG Regulator Conversion Steps

Detailed, step-by-step instructions for converting the appliance to LPG using this regulator.

LPG Conversion Data - DONG YANG

Burner Consumption Data

A table comparing gas consumption for different burner types with Natural Gas and LPG.

Regulator Assembly Diagrams

Visual illustrations of the regulator assembly for different gas types.

LPG Conversion - CHANT Regulator

CHANT Regulator Conversion Steps

Detailed, step-by-step instructions for converting the appliance to LPG using this regulator.

Regulator Component Visuals

Diagrams showing the components and configurations of the CHANT regulator.

Electrical Systems and Connections

Battery Ignition System

Instructions for installing and connecting the battery for the ignition system.

220-240 V Mains Connection

Guidelines for connecting the appliance to a standard 220-240V electrical supply.

Hose Assembly Safety Note

An important safety precaution regarding the use and placement of hose assemblies.

Final Appliance Testing

Burner Flame Adjustment and Testing

Procedures for testing burner operation, flame appearance, and making adjustments.

Notes Section

Product Warranty Information

Warranty Terms and Conditions

Detailed explanation of the product's warranty coverage, exclusions, and duration.

Customer Support and Service

Contact information and procedures for obtaining customer support and spare parts.

Additional Information Resources

Customer Care and Websites

Contact details for customer care and relevant company websites for more information.

Overview

This document serves as a comprehensive user and installation manual for a range of gas cooktops, including models GHS607W, GHS607S, GHC607W, GHC607S, GHC617W, GHC617S, GHS917W, GHS917S, GHC937W, GHC937S, 72K315W, 72K315S, GHR12W, GHR12S, GHR92W, GHR92S, WHG640WA, and WHG640SA. It provides essential information for safe operation, maintenance, and installation, ensuring users can maximize the appliance's potential while adhering to safety standards.

Function Description

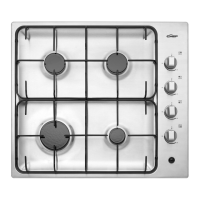
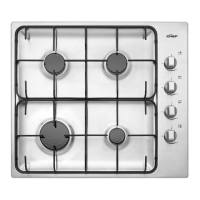
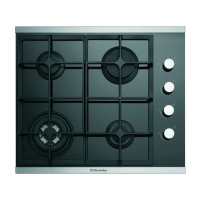
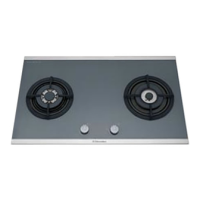
The gas cooktop is designed for domestic cooking applications, offering a versatile range of hotplates to suit different culinary needs. Each burner is controlled by a dedicated knob, allowing for precise flame adjustment from 'HIGH' to 'LOW' settings. The cooktop features either mains-powered or battery-powered electronic ignition, enabling quick and convenient lighting of the burners. For models with mains-powered ignition, depressing any knob releases sparks to all burners, while push-button ignition models require pressing a dedicated button until the flame establishes. In the event of an electrical power outage, burners can be lit manually using an external ignition source.

The cooktop offers a selection of hotplate sizes: a small burner for low-heat and slow cooking, a medium burner for normal cooking and simmering, a large burner for fast heating and accommodating larger pots, and a wok burner specifically designed for very fast heating with woks or large pots. This variety allows users to optimize cooking efficiency and energy consumption by selecting the appropriate burner for their cookware and desired heat level. The appliance is designed to be integrated into a benchtop, providing a sleek and functional addition to the kitchen.

Usage Features

The manual emphasizes several key usage features to ensure safety and optimal performance. Users are advised to place pots centrally over the burner and adjust the flame so it does not extend beyond the pan's edge, which conserves gas and prevents handle damage. The cooktop is compatible with all common types of pots and pans, including aluminium, stainless steel, cast iron, and ceramic, provided they have flat bases for stability and to prevent spills.

For safety, the manual strongly warns against using asbestos mats, wire mats, grids, or aluminium foil, as these can lead to overheating, cracked enamel, or broken glass, potentially voiding the warranty. Woks should only be used on the designated wok burner with its support trivet. During operation, hands should be kept clear of the burners when lighting. If a burner fails to light within five seconds, the knob should be turned to 'OFF' to allow gas to disperse before attempting to light it again. Burners must only be operated between 'HIGH' and 'LOW' settings; intermediate settings are not supported. The appliance is not intended for use as a space heater, and proper ventilation is crucial, especially in confined areas.

The cooktop is designed for use in various domestic and similar environments, including staff kitchens, farmhouses, hotels, motels, and bed and breakfast establishments. However, models without a flame safeguard on each burner are explicitly not to be installed in marine craft, caravans, or mobile homes. The manual also includes detailed instructions for converting the cooktop from Natural Gas to LPG, which involves replacing injectors and adjusting the regulator settings. This conversion process is critical for ensuring the appliance operates safely and efficiently with the correct gas type.

Maintenance Features

Regular cleaning and care are essential for maintaining the cooktop's appearance and functionality. Before any cleaning, the appliance must be turned off and allowed to cool. For enamel surfaces, persistent stains can be removed with a nylon scourer or creamed powder cleansers, avoiding harsh abrasive cleaners, steel wool, or wax polishes. Stainless steel surfaces require regular cleaning with warm soapy water and rinsing with clean water. For heavily soiled stainless steel, a specialized stainless steel cleaner should be used, following the polish or brushing lines. Abrasive scourers or steel wool are strictly prohibited on stainless steel.

Trivets, burner caps, and crowns can be easily removed for separate cleaning. After cleaning, it is crucial to ensure these components are thoroughly dried and correctly seated. Flame ports should be checked for any blockages and cleared with a toothpick or brush if necessary. The polished finish of the burner caps requires extra care during cleaning to prevent scratching; a non-abrasive cleaning compound and a soft, dry cloth are recommended for heavy soiling. Trivets and burners should not be cleaned in a dishwasher.

The ignition electrode and flame safeguard sensor should be gently cleaned with a damp cloth to prevent lighting difficulties, ensuring they are dry before use. The injector must also be kept free of foreign material, and a thin piece of wire can be used to clear its orifice if needed. The manual also provides a troubleshooting guide to help users identify and resolve common issues, such as burners not lighting, uneven flames, or overheating. This guide covers problems like gas supply issues, dirty ignition electrodes, incorrectly fitted burner components, and incorrect pot usage. For battery-ignition models, periodic battery replacement is necessary, and the manual details the correct installation orientation.

The document stresses that servicing must only be carried out by authorized personnel, and a professional inspection every five years is recommended to maintain safe operation. If the supply cord is damaged, it must be replaced by an authorized service person. These maintenance guidelines are crucial for prolonging the appliance's lifespan and ensuring its continued safe and efficient operation.

Electrolux GHS607S Specifications

General IconGeneral
BrandElectrolux
ModelGHS607S
CategoryCooktop
LanguageEnglish

Related product manuals