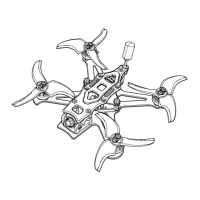
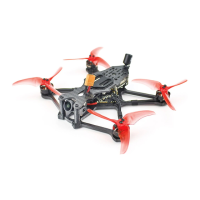
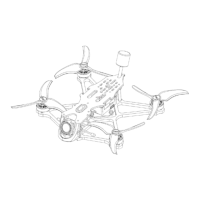
Tinyhawk III Plus Freestyle
Note: To operate the Transporter II correctly, perform the following steps:
Attach the provided antenna to the SMA connector and separate the antenna
from the USB power cable when wearing the goggles.
3.2 Transporter II Specifications
Maximum Dimensions (excluding antenna, folded state): LxWxH =
155x100x90mm
Weight (excluding battery): Approximately 398g (including headband and
antenna)
Screen Resolution: 480 x 800
Display Screen Size: 4.3 inches
Battery: Built-in 1300mAh lithium-ion battery
Operating Voltage: 4.2V-3.7V
Operating Frequency: 5.8GHz frequency band (5658MHz-5945MHz)
Charging System: Built-in USB 1A linear lithium-ion battery charging
system
DVR: Supports up to a 32GB TF card, MJPEG compression format, AV file
format
Recording Resolutions: VGA/D1/HD (three modes available)
Recording Time: Off/3 minutes/5 minutes/10 minutes (selectable)
Top of Form
3.3 Transporter II Operation
3.3.1 Video Channel Selection
Transporter II features a frequency band selection button labeled as "B" and
a channel selection button labeled as "C." These two buttons allow you to
manually choose the correct frequency band and channel. While cycling through
frequency bands/channels, the channel number and frequency will be displayed
in the upper-left corner of the screen.
Frequency Band Selection Button (B): Each short press switches to the next
frequency band in the order of A, B, E, F, R. For example, if the current frequency
band is E, the first short press of the B button will switch to the E frequency band,
the second short press will switch to the F frequency band, and the third short
press will switch to the R frequency band. This cycling continues.
Channel Selection Button (C): Each short press switches to the next channel
among the 8 available channels. This cycle continues.
Note: Make sure that the Tinyhawk III Plus Freestyle is powered on. When
cycling through channels, ensure that you select the correct channel and
frequency band.
Top of Form