Installer’s Menu #
(Hold Menu 8 Seconds)
Description
Default Setting
(ashing icons)
Settings
(Press or )
30
Heat Cycle Rate (how often
the heat will turn on)
MEd
SLO – slow
MEd – medium
FAS – fast
32
Aux Cycle Rate (how often the
auxiliary heat will turn on)
MEd
SLO – slow
MEd – medium
FAS – fast
35
Cool Cycle Rate (how often
the cooling will turn on)
MEd
SLO – slow
MEd – medium
FAS – fast
50
Compressor Lockout
(protects the compressor
from short cycling)
OFF
On – 5 minute delay
OFF – no delay
60
Duel Fuel Logic (turn On when using
gas as the auxiliary heat source)
OFF
On- gas auxiliary heat
OFF- electric auxiliary heat
65
Maximum Heat Limit
(maximum set point for heat mode)
99 47 to 99
66
Minimum Cool Limit
(minimum set point for cool mode)
45 45 to 97
74
Schedule Type (set as either 7-Day,
5-1-1 Day or Non-Programmable)
5
7 – 7 Day
5 – 5-1-1 Day
0 – Non Programmable
76
Early Start (starts heating or
cooling early so your programmed
temperature is reached by the
programmed time)
OFF
On – start early
OFF – start at program
period time
(Installer Menu continued on next page)
3
INSTALLER MENU
To prevent changes that may aect system performance, this thermostat has an INSTALLER’S
MENU and a USER MENU. The INSTALLER’S MENU provides access to every option, while the
USER MENU provides access to items that will not aect system performance. To access the
INSTALLER’S MENU press the Menu button for 8 seconds. The display will show item 30 in the
table below. Use Next and Back to navigate through menu items. Press or to change a
menu setting.
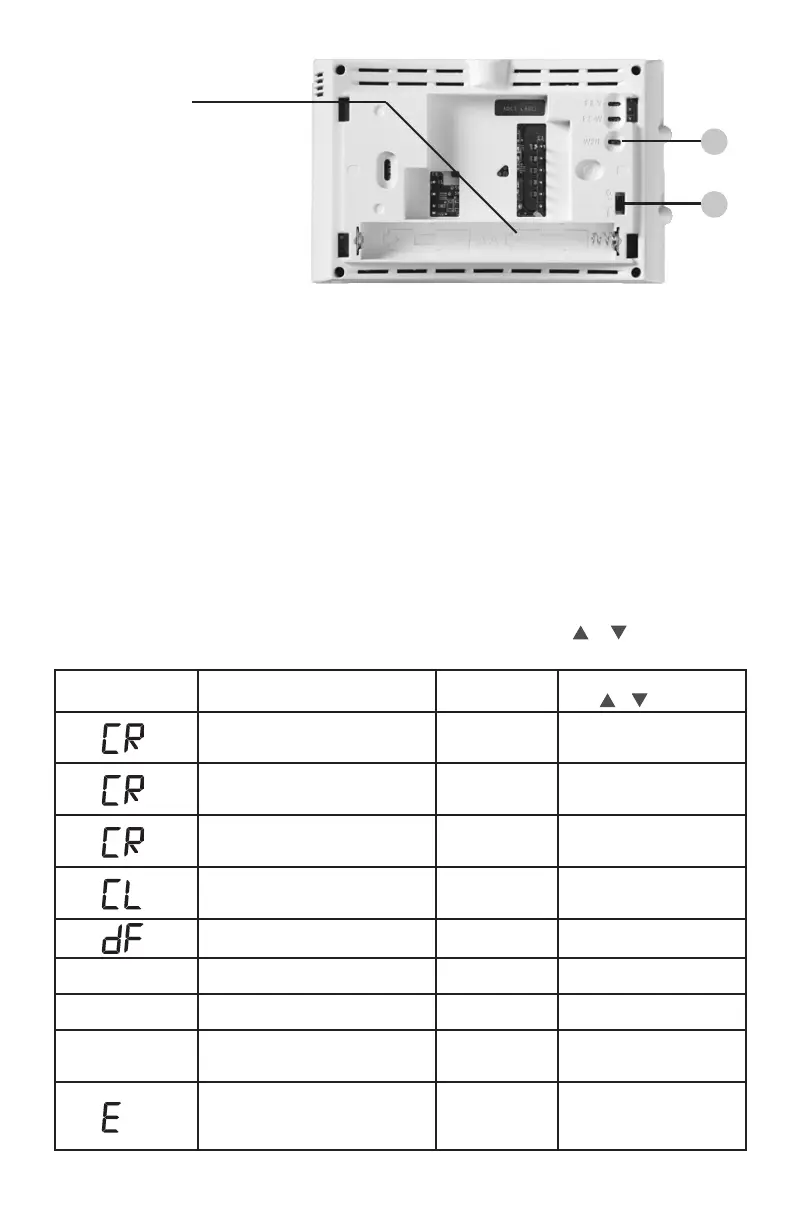
1.) W2/E Jumper Wire
This thermostat electrically connect the W2 and E terminals so that you do not need to do
this with a jumper wire. If your system has separate W2 and E wires, clip the W2/E jumper
located on the back of the thermostat. This will isolate both terminals so they can be used
independently.
2.) O/B Terminal Switch
The O/B switch on this thermostat is factory set to the O position. This will accommodate
the majority of heat pump applications, which require the changeover relay to be
energized in Cool. If the heat pump being installed requires a B terminal to energize the
changeover relay in Heat, the O/B switch must be moved to the B position.
Baery Locaon
Premium AA alkaline batteries
are required when C-wire is
not available. When C-wire is
available, the batteries provide
a back-up source of power (this
will maintain the clock in the
event of a power outage).
1
2
3
MENU DE L’INSTALLATEUR
Pour empêcher des changements pouvant aecter le rendement du système, ce thermostat a un MENU
DE L’INSTALLATEUR et un MENU DE L’UTILISATEUR. Le MENU DE L’INSTALLATEUR donne accès à
toutes les options, tandis que le MENU DE L’UTILISATEUR donne accès aux réglages qui n’aecteront
pas le rendement du système. Pour accéder au MENU DE L’INSTALLATEUR, appuyez sur le bouton
Menu pendant 8 secondes. L’achage montrera l’article 30 du tableau ci-dessous. Utilisez Next
(Suivant) et Back (Précédent) pour naviguer dans les articles du menu. Enfoncez ou pour changer
le réglage d’un article du menu.
Num. de menu
d’installateur
(enfoncez Menu 8
secondes)
Description
Réglage par
défaut
(icônes clignotantes)
Réglages
(appuyez sur ou )
30
Vitesse du cycle de chauage (à quelle
fréquence le chauage s’activera)
MEd
SLO – lent
MEd – moyen
FAS – rapide
32
Vitesse du chauage auxiliaire (à quelle
fréquence le chauage auxiliaire s’activera)
MEd
SLO – lent
MEd – moyen
FAS – rapide
35
Vitesse du cycle de climatisation (à quelle
fréquence la climatisation s’activera)
MEd
SLO – lent
MEd – moyen
FAS – rapide
50
Verrouillage du compresseur
(protège le compresseur contre les cycles
trop courts)
OFF
On – délai de 5 minutes
OFF – aucun délai
60
Programme bi-carburant (activez si le
gaz est la source de chauage auxiliaire)
OFF
On – chauage auxiliaire au gaz
OFF – chauage auxiliaire
électrique
65
Temp. de chauage maximale
(point de consigne maximal pour le
chauage)
99 47 à 99
66
Temp. de climatisation minimale
(point de consigne minimal pour la
climatisation)
45 45 à 97
74
Type d’horaire (réglez soit à 7 jours, 5-1-1
jours ou non programmable)
5
7 – 7 jours
5 – 5-1-1 jours
0 – non programmable
76
Démarrage anticipé (commence le
chauage ou la climatisation à l’avance
pour que la température programmée soit
atteinte à l’heure programmée)
OFF
On – démarrage anticipé
OFF – démarrage à l’heure
(suite du Menu de l’installateur à la page suivante)
1.) Fil de cavalier W2/E
Ce thermostat connecte électriquement les bornes W2 et E de façon que cette opération ne soit
pas nécessaire avec un cavalier. Si votre système a des ls W2 et E séparés, coupez le cavalier W2/E
situé à l’arrière du thermostat. Cela isolera les deux bornes de façon qu’elles puissent être utilisées
indépendamment.
2.) Sélecteur de borne O/B
Le sélecteur O/B sur ce thermostat est réglé en usine à la position O. Cela conviendra à la majorité
des applications de thermopompe, qui exigent que le relais de permutation soit énergisé en
mode Cool (climatisation). Si la thermopompe installée exige qu’une borne B énergise le relais de
permutation en mode Heat (chauage), le sélecteur O/B doit être réglé à la position B.
Emplacement des piles
Des piles AA de qualité sont
requises lorsqu’un l commun
n’est pas disponible. Lorsqu’il est
disponible, les piles orent alors
une source auxiliaire d’alimentation
(qui permettra de garder l’heure
active en cas de panne d’électricité).
1
2
 Loading...