7
OPTIONS MENU
To enter the Options Menu:
1. Press and hold the dial/menu button until “Options Menu” is shown in the display.
2. Use the up/down buttons to scroll through the options below, and press the dial/menu
button to select the desired option you wish to set:
• Set Language
• Local Area Code
• Set Time/Date
• Set Flash Time
• LED Contrast
• Set Tone/Pulse
• Exit Options
3. Use the up/down buttons to adjust the setting, and press the dial/menu button to confirm
and set.
NOTE: It is important to set the Area code so that the telephone can distinguish local or long
distance calls when dialing from the Caller ID list.
NOTE: Time and Date will automatically set when you recieve the first or second Caller ID
phone call.
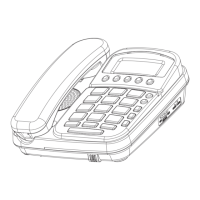
VOLUME CONTROL AND RINGER SETTINGS
Adjust the handset volume Slide the HANDSET VOLUME control to NORM or LOUD
Adjust the speakerphone
volume
Slide the SPEAKERPHONE VOLUME control: MIN/MAX
(on the right side of the phone).
Adjust the ringer level
HI - Rings loud on incoming calls.
LO - Ring volume is lowered on incoming calls.
OFF - No ringing on incoming calls.
MAKING CALLS
1. Pick up the handset or press the speaker button to get a dial tone.
2. Dial your call.
3. To end the call, replace the handset on the base or press the speaker button again.
ANSWERING CALLS
1. After the phone rings, pick up the handset or press the speaker button.
2. To end the call, replace the handset on the base or press the speaker button again.
HOLD FUNCTION
Press the hold button to temporarily put a caller on hold without disconnecting the call.
FLASH
Use the flash button for Call Waiting and Three Way Calling services.
NOTE: Call Waiting and Three Way Calling are services provided by your local telephone
company.
LAST NUMBER REDIALING
1. Pick up the HANDSET or press the speaker button.
2. Press the redial button. The last dialed number appears in the display and is
automatically dialed.