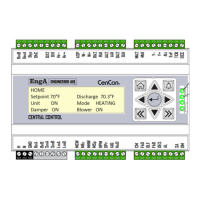
CenCon
32
G-XM COMBUSTION SETUP
Combustion setup may only be done using a
computer.
NOTICE:
Always allow the heat exchanger temperature to
stabilize before accepting combustion values.
A set of full clocking data must be completed in
test bay to generate a data base of combustion fuel
curves.
GAS AND AIR ACTUATOR CALIBRATION
WARNING:
If using a ball valve and actuator for gas or
air, it must be pre-calibrated before
attempting to set combustion offsets. This is
normally completed at initial factory setup,
but will also need to be verified if the
actuator is replaced.
For field serviced, record all offset values,
and then set all values to zero for both the
gas and air actuators. Enter calibration
screen and perform calibration setup. Return
and re-set offset values.
Power the CenCon, leave the heat switch and fan
switch off.
Press the UP arrow to enter the Actuator
Calibration screen.
Press: Start Setup, then Closed (0%)
Both actuators will move to fully closed (90°)
position, and read 2V. Set the ball valve and
combustion air damper to fully closed mechanically,
and tighten linkage. The feedbacks must be at or
very near 2V. Enter the actual feedback values into
the spaces provided.
Press in sequence from low to high fire. At each
stage enter the feedback values for both the gas
and air actuators once stabilized.
Once complete, press Start Setup to release.
COMBUSTION OFFSETS
Access the combustion setup page by pressing the
Right arrow key on the computer.
Connect analyzer to flue.
Enable the fan and heat switch.
Press: Service Mode and High Fire.
The burner will be enabled to prepurge and ignition.
Allow the heat exchanger to warm up a few
minutes.
From this point begin setup.
CAUTION:
Be aware of high discharge temperatures. High
limit failure may occur.
Adjust regulator to achieve design manifold
pressure and suggested oxygen levels of 3.5 -4.5%.
Once stabilized clock input. Readjust regulator or
air offset if required.
To adjust the high fire air use High Fire Air Offset
value.
Follow the sequence noted below exactly and set
to the approximate O
2
values noted by adjusting
the air and gas offsets as required. Recalculate
and record clocking value to match percentage of
fuel at each level.
Important: remember to un-click the previous gas
position button once you have clicked on the next
position.
Position %O
2
Near High Fire 90% 3.8 – 4.8
Low Fire 4% 16.8 – 17.3
Near Low Fire 10% 15.0 – 16.0
Medium Fire 1 25% 10.5 – 12.5
Medium Fire 2 55% 7.0 – 8.5