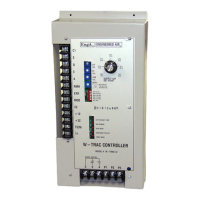
A G-TRAC2
IOM-25 30 of 42 Mar 99 R7
TE6000 Discharge Sensor Self-Test
If the discharge sensor resistance is greater than 4000-ohms or less than 880-ohms, the unit will lock out either on low limit
or bad temperature sensor. The G-TRAC2 will not operate with a bad discharge sensor. If the G-TRAC2 locks out due to an
open discharge sensor LED 3 will flash rapidly.
Sensor Resistance Chart for TE 6100-960 and TE 6000-960
*Reference resistance is 1035 ohms at 77°F. Resistance tolerances are ±0.05 to 0.15% at 77°F.
*Temperature range +32 to +104°F. (TE 6100-960 pot is 53C3, 500R, 7/8 by ¼ shaft.)
Discharge Sensor Calibration
NOTE: These controls are calibrated at the factory and in most instances field calibration is not necessary.
The discharge sensor is used for both temperature control and low limit safety control. For that reason it is VERY important
that this calibration step be PROPERLY done. The G-TRAC2 has two calibration pots. DSEN CAL is used to calibrate the
discharge sensor, and DSP CAL is used to calibrate the discharge set point.
1. Accurately measure the discharge air temperature at the temperature sensor.
NOTE: The sensor should be located in a stable, non-changing temperature location between 5 and 30ºC.
Calibration at other temperatures will not produce as accurate a result.
2. Read the G-TRAC2 discharge temperature by reading the DC voltage across spade connector terminals “DTEMP”
and “COMMON”. The readings are based on 10ºC per volt. (See Discharge Temperature Readout for table.)
3. If required, adjust DSEN CAL until the two readings agree.
Discharge Set-Point Calibration
1. Record the settings of dipswitches 1, 2, and 3.
2. Turn off dipswitch 1, 2, and 3 and remove wire to terminal OR and K. This eliminates all resets, leaving only the
base set point value across the test points.
3. Set discharge set point to 20ºC. The base set point in ºC is the DC volts across test points “SPC” to “COMMON”
multiplied by 10°C.
4. NOTE: There are different calibration procedures for JOHNSON TE 6100 and the G-TRAC2 face mounted set point.
Select the applicable one and go to point 4-1 or 4-2.