Do you have a question about the epiphan video Webcaster X2 and is the answer not in the manual?
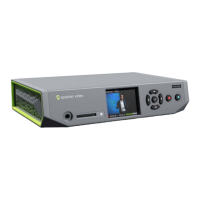
Plug in the power and Ethernet cables to the Webcaster X2 for initial setup.
Connect a display to HDMI OUT and a mouse to a USB port on the Webcaster X2.
Press the multi-function power button once to turn on the Webcaster X2.
Click the 'Update available' notice in the top bar to start the firmware update process.
Wait for the firmware update to download completely before proceeding.
Click 'Restart and install' to complete the firmware update on the Webcaster X2.
Connect your HDMI camera to the HDMI IN port of Webcaster X2 using an HDMI cable.
Connect Webcaster X2 to a network that allows access to YouTube and Facebook via Ethernet.
Connect the power cable to the back of Webcaster X2 to turn on the device.
Double-click the power button to select between YouTube and Facebook Live.
Use a browser to enter the pairing code on YouTube or Facebook Live.
Press the power button to start the live stream; the light blinks during content.
Press the power button again to stop streaming; content is processed for replay.
Long press the power button or disconnect the power cable to turn off the device.
Contact support@epiphan.com if you need help setting up or troubleshooting the Webcaster X2.
Register your Webcaster X2 for product updates at epiphan.com/register.
| Streaming Resolutions | Up to 1080p60 |
|---|---|
| USB | USB 2.0 |
| Video Encoding | H.264 |
| Audio Encoding | AAC |
| Video Inputs | HDMI |
| Video Outputs | HDMI |
| Audio Inputs | HDMI, 3.5mm |
| Audio Outputs | HDMI, 3.5mm |
| Network Connectivity | Ethernet |
| Streaming Platforms | RTMP |