d)
MENU module
When switching
on
the PX-8 it
is
sometimes difficult to find a particular pro-
gram among a number
of
others
on
a disk device. Many
of
them may not be
be relevant.
In
many cases the same program is used over and over again, and
like using the
PF
keys it
is
easier
to
press one key
to
load the program. The
MENU module simplifies the selection
of
a program by allowing the types
of
file names which are displayed to be limited, and allows programs from a mix-
ture
of
drives
to
be displayed together.
It
also allows the programs to be select-
ed by movement around the displayed files using the cursor keys, and then
running the program simply by pressing the
I
RETURN
I key.
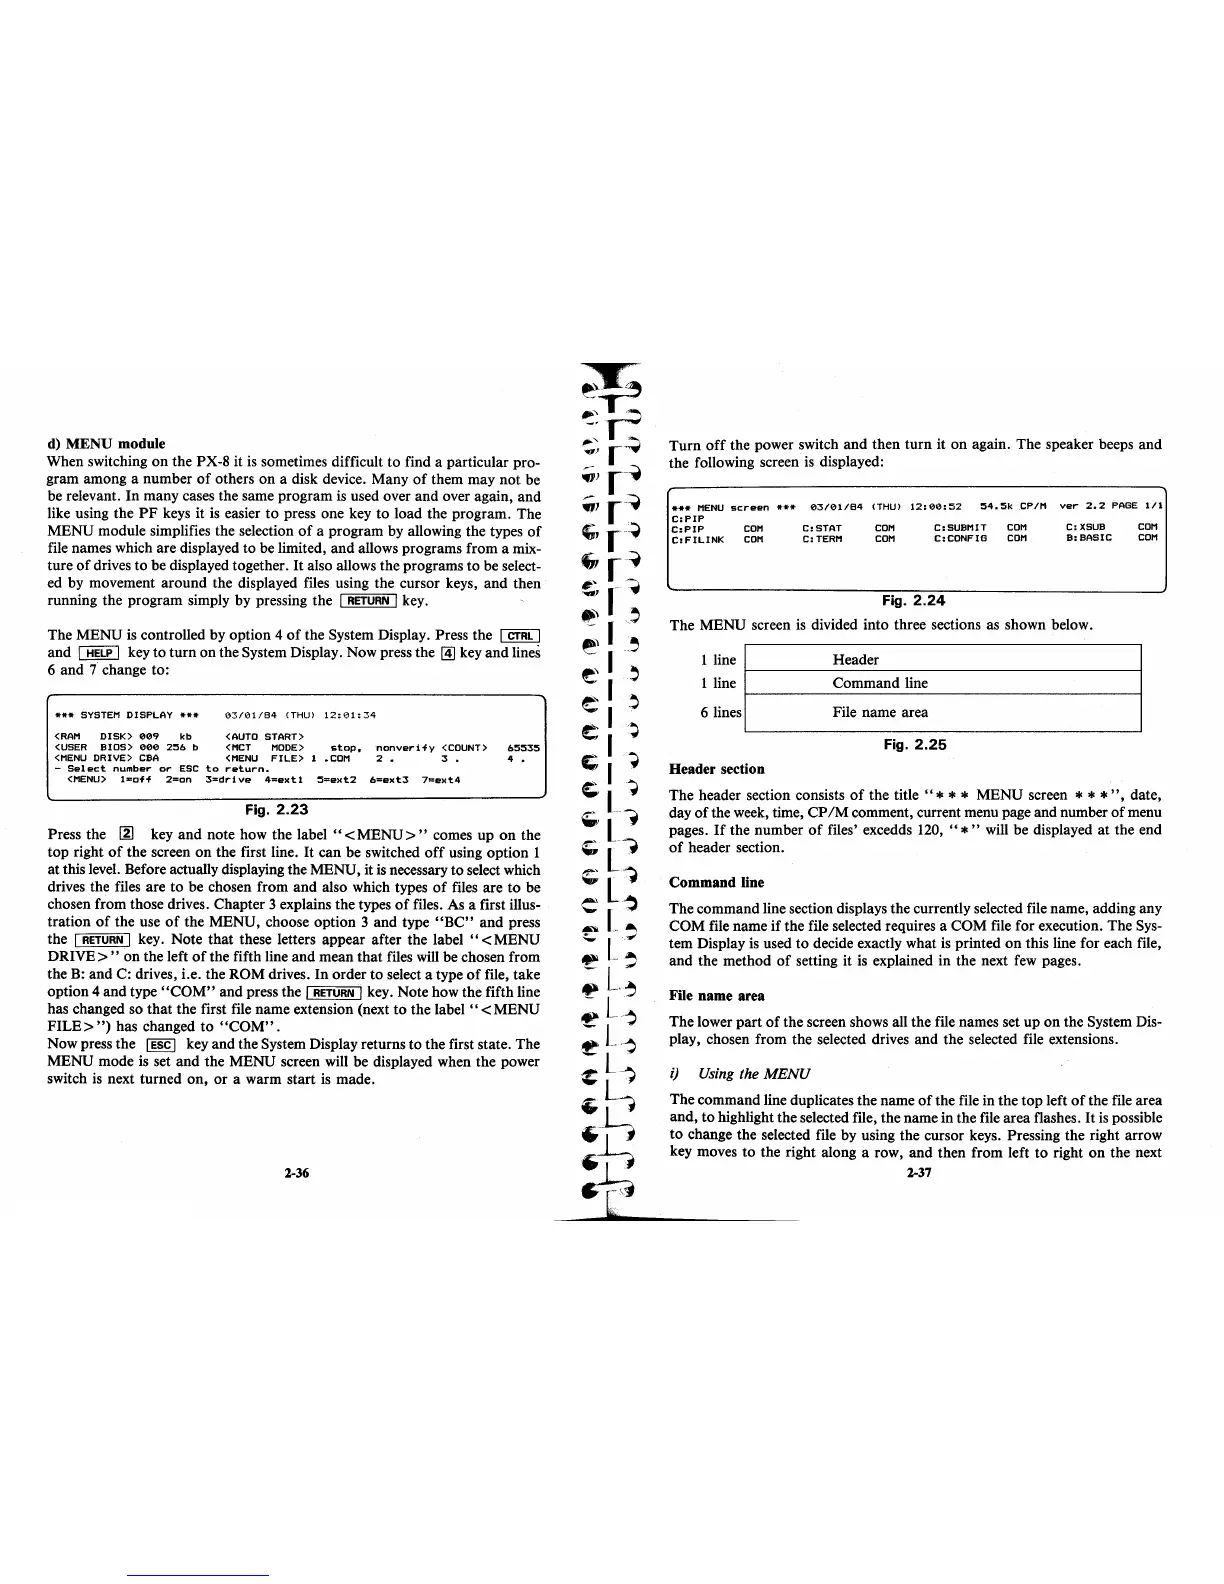
The MENU
is
controlled by option 4
of
the System Display. Press the I
CTRL
I
and I
HELP
I key
to
turn
on the System Display. Now press the
~
key and lines
6 and
7 change to:
***
SYSTEM
DISPLAY
***
<RAM
DISK>
009
kb
<USER
BIOS>
000
256
b
<MENU
DRIVE>
CBA
03/01/84
(THU)
12:01:34
<AUTO
START)
<MCT
MODE>
stop,
nonverify
<COUNT>
65535
<MENU
FILE>
1
.COM
2.
3 • 4 •
-
Select
number
or
ESC
to
return.
<MENU>
l=off
2=on
3=drive
4=extl
5=ext2
6=ext3 7=ext4
Fig.
2.23
Press the ~ key and note how the label
"<
MENU>"
comes up
on
the
top right
of
the screen
on
the first line.
It
can be switched
off
using option 1
at
this level. Before actually displaying the MENU, it
is
necessary to select which
drives the files are to be chosen from and also which types
of
files are
to
be
chosen from those drives. Chapter 3 explains the types
of
files. As a first illus-
tration
of
the use
of
the MENU, choose option 3 and type
"BC"
and press
the
I
RETURN
I key. Note that these letters appear after the
label"
<MENU
DRIVE>
" on the left
of
the fifth line and mean that files will be chosen from
the
B:
and C: drives, i.e. the ROM drives.
In
order to select a type
of
file, take
option 4 and type
"COM"
and press the I
RETURN
I key. Note how the fifth line
has changed so that the first file name extension (next
to
the label
"<
MENU
FILE>")
has changed
to
"COM".
Now press the I
ESC
I key and the System Display returns to the first state. The
MENU mode
is
set and the MENU screen will be displayed when the power
switch
is
next turned on, or a warm start
is
made.
2-36
Turn
off
the power switch and then turn it
on
again. The speaker beeps and
the following screen
is
displayed:
***
MENU
screen
***
03/01/84
(THU)
12:00:52
54.5k
CPIM
C:PIP
C:PIP
COM
C:STAT
COM
C:SUBMIT
COM
C:FILINK
COM
C:TERM
COM
C:CONFIG
COM
Fig.
2.24
ver
2.2
PAGE
1/1
C:
XSUB
COM
B:BASIC
COM
The MENU screen
is
divided into three sections as shown below.
1 line Header
~--------------------------------------------~
1 line Command line
~--------------------------------------------~
6 lines
File name area
Fig.
2.25
Header section
The header section consists
of
the title
"*
* * MENU screen * * *
",
date,
day
of
the week, time, CP 1M comment, current menu page and number
of
menu
pages.
If
the number
of
files' excedds
120,
"*"
will be displayed
at
the end
of
header section.
Command line
The command line section displays the currently selected file name, adding any
COM file name
if
the file selected requires a COM file for execution. The Sys-
tem Display
is
used
to
decide exactly what
is
printed
on
this line for each file,
and the method
of
setting it
is
explained in the next few pages.
File name area
The lower part
of
the screen shows all the file names set up on the System Dis-
play, chosen from the selected drives and the selected file extensions.
i)
Using
the
MENU
The command line duplicates the name
of
the file in the top left
of
the file area
and,
to
highlight the selected file, the name in the file area flashes.
It
is
possible
to
change the selected file by using the cursor keys. Pressing the right arrow
key moves
to
the right along a row, and then from left
to
right
on
the next
2-37