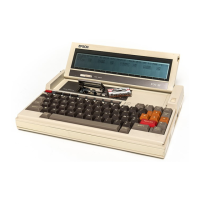
The I PF7 I (shifted I
PF2!
) key
is
used to mount a tape, i.e. make it ready to
be read from
or
written to by reading the directory into memory. When the
tape
is
used first, the I PF8 I (shifted I PF31 ) key can be used
to
initialize the tape
by storing space for a directory.
It
is
equivalent to formatting a conventional
disk. The
I PF91 (shifted
,PF4')
key
is
used to erase data from a tape. It does
this from the current position
of
the tape.
The
I
PF5!
key
is
used
to
reset the tape counter
to
zero. The current position
of
the counter can be seen
on
the right
of
line 5
of
the System Display next
to
the"
<COUNT>"
label.
The
I PF31 key marked with a
1m
character
is
the key
to
stop the cassette.
TO STOP
THE
MICRO CASSETTE IN
AN
EMERGENCY press the I CTRL !
and I
STOP
! keys together.
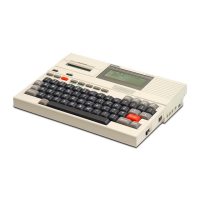
If
a Microcassette has been mounted, the only key which is assigned
is
,PF6
I
(shifted
~
). This will show the string
"remove"
which will allow the tape
to be removed from the cassette drive. It
is
worth getting into the habit
of
check-
ing the status
of
the cassette tape in the Microcassette drive, by inspecting the
System Display BEFORE removing a tape from the drive.
If
a tape has been
mounted, the eighth line will only show the word remove.
If
a tape has been mounted, when the I PF6 ! (shifted , PF1 I ) key
is
pressed, the
screen will clear and show the message
"remove"
in the top left hand corner
of
the screen.
If
the tape has simply been read this will flash up momentarily,
and the System Display will be redisplayed but with the eighth line showing
the assignments for an unmounted tape.
If
the tape has been written to, the revised directory on the tape will have to
be written back
on
to the tape from memory. The tape will thus wind back
to the beginning, and then record the updated directory. When this has been
carried out, the System Display
will
be redisplayed but with the eighth line show-
ing the assignments for an unmounted tape.
/I\.
WARNING:
W
Do
not
change a tape
and
attempt to write to another one, without first
removing the first tape and mounting the new one. Failure to observe this
will almost certainly mean that data on both tapes will
not
be
able to be
read,
and may also remove valuable data
from
the second unmounted tape.
2-44
f)
The screen dump module
The screen dump module outputs the contents
of
display screen to a printer.
It
is
activated by pressing the I PF5 I key together with the , CTRL I key
or
calling
the BIOS SCRNDUMP routine in
CP
1M
mode. In screen modes
0,1
and 2 data
is
sent to the printer in ASCII format, and in screen mode 3 in bit image format.
Printing stops when the ,
CTRL I and,
STOP
Ikeys
are pressed simultaneously, the
power switch
is
turned
off
or power failure
is
detected.
If
the printer
is
not ready, the module waits until it becomes ready.
NOTE:
If
there is
no
printer attached to the PX-8, this creates a lock-up
of
the sytem.
If
this happens, press ,
CTRL
!
and
,
STOP
I keys together. User can resume his ses-
sion with
no
loss
of
data.
2-45