The date will be updated
on
the screen when the time
is
first updated as the
seconds change.
Pressing the !
ESC!
key
at
any time returns
to
the
CONFIG
main menu.
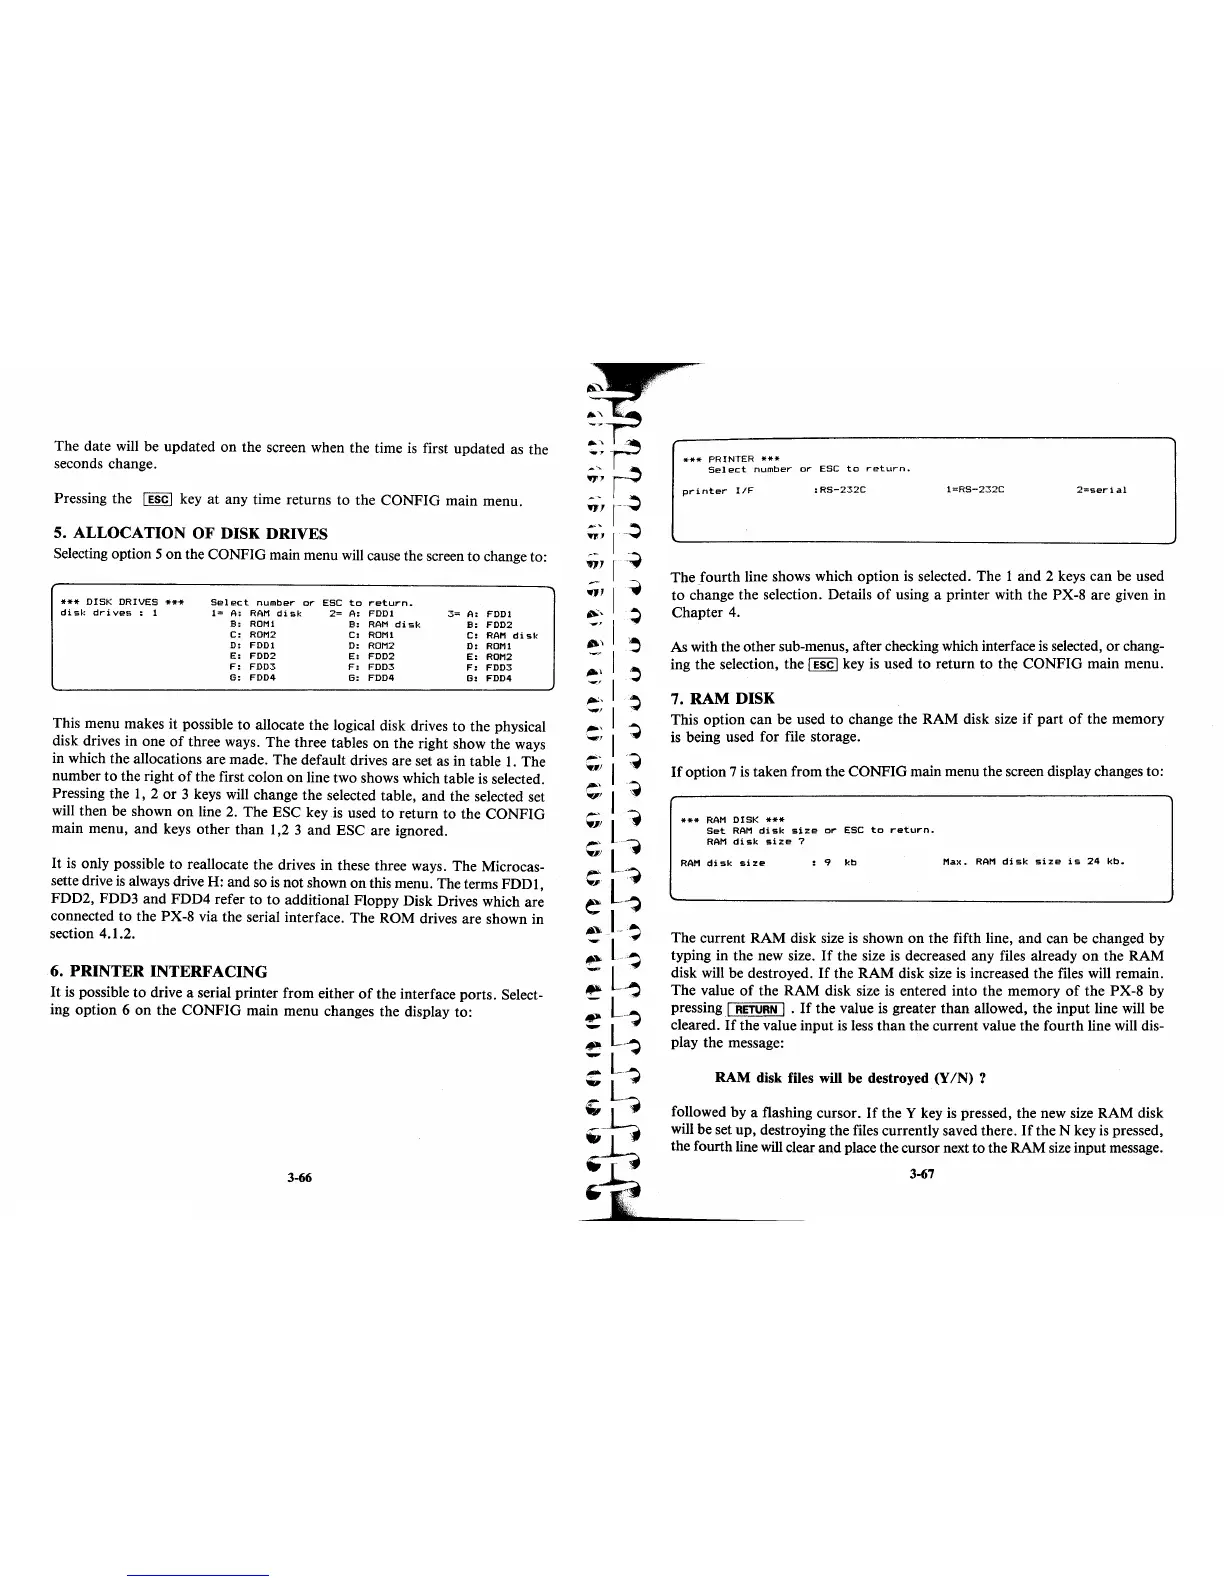
5. ALLOCATION
OF
DISK DRIVES
Selecting option 5
on
the CONFIG main menu will cause the screen
to
change to:
***
DISK DRIVES
***
Select
number
or
ESC
to
return.
disk
drives
: 1
1=
A:
RAM
disk
2=
A: FDDI
3=
A: FDDI
s:
ROMI
B:
RAM
disk
B:
FDD2
C:
ROM2
C:
ROMI
C:
RAM
disk
D:
FDDI
D:
ROM2
D:
ROMI
E:
FDD2
E:
FDD2
E:
ROM2
F:
FDD3
F:
FDD3
F:
FDD3
G: FDD4
G: FDD4
G: FDD4
This menu makes it possible
to
allocate the logical disk drives
to
the physical
disk drives in one
of
three ways. The three tables
on
the right show the ways
in which the allocations are made. The default drives are set as in table
1.
The
number
to
the right
of
the first colon
on
line two shows which table is selected.
Pressing the
1,
2
or
3 keys will change the selected table,
and
the selected set
will then be shown
on
line 2. The ESC key is used
to
return
to
the
CONFIG
main menu,
and
keys other
than
1,2 3
and
ESC are ignored.
It
is only possible
to
reallocate the drives in these three ways. The Microcas-
sette drive
is
always drive
H:
and so
is
not shown
on
this menu. The terms FDD1,
FDD2, FDD3
and
FDD4 refer
to
to
additional Floppy Disk Drives which are
connected
to
the PX-8 via the serial interface.
The
ROM drives are shown in
section 4.1.2.
6.
PRINTER
INTERFACING
It
is possible
to
drive a serial printer from either
of
the interface ports. Select-
ing option 6
on
the
CONFIG
main menu changes the display to:
3-66
***
PRINTER .... *
Sel
ect
number
or
ESC
to
return.
printer
ItF
:
RS-232C
1=RS-232C
2=serial
The
fourth
line shows which option
is
selected.
The
1
and
2 keys can be used
to
change the selection. Details
of
using a printer with the PX-8 are given in
Chapter 4.
As with the other sub-menus, after checking which interface
is
selected,
or
chang-
ing the selection,
the!
ESC!
key is used
to
return
to
th~
CONFIG
main menu.
7.
RAM
DISK
This option can be used
to
change the
RAM
disk size
if
part
of
the memory
is being used for file storage.
If
option 7 is taken from the CONFIG main menu the screen display changes to:
***
RAM
DISK
***
Set
RAM
disk
size
or
ESC
to
return.
RAM
disk
size?
RAM
disk
size
: 9
kb
Max.
RAM
disk
size
is
24
kb.
The current RAM disk size is shown
on
the fifth line,
and
can be changed by
typing in the new size.
If
the size is decreased any files already
on
the RAM
disk will be destroyed.
If
the
RAM
disk size is increased the files will remain.
The value
of
the RAM disk size
is
entered into the memory
of
the PX-8 by
pressing !
RETURN
I .
If
the value
is
greater
than
allowed, the input line will be
cleared.
If
the value input is less
than
the current value the fourth line will dis-
play the message:
RAM
disk files will be destroyed
(YIN)
?
followed by a flashing cursor.
If
the Y key is pressed, the new size
RAM
disk
will be set
up,
destroying the files currently saved there.
If
the N key
is
pressed,
the fourth line will clear and place the cursor next
to
the RAM size input message.
3-67