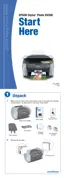
Scanning From a Program 67
Adjusting the Scan Area (Marquee)
Once you create a marquee on your preview image, you can use it to crop the area
you want to scan. You can create a marquee on each preview image, if you’re
scanning more than one at a time.
■ To move the entire marquee, click and hold your mouse button inside the
outlined area and drag the marquee to where you want it.
■ To resize the marquee, click and hold your mouse button on one of the edges
or corners and drag the marquee to the size you want.
■ To create additional marquees on multiple images, click the next image, then
click the Duplicate button. Then adjust the marquees as described above.
■ To delete a marquee, click the Delete button.
■ To start over with a new marquee, click the Auto Detect button.
Marquee

 Loading...