This document provides comprehensive instructions for the Erbauer ECSG18-Li and ECSG3640-Li cordless chain saws, covering their function, technical specifications, usage, and maintenance.
Function Description
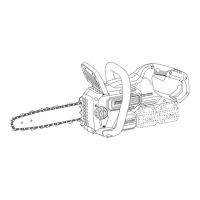
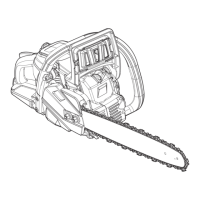
The Erbauer ECSG18-Li and ECSG3640-Li are cordless chain saws designed for cutting wood logs and limbs. They are intended for private domestic use and are not suitable for commercial applications, felling trees, or lumber work in forested areas. The tools are specifically designed for use with the guide bar/saw chain combinations stated in the technical specifications and are capable of performing vertical and horizontal cuts. Longitudinal sections should only be cut by professionals. The chain saws operate on two 18V (36V d.c.) Li-Ion battery packs, which must be inserted and removed simultaneously. A key safety feature is the kickback brake, activated by the front hand guard, which immediately stops the saw chain in the event of kickback.
Important Technical Specifications
The two models, ECSG18-Li and ECSG3640-Li, share many specifications but differ in cutting length and guide bar type.
Product Model:
Rated Voltage:
- 36 V d.c. (18V x 2) for both models
Chain Speed (no-load):
Cutting Length:
- ECSG18-Li: 28 cm
- ECSG3640-Li: 37.5 cm
Saw Chain Type:
- ECSG18-Li: 90PX045
- ECSG3640-Li: 90PX056X
Guide Bar Type:
- ECSG18-Li: 124MLEA041
- ECSG3640-Li: 164MLEA041
Guide Bar Length:
- ECSG18-Li: 352 mm
- ECSG3640-Li: 458 mm
Chain Oil Tank Volume:
Weight:
- ECSG18-Li: 3.5 kg
- ECSG3640-Li: 3.8 kg
Sound Pressure Level (LPA):
- 80.56 dB(A) for ECSG18-Li
- 80 dB(A) for ECSG3640-Li
- Uncertainty KPA: 1.87 dB(A) for both models
Guaranteed Sound Power Level (LWA):
- 104 dB(A) for both models
- Uncertainty KWA: 1.87 dB(A) for ECSG18-Li, 3.38 dB(A) for ECSG3640-Li
Vibration (ah) for Main Handle:
- ECSG18-Li: 5.534 m/s²
- ECSG3640-Li: 3.366 m/s²
Vibration (ah) for Auxiliary Handle:
- ECSG18-Li: 3.028 m/s²
- ECSG3640-Li: 1.556 m/s²
- Uncertainty K: 1.5 m/s² for both models
Ambient Temperature Range for Tool and Battery Use:
Compatible Battery Packs (2x, sold separately):
- EBAT18-Li-2, EBAT18-Li-4, EBAT18-Li-5, EHPB18-Li-4, EHPB18-Li-8
Compatible Chargers (sold separately):
- EC18-Li, EFC18-Li, EMC18-Li
The battery packs feature a power bar (12b) to indicate remaining capacity, with LED indicators for 76-100%, 51-75%, 26-50%, 5-25%, and <5%.
Usage Features
Assembly and Setup:
- Unpacking: All parts should be unpacked and laid on a flat, stable surface. Ensure all components are present and undamaged.
- Battery Pack: Two battery packs of the specified type must be used. They are slid into compartments under the rear handle until securely locked. To remove, depress the release button (12a) and pull the pack out. The product cannot operate with only one battery pack.
- Chain Lubrication Oil: The product is not pre-filled with chain oil. It is crucial to fill the oil tank (15) with environment-friendly biodegradable chain oil before use. The oil level gauge (14) helps monitor the oil level. A 5mm space should be left at the top of the tank for expansion. Operating without sufficient oil will cause rapid wear and damage.
- Guide Bar and Saw Chain Attachment: The saw chain (3) is fitted around the guide bar (4) and over the drive sprocket (23). The guide bar must be correctly positioned over the fastening bolt (24), and the saw chain cutter must comply with the chain direction indicator (26). The drive sprocket cover (17) is then attached, aligning holes/pins and the fastening bolt/thread hole (22). The clamping knob (19) is turned clockwise to allow the guide bar to move.
- Saw Chain Tensioning: Proper chain tension is critical for safety and performance. The clamping knob (19) is loosened, and the chain tension knob (18) is turned to move the tensioning pin (20) towards the drive sprocket (23) until all chain sections touch the bottom edge of the guide. The correct tension allows the saw chain to be lifted approximately 5mm from the guide bar in the center (Fig. G). The clamping knob is then tightened firmly. Regular checks and adjustments are necessary, especially with new chains.
- Guide Bar Cover: The guide bar cover should always be fitted when the product is not in use, during transport, or storage.
Operation:
- Switching On/Off: To start, press the lock-off button (8) and then the switch trigger (10), keeping it pressed. To switch off, release the switch trigger.
- Kickback Brake: The kickback brake (6) is a safety mechanism that stops the saw chain immediately upon kickback. It can be manually engaged by rolling the left hand forward against the front hand guard.
- Pre-Operation Checks: Before each use, check the chain oil level, chain tension, and ensure the kickback brake functions correctly.
- General Cutting Process:
- Always hold the product firmly with both hands (left hand on front handle, right hand on rear handle).
- Maintain a secure stance and hold the product at the right-hand side of the body.
- Ensure the cutting object does not exceed the usable cutting length of the chain saw, keeping the guide bar tip at least 5cm outside the wood log.
- The saw chain should run at full speed before contacting the wood.
- Use the ridged bumper (5) to secure the product and as a leverage point.
- Avoid forcing the saw chain; let the chain do the work.
- Do not operate with arms fully extended or above shoulder height.
- Be cautious when reaching the end of a cut as the product's weight may shift.
- Always remove the product from a cut while it is running.
- Felling a Tree (Fig. L, M):
- Maintain a safe distance from other felling operations (at least twice the tree's height).
- Plan an escape path.
- Consider the tree's natural lean, branch location, and wind direction.
- Remove debris from the tree.
- Make a notching undercut (B) 1/3 of the tree's diameter, perpendicular to the fall direction, starting with the lower horizontal cut.
- Make the felling back cut (A) at least 50mm higher than the notching cut, keeping it parallel to create a hinge (C). Do not cut through the hinge.
- Use wedges if the tree doesn't fall as desired.
- Remove the product and retreat along the planned path once the tree begins to fall.
- Limbing and Pruning (Fig. N): Remove branches from a fallen tree, leaving larger lower limbs for support. Cut branches under tension from the bottom up.
- Cutting Spring Poles (Fig. O): Be aware of spring poles (bent logs/branches under tension) as they can spring back dangerously.
- Bucking a Log (Fig. P, Q, R, S, T):
- Log supported along its entire length: Cut from the top (overbuck, Fig. P).
- Log supported on one end: Cut 1/3 diameter from the underside (underbuck), then finish by overbucking (Fig. Q).
- Log supported on both ends: Cut 1/3 diameter from the top (overbuck), then underbuck the lower 2/3 (Fig. R).
- When bucking on a slope, stand on the uphill side. Release cutting pressure near the end of the cut without relaxing grip. Do not let the chain contact the ground.
- Support small logs on a sawing stand or another log.
Maintenance Features
General Maintenance:
- Cleaning: Keep the product clean, removing debris after each use. Use a dry cloth and a brush for hard-to-reach areas. Clean the air inlet (11) and the space under the drive sprocket cover (17) after every use. Do not use chemical, alkaline, abrasive, or aggressive detergents.
- Inspection: Regularly inspect for worn or damaged parts. Do not operate if broken or worn parts are found.
- Battery Pack Storage: Store battery packs at room temperature (19-25°C), charged to 30-50% capacity. Boost charge once per year for long storage periods. Clean venting slots and contact pins with a soft, dry brush.
Sprocket Wheel Maintenance:
- Clean the sprocket wheel.
- Use a disposable lube gun to inject grease into the lubrication hole (Fig. U step 1) until it appears at the outside edge.
- Rotate the saw chain by hand (with protective glove) (Fig. U step 2) and repeat lubrication until the entire sprocket wheel is greased.
Guide Bar and Saw Chain Maintenance:
- Disassembly: Disassemble the guide bar and saw chain in reverse order of assembly.
- Oiling Port: Check the oiling port for clogging and clean it with a soft wire to ensure proper lubrication.
- Drive Sprocket: Check for wear or damage and replace if necessary.
- Rails: Clear residue from the guide bar rails using a screwdriver, putty knife, or wire brush to keep oil passages open.
- Guide Bar Wear: Check the guide bar 'rail' for wear by holding a ruler against the side of the guide bar and 'cutter side plates'. If there is no gap, the rail is worn and needs replacement (Fig. V).
- Saw Chain Wear: Check the saw chain for wear and damage, replacing if required.
- Saw Chain Sharpening: Sharpening may be needed if cutting damp wood, if the product pulls to one side, if excessive force is required to penetrate wood, or if chips are very small. Sharpening should be done professionally or by experienced users with proper tools.
Storage and Transportation:
- Storage: Switch off, remove battery packs, clean, attach guide bar cover, and empty the oil tank. Store in a dark, dry, frost-free, well-ventilated place, inaccessible to children, at 10-30°C. Use original packaging or a suitable cover to protect against dust.
- Transportation: Switch off, remove battery packs, clean, and attach the guide bar cover. Carry by the handle. Protect from heavy impact or strong vibrations and secure to prevent slipping or falling.
Troubleshooting:
The manual includes a troubleshooting section to help users identify and fix common issues, such as the product not starting, not reaching full power, unsatisfactory cutting results, excessive vibration/noise, or sudden stops. For complex issues, an authorized service center or qualified specialist should be consulted.
Recycling and Disposal:
Waste electrical products, batteries, and battery packs should not be disposed of with household waste. They should be recycled at designated facilities. Battery pack connections should be covered with heavy-duty adhesive tape before disposal to prevent short circuits. Do not open or remove components from battery packs.