EasyManua.ls Logo

ESCALADE STIGA T8561 - User Manual

ESCALADE STIGA T8561
24 pages
Print Icon
To Next Page IconTo Next Page
Loading...
1. Read this manual carefully before starting assemb ly. Read each step completely before beginning
each step.
2. Some smaller parts may be shipped inside larger parts. Check inside all parts and cartons
before assembling or ordering parts.
3. Do not tighten hardware until instructed to do so. If hardware is tighten too soon, mounting holes
may not align and parts may not easily fit togeth er. Leave locknuts slightly loose until you are instructed to
tighten them.
4. Tools required for assembly: Phillips Screwdriver, Adjustable Wrenches, Rubber Hammer, 8mm Wrench,
5. To make assembly as easy as possible, place all parts of the table in a cleared area and remove the packaging
material. Do not remove parts from bags until you are ready to assemble that part. Do not dispose of the
Identification and the Exploded Drawings.
O W N E R S M A N U A L
Please Do Not Return This Product To The Store!
Contact Escalade Sports customer service department at:
Phone: 1-866-873-3528 Toll-Free!
Fax: 1-866-873-3533 Toll-Free!
E-mail: tabletennis@escaladesports.com
Mailing Address(correspondence only):
Escalade Sports
PO box 889
Evansville, IN 47706
Please visit our World Wide Web site at: www.escaladesports.com
ON-LINE TROUBLE SHOOTING TECHNICAL ASSISTANCE
ON-LINE PARTS REQUESTS FREQUENTLY ASKED QUESTIONS
ADDITIONAL ESCALADE SPORTS PRODUCT INFORMANTION
2L-5057-00
Escalade Sport products may be manufactured and/or
licensed under the following patents.
6120397, 5816957, 5769744, 5119741, 4911085, 4717157, D460140, D420563
TABLE TENNIS TABLE
Additional patents may be pending. One or more of the listed patents and/or pending patents may cover specific product.
MODEL NO.
T8561
2014 Escalade Sports
R
R
C
R
and 10mm wrench.
6.
An electric screwdriver is helpful in assembly. However, please set at low torque and use caution because you
could overtighten the hardware and strip the screws.
packing material until assembly is completed. For he lp in identifying parts, use the the Parts List, Hardware
Question and Answer IconNeed help?

Do you have a question about the ESCALADE STIGA T8561 and is the answer not in the manual?

Overview

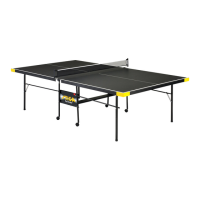
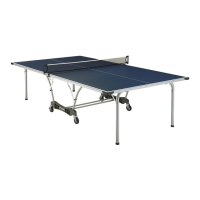
This document describes the STIGA T8561 Table Tennis Table, a device designed for recreational and competitive table tennis play.

Function Description

The STIGA T8561 Table Tennis Table serves as a playing surface for the sport of table tennis. It is designed to be foldable for storage and can be set up in a "playback position" for solo practice. The table consists of two separate halves, each supported by a U-leg and U-support structure, and equipped with casters for mobility. The two halves are joined by a net and post set during play.

Important Technical Specifications

The table features an aluminum top assembly, which is susceptible to atmospheric conditions like temperature and humidity, potentially causing slight sag or distortion. This is considered normal and does not affect play or utility.

Key Components and Materials:

  • Aluminum Top Assembly (Part #2): The playing surface.
  • U-Leg (Part #1) and U-Support (Part #3): Silver-colored structural components that support the table halves.
  • Strut Tube (Part #4): Silver-colored tubes connecting the caster beams to the table.
  • Hinge & Mounting Bracket Assemblies (Parts #5, #6, #18): Long and short hinges for folding and connecting the table halves.
  • Caster Beam Assembly (Part #8): Plastic beams that house the casters.
  • Casters (Parts #9, #30): 4" single wheel casters, some with locks.
  • Cross Tube (Part #7): Connects the caster beams.
  • Net Post (Part #21) and Net (Part #22): For the playing setup.
  • Hardware: A variety of Phillips head bolts and screws, carriage bolts, thumb screws, locknuts, plastic spacers, and washers are used for assembly. Specific hardware includes:
    • 1/4-20 X 2 1/4 Phillips Rd. Hd. Bolt (Part #12)
    • 1/4-20 X 2 Carriage Bolt (Part #10)
    • #10-24 X 2" Phillips Rd. Hd. Bolt (Part #17)
    • #10-24 X 3/4 Thumb Screw (Part #28)
    • #8-32 X 1 1/4 Phillips Rd. Hd. Sms (Part #16)
    • #8 X 5/8 Phillips Rd. Hd. Sms (Part #15)
    • #10 Washer (Part #26)
    • 1/2 OD X .281 ID X 3/4 Long Plastic Spacer (Part #11)
    • 3/4 OD X1/4 ID X 1/16 Thick Flat Plastic Washer (Part #13)
    • #10-24 Locknut (Part #19)
    • 1/4-20 Locknut (Part #14)
    • 3/4 OD X1/4 ID X 1/8 Thick Flat Plastic Washer (Part #33)

Dimensions (from plastic spacers/washers):

  • 1/2 OD X .281 ID X 3/4 Long Plastic Spacer
  • 3/4 OD X 1/4 ID X 1/16 Thick Flat Plastic Washer
  • 3/4 OD X 1/4 ID X 1/8 Thick Flat Plastic Washer

Warranty:

  • Duration: Three (3) years from the original purchase date.
  • Coverage: Covers defects in material and workmanship under normal use. Voided by accident, unreasonable use, negligence, improper service, failure to follow instructions, or other non-material/workmanship causes.
  • Performance: Escalade® Sports will repair or replace defective products or components.

Usage Features

Assembly:

  • Requires at least two adults for assembly.
  • Tools needed: Phillips screwdriver, adjustable wrenches, rubber hammer, 8mm wrench, and 10mm wrench. An electric screwdriver can be used at low power with caution to avoid overtightening.
  • Caster Beam Assembly: Casters (some with locks, some without) are inserted into the plastic caster beams. The cross tube connects these beams.
  • Strut Tube Attachment: Four strut tubes connect to the caster beam assembly using carriage bolts and locknuts. Nuts should be snug but not overtightened to allow pivot.
  • Table Top Attachment: The aluminum top assembly is attached to the U-legs and U-supports using plastic clips, plastic tube brackets, and screws. Slots in the plastic tube brackets must face the middle of the table for proper operation. Screws should be snug but not overtightened to avoid stripping metal tubes.
  • Hinge & Mounting Bracket Attachment: Various hinge assemblies (short and long) are attached to the U-legs and the table top using screws, bolts, thick plastic washers, and locknuts. Hinges must be positioned exactly as shown and nuts should not be overtightened to allow the hinge to pivot.
  • Final Assembly: The table halves are connected by aligning the U-support tubes with the strut tubes and sliding them together. Strut tubes should be rotated upwards.
  • Net and Post Installation: Net posts are secured to the center of the table, and the net slides down over the posts. Velcro straps on one end of the net allow for tension adjustment.

Safety Warnings:

  • Assembly: Always read and follow all instructions. Two adults are required. When assembling table tops to the base, handle tops by grasping only the tops themselves. Do not grasp metal legs, U-support, linkage, or hinges, as these parts can move and cause serious injury. Assemble with legs fully closed and top in a vertical position. Do not open legs or attempt to assemble alone as tops are heavy.
  • Playing Position: Do not open the table to playing position until both halves are installed. Do not leave the table standing unattended, as it could fall and cause serious injury or property damage.
  • General Use: This is a table tennis table. Do not sit, stand, lean, walk, or jump on the table. Failure to comply can result in personal injury and/or property damage.
  • Opening/Closing: Wind gusts can blow over or unexpectedly open the table; store in a protected area. Exercise caution when opening/closing. Small children, or those not properly instructed, must not open/close the table. Improper handling can cause serious injury or damage.

Operating the Table:

  • Opening:
    1. Open legs on one table half and lock both leg hinges.
    2. Stand at the center of the table, hold the top edge with one hand and the U-support with the other. Pull the U-support outward to the midway position. Continue pulling the top until the leg rests on the floor. Do not leave the table partially opened at the midway position.
    3. Repeat for the second table half.
    4. Lower the second top as described in step 2.
    5. Lock all four center hinges.
    6. Secure net posts and slide the net down. Adjust net tension with Velcro straps.
  • Playback Position (Solo Play): Pull the leg open and lock the hinges.
  • Closing (Storage Position):
    1. Remove the net and net posts.
    2. Unlock all four center hinges.
    3. Lift one table half to the midpoint until plastic clips engage. Continue lifting until closed.
    4. Unlock leg hinges on this half and fold legs against the top.
    5. Raise the other table half in the same manner.

Unlevel Floors:

  • If the table appears unlevel, it is likely due to an unlevel floor. Move the table several inches in different directions to find the best location. If the floor is extremely unlevel, the table may not play or operate properly. If the table is high in the center, shim up under the outer legs.

Maintenance Features

Care and Maintenance:

  • The aluminum top is a quality product designed for years of enjoyment.
  • Top Surface: The aluminum top can be affected by atmospheric conditions (temperature and humidity), potentially causing slight sag or distortion as it expands or contracts. This is normal and does not detract from play or utility.
  • Storage: Store the table in a protected, dry area when not in use. Wind gusts can unexpectedly open or blow over the table. Fold the table up when storing.
  • Cleaning: Use only a soft, damp (NOT WET) cloth to clean the table. DO NOT use any chemicals, abrasive, or cleaning products on the playing surface to prevent damage.
  • Lubrication: Periodically lubricate all moving parts, including pivot points, to ensure smooth opening and closing. A light lubricant such as WD-40 is recommended.

Customer Service:

  • Contact Escalade® Sports customer service for parts or assistance.
  • Phone: 1-800-873-3528 (toll-free)
  • Fax: 1-866-873-3533 (toll-free)
  • Email: tabletennis@escaladesports.com
  • Postal Address: Escalade Sports, PO Box 889, Evansville, IN 47706
  • Website: www.escaladesports.com (for troubleshooting, parts orders, technical assistance, FAQs, and product information).
  • Do not return the product to the store.

ESCALADE STIGA T8561 Specifications

General IconGeneral
BrandESCALADE
ModelSTIGA T8561
CategorySports & Outdoors
LanguageEnglish

Related product manuals