13
After Sales Support
(AU) 1300 886 649 (NZ) 0800 836 761 | info@tempo.org
Getting Started (Cont.)
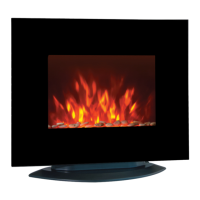
Base assembly (for freestanding use)
Your new flame effect heater can also be assembled onto the base supplied.
• First remove the glass panel, as described on page 11.
• Place the metal body of the flame effect heater horizontally on a table or
worktop, with the bottom part overhanging for free access.
• The base must be installed so that its curved side is at the back of the
appliance (Fig. 6).
• Align the holes in the lower part of the heater body with the holes on the
base for the appliance, making sure that the two salient points on the base
(circled in Fig. 7) are aligned with the small holes on in the lower part of the
heater. Then secure the base to the main body with the supplied screws.
• Aligning the points with the holes is very important. If the two salient points
are not properly aligned, the screws cannot be securely fastened, as pictured
in Fig. 8. Correctly installed, there will be no gap between the flame effect
heater and its base (Fig. 9).
Fig. 8 - WRONG
Fig. 9 - CORRECT
• Carefully move the heater to where you want to use it. Always ensure to
place it on a flat, stable and even surface for operation.
• Add the decorative pebbles along the light unit in the desired position.
• Before attaching the glass panel, make sure the inside of the panel is
clean and free of fingerprints. Then reinstall the panel, with some help, as
described under ‘Finishing the installation’, on page 12.
Fig. 7
Fig. 6
back
front