EasyManua.ls Logo

Evco c-pro 3 nano plus - User Manual

Evco c-pro 3 nano plus
26 pages
Print Icon
To Next Page IconTo Next Page
Loading...
c-pro 3 nano
Programmable controllers (up to 25 I/O)
Hardware Manual | ENGLISH
Code 114CP3NE104
TheInnovationEvolution
Question and Answer IconNeed help?

Do you have a question about the Evco c-pro 3 nano plus and is the answer not in the manual?

Summary

Introduction to c-pro 3 nano Controllers

Initial Information on c-pro 3 nano

Overview of c-pro 3 nano controllers, features, and applications.

Model Features and Purchasing Codes

Details features and purchasing codes for different c-pro 3 nano models.

Measurements and Installation

Device Dimensions and Measurements

Presents physical dimensions of c-pro 3 nano devices in mm and inches.

Panel Mounting and Installation Precautions

Guides on panel installation and safety precautions during setup.

Electrical Connection Guide

Overview of c-pro 3 nano Connectors

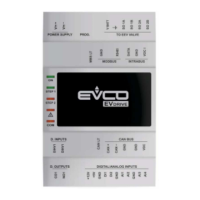
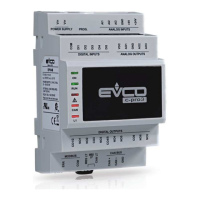
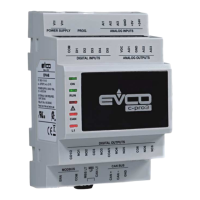
Illustrates and describes various connectors on c-pro 3 nano devices.

Connecting the Power Supply

Instructions for connecting the device to the appropriate power supply.

Analogue Input Wiring Diagrams

Provides wiring diagrams for connecting analogue inputs to the c-pro 3 nano.

Digital Input Wiring Diagrams

Provides wiring diagrams for connecting digital inputs to the c-pro 3 nano.

Analogue Output Wiring Diagrams

Provides wiring diagrams for connecting analogue outputs from the c-pro 3 nano.

Digital Output Wiring Diagrams

Provides wiring diagrams for connecting digital outputs from the c-pro 3 nano.

INTRABUS Port Wiring Diagram

Diagram for connecting the INTRABUS port for device communication.

RS-485 MODBUS Port Wiring Diagram

Diagram for connecting the RS-485 MODBUS port for network communication.

CAN Port Wiring Diagram

Diagram for connecting the CAN port for network communication.

Connecting to a PC via USB

Instructions for connecting the c-pro 3 nano to a PC using its USB port.

Connecting a USB Flash Drive

Guide on connecting a USB flash drive for configuration or updates.

Fitting Termination Resistors for Networks

Procedure for fitting termination resistors on RS-485 MODBUS and CAN networks.

RS-485 MODBUS Network Polarisation

Information on polarizing RS-485 MODBUS networks using the development environment.

Electrical Connection Precautions

Important safety and operational precautions for electrical connections.

Device Configuration

Accessing Device Configuration

Steps to access device configuration menu and sub-menus.

Setting Device Language

Procedure for setting the application software display language.

Setting Date and Time (RTC)

Instructions for setting the real-time clock (date and time) for c-pro 3 nano plus.

Downloading Configuration via USB

Steps to download device configuration to a USB flash drive.

Uploading Configuration via USB

Steps to upload device configuration from a USB flash drive.

List of Hardware Parameters

Available Accessories

Accessory: USB Extension Cable (1 m)

Details the USB extension cable (1m) for PC connection.

Accessory: USB Extension Cable (2 m)

Details the USB extension cable (2m) for USB flash drive connection.

Accessory: RS-485;USB Serial Interface

Describes RS-485/USB serial interface for setup software connection.

Accessory: INTRABUS;RS-485 Serial Interface

Details INTRABUS/RS-485 serial interface for signal conversion.

Accessory: Fan Speed Regulator (EVDFAN1)

Describes EVDFAN1 for regulating single-phase fan speed.

Accessory: 4 GB USB Flash Drive

Details 4GB USB flash drive for configuration upload/download.

Accessory: Connection Kit (CJAV)

Provides information on CJAV connection kits for c-pro 3 nano models.

Technical Specifications

Overview

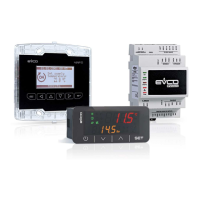
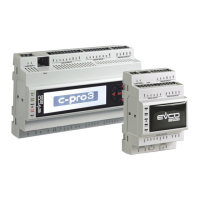
The c-pro 3 nano is a range of highly compact programmable controllers designed for HVAC/R and OEM applications, offering numerous inputs and outputs (up to 25) and enhanced memory capacity.

Function Description

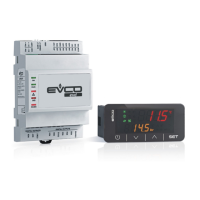
The c-pro 3 nano functions as a built-in electronic device, serving as a function controller. It can be expanded with additional I/O by adding expansion modules, utilizing either a CAN port or a proprietary INTRABUS port. The CAN protocol allows for integration with the entire c-pro 3 series of controllers and displays. An optional MODBUS RTU interface is available in both master and slave formats, and the c-pro 3 nano plus model includes an RS-485 port, enabling simultaneous use of two MODBUS protocols. The application software is developed using the UNI-PRO 3 integrated development environment, which supports simple, intuitive, and portable design. The device features a standard USB port for easy programming during development and debugging, and for updates using common USB flash drives.

Important Technical Specifications

The c-pro 3 nano has a compact format with dimensions of 75.0 x 33.0 x 59.0 mm (2 15/16 x 1 5/16 x 2 5/16 in) and is designed for panel installation with snap-in brackets. It offers IP65 protection for the front. The device is available with 12 VAC or 24 VAC/DC power supply options.

Analogue Inputs:

  • PTC, NTC, or Pt 1000 probes: 5 inputs, configurable for dry contact digital input.
  • NTC probes, 0-5 V ratiometric, 0-10 V, 0-20 mA, or 4-20 mA transducers: 2 inputs (4 for 'plus' models), configurable for dry contact digital input.
  • Resolution: 0.1 °C (1 °F) for PTC/NTC/Pt1000, 0.01 V for 0-5 V transducers, 0.01 mA for 0-10 V/0-20 mA/4-20 mA transducers.
  • Measurement Ranges:
    • PTC (KTY 81-121): -50 to 150 °C (-58 to 302 °F).
    • NTC (83435): -50 to 120 °C (-58 to 248 °F).
    • Pt 1000: -100 to 400 °C (-148 to 752 °F).
  • Input Resistance: ≥ 10 KΩ for 0-5 V, ≤ 200 Ω for 0-10 V/0-20 mA/4-20 mA.

Digital Inputs:

  • Dry contact and pulse trains up to 2 KHz: 2 inputs.
  • Dry contact: 1 input (3 for 'plus' models).

Analogue Outputs:

  • 0-10 V, PWM, or phase cutting signal: 2 outputs.
  • 0-10 V, 0-20 mA, or 4-20 mA signal: 2 outputs (only for 'plus' models).
  • Resolution: 0.01 V for 0-10 V, 0.05 mA for 0-20 mA/4-20 mA.
  • PWM Signal: 0-10 VDC (+16% -25%), 10 mA max, 10 Hz...2 KHz frequency, 0...100% duty.

Digital Outputs:

  • SPST electro-mechanical relay, 3 A res. @ 250 VAC: 6 outputs (7 for 'plus' models).
  • Reinforced insulation between each digital output connector and other components.

Communication Ports:

  • INTRABUS port (RS-485 MODBUS master/slave): 1 port, 10 m (32.8 ft) max length.
  • RS-485 MODBUS port: 1 port (for 'plus' models), 1,000 m (3,280 ft) max length.
  • CAN port: 1 port (for 'CAN' and 'plus' models), up to 1,000 m (3,280 ft) max length, baud rates from 20,000 to 500,000 baud.
  • USB port: 1 port, 1 m (3.28 ft) max length.

Clock:

  • Drift: ≤ 60 s/month at 25 °C (77 °F).
  • Battery Autonomy: > 6 months (with secondary lithium battery).
  • Charging Time: 24 h (charged by device power supply).

Environmental Conditions:

  • Operating Temperature: 0 to 55 °C (32 to 131 °F).
  • Storage Temperature: -20 to 70 °C (-4 to 158 °F).
  • Operating Humidity: Relative humidity without condensate from 5 to 95%.
  • Pollution Status: 2.

Usage Features

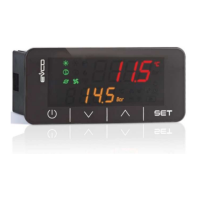
The c-pro 3 nano features a user-friendly interface with a double LED display (4 + 4 digits), function icons, and 4 capacitive touch keys, offering IP65 protection.

  • First-Time Use: Installation involves mounting, powering up for an internal test, configuring the device, disconnecting power, making electrical connections, and then powering up again.
  • Device Configuration: Access to configuration pages is managed via the DOWN key (held for 6s) to enter the "Menu InFo" submenu. Further navigation is done using UP/DOWN keys to select parameters and SET key to confirm. The ON/STAND-BY key returns to the main display.
  • Language Setting: The viewing language can be set via the "Menu EnG" submenu, selecting from available labels like "ItA" (Italian).
  • Date and Time Setting (c-pro 3 nano plus only): The date and time (year, month, day, hour, minute, second) can be set via the "Menu rtC" submenu.
  • Configuration Download/Upload: The device configuration can be downloaded to or uploaded from a USB flash drive. This involves connecting the USB drive, holding the DOWN key for 4s, navigating to the "Menu Strd" submenu, and using the SET key to initiate the transfer.
  • RS-485 MODBUS and CAN Network Termination: Micro-switches (1 for RS-485, 2 for CAN) on the device's left side allow fitting termination resistors to the first and last devices in the network to reduce signal reflections.
  • RS-485 MODBUS Network Polarisation: This can be configured using the UNI-PRO 3 development environment.

Maintenance Features

  • Electrical Connection Precautions: Ensure proper tightening torque for electrical screwdrivers. Allow the device to acclimatize for about an hour if moved from a cold to a warm place to prevent condensation. Verify that supply voltage, frequency, and power are within specified limits. Disconnect power before any maintenance.
  • Safety: The device is not to be used as a safety device. For repairs or further information, contact the EVCO sales network.
  • Disposal: The device must be disposed of according to local regulations for electrical and electronic waste.

Evco c-pro 3 nano plus Specifications

General IconGeneral
BrandEvco
Modelc-pro 3 nano plus
CategoryController
LanguageEnglish

Related product manuals