68 69
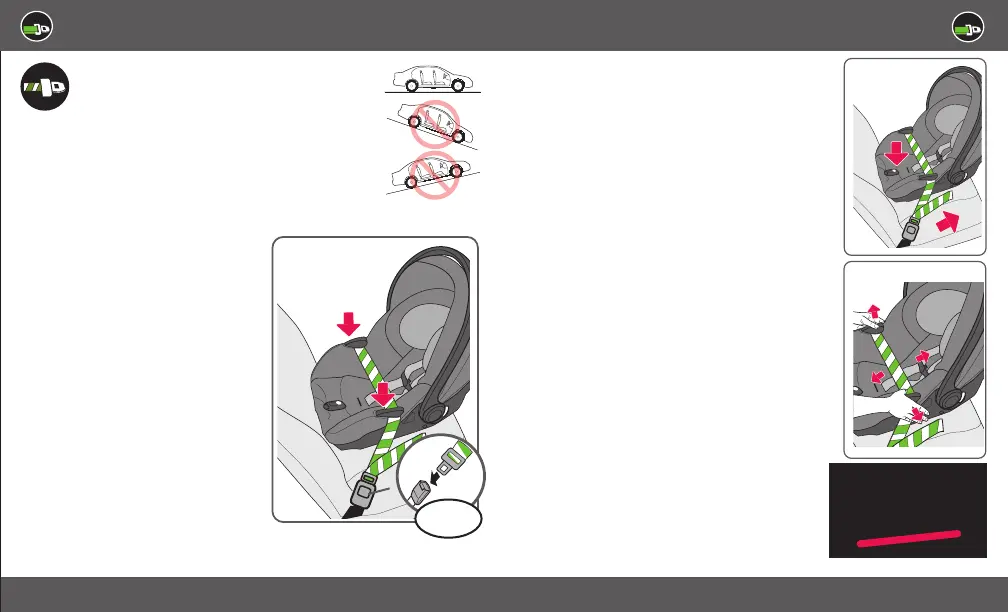
Push down in center of carrier to
tighten carrier against the vehicle
seat while pulling on the free end
of the vehicle belt. Once tightened,
tuck the free end of the strap near
the vehicle seat crease.
CHECK to make sure carrier is
secure by holding both sides near
the lap belt guides and moving
it from side to side and front and
back. The lap belt should not
loosen and the carrier should not
move easily. The carrier should not
move more than 2.5 cm (1 in.)
from side to side or front to back.
After installing carrier without base
check the RED level line on the
label to make sure that it is level
with the ground.
If seat is still not level, refer to
page 66-67, when using the
carrier WITHOUT the base.
BEFORE installing carrier, make
sure vehicle is on level ground.
Place carrier on an approved
vehicle seat location in a
rear-facing position.
CLICK!
Route the lap belt through
the lap belt guides on both
sides of carrier. Make sure
not to twist the belt and
make sure it lies flat.
Fasten the vehicle belt to
the buckle until it clicks into
place. If vehicle belt latch
plate does not lock, then
the retractor must lock.
CHECK the vehicle owner’s
manual and page 16-21
in this manual to see how
to lock your seat belt. If
seat belt does not lock, try
another seating position.
La línea ROJA
DEBE estar nivelada
con el piso cuando
está instalado en el
vehículo SIN la base.
RED line MUST be
level with the ground
when installed in vehicle
WITHOUT the base.
Installing the Carrier with the Vehicle
Seat Belt (cont.)
Installing the Carrier with the Vehicle
Seat Belt