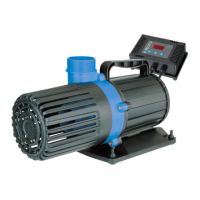
The Evolution Aqua Varipump is a fully controllable pond pump designed for large ponds, offering adjustable flow rates and energy consumption. It is available in three sizes: 10,000 lph, 20,000 lph, and 30,000 lph, making it suitable for running large ponds and filters in demanding situations. The pump can be used either as a submersible unit within the pond or installed externally, drawing water from the pond through a filtration system. Its motor is designed for quiet and reliable operation, delivering consistent performance while being economical to run.
Before installation or operation, it is crucial to read the entire instruction manual. Electrical installation must be performed by a qualified electrician in accordance with applicable electrical codes. Always shut off electrical power before any installation or servicing. A Residual Current Device (RCD) or Residual Current Circuit Breaker (RCCB) with a tripping current not exceeding 30mA must be installed in the supply circuit. The wiring must incorporate a means of disconnection from the supply with a contact separation of at least 3mm in all poles.
The pump's nameplate should be checked for voltage, amp draw, and cycle specifications. Do not use the power cord if there is any visible damage, or if it is in water, or if the motor or electrical receptacle is in contact with standing water. The power cord should only be plugged into a properly installed RCD, which should be tested regularly to determine its condition. Improper installation can lead to electrical hazards, property damage, serious injury, or death, and will void the warranty. The controller must not be submerged in water.
The Varipump should be operated within a permissible temperature range of 0°C to 35°C. Operating outside these temperatures may cause damage. Never operate the pump without water. Young children must always be supervised near ponds.
Disposal of Your Old Product:
The product is manufactured with high-quality, recyclable components. The crossed-out wheeled bin symbol indicates compliance with European Directive 2002/96/EC. Contact your local authority for correct disposal of electrical and electronic equipment. The WEEE Registration Number is WEE/FE1471RR. Do not dispose of old products with normal household waste; proper disposal helps prevent negative environmental and health consequences.
Technical Specifications:
| Model |
Inlet |
Outlet |
Max. Flow (Litres per hour) |
Max. Flow (Gallons per hour) |
Max. Flow (US Gallons per hour) |
Max. Head |
Dimensions (L x W x H) |
| Varipump 10000 |
1½" |
1½" |
10,000 |
2,200 |
2,642 |
3.1m |
267mm x 122mm x 162mm |
| Varipump 20000 |
2" |
2" |
20,000 |
4,400 |
5,283 |
5.5m |
319mm x 142mm x 181mm |
| Varipump 30000 |
2" |
2" |
30,000 |
6,600 |
7,925 |
5.5m |
370mm x 155mm x 205mm |
What's in the Box:
Varipump 10,000:
- Varipump 10,000 (Strainer Basket & Base Plate)
- Control Box
- Inlet & Outlet Connectors To 40mm Pipe
- Hosetail For Inlet / Outlet
- 1 x Washer For Hosetail
- 2 x O-Rings For Connectors (36.5mm OD x 2.65mm and 45mm OD x 33mm ID x 3mm)
Varipump 20,000 / 30,000:
- Varipump 20,000 / 30,000 (Strainer Basket & Base Plate)
- Control Box
- Inlet & Outlet Connectors To 50mm Pipe
- Hosetail For Inlet / Outlet
- 3 x Washers For Hosetail And Connectors (56mm OD x 45mm ID x 3mm)
Installation Advice:
For the Varipump 10,000, it is recommended to purchase two 1½" Single Unions (Threaded Female To Plain Female, EA Code: K82-76-55) to connect the inlet and outlet to 1½" Pressure Pipe. For Varipump 20,000 / 30,000, two 2" Single Unions (Threaded Female To Plain Female, EA Code: K82-76-66) are recommended for connection to 2" Pressure Pipe. These unions facilitate easy access for maintenance. Pressure pipe and fittings are available from Evolution Aqua stockists.
Connecting to Flexible Hose:
For Varipump 10,000, the supplied stepped hosetail allows connections to 38mm (1½”), 32mm, and 26mm flexible hose. For Varipump 20,000 & 30,000, connections to 50mm (2"), 40mm, and 32mm flexible hose are possible. When fitting the hosetail, ensure the flat washer is correctly seated inside the thread. It is advised to use the largest connection; therefore, smaller sections of the hosetail should be cut off to ensure sufficient water flow. Secure the flexible hose with a stainless steel hose clip (not provided).
Gravity Fed Set-Up:
- The pump suction line should be no smaller than 1½” (40mm imperial) or 50mm true metric.
- Use Single Unions (Threaded Female To Plain Female) to connect to Pressure Pipe.
- The suction line should have minimal bends or elbows and no air traps.
- Tighten pump fittings only enough to ensure a tight connection; excessive torque can damage the pump.
- All electrical wiring must be done by a qualified electrician according to local codes.
- The motor must be earthed.
- The weight of plumbing and fittings must be independently supported, not carried by the pump.
- The pump is not self-priming. If the water level is below the pump, a non-return valve must be installed below water level, and the pump and inlet line must be primed before start-up. A check valve is recommended for non-flooded installations.
- The controller must not be submerged in water.
- Do not operate the pump without water.
Pump Fed Set-Up:
Varipump can be submersed in water for pump-fed systems. Use the provided hosetails to connect to flexible hose (not supplied).
- Flexible hose should be the widest possible diameter.
- Extra steps on hosetails must be sawn off.
- A hoseclip (not supplied) must be used to secure the hose to the hosetail.
- Ensure sealing rings are properly fitted.
- If using pressure pipe, use appropriate Single Unions (Threaded Female To Plain Female).
- All electrical wiring must be carried out by qualified electricians according to local codes.
- The motor must be earthed.
- The controller must not be submerged in water.
- Do not operate the pump without water.
Setting Up the Varipump Control Box:
Consider the location of the control box relative to the mains power supply. The cable from the control box to the pump is 10 metres long, and the cable to the mains supply is 2 metres long. The control box is rated IPX4, making it weather/rain-proof for outdoor use, but it MUST NOT be submerged. Secure the control box to a wall using the four slots around its edge with appropriately sized screws and wall plugs.
If the pump is supplied with a plug, it can be cut off and removed, as the mains supply cable should be wired into a safe, compliant, outdoor electrical system with an RCD cut-off. Cutting the plug will not invalidate the warranty. The pump's cable has a weatherproof 4-pin connector that should be inserted into the control box connector, then slide the sleeve over and tighten.
Operating the Varipump:
Use the power button to turn the Varipump on or off. The display shows the operating wattage. Pressing the up or down buttons adjusts the flow rate, displaying a number between 0 and 100, indicating the percentage of power. ZERO means no flow, and 100 means maximum flow. After a few seconds, the display reverts to showing the current wattage. Fluctuations in displayed wattage are normal. If the display shows letters and numbers, it's a fault code; refer to the troubleshooting section.
General Operating Advice:
- Do not operate the Varipump without water.
- Do not use when temperatures are below 0°C or above 35°C. If water might freeze, remove the pump from the pond, dry it, and store it in a dry place for winter, reconnecting in spring.
- The Varipump is not self-priming. If the water level is below the pump, a non-return valve must be installed below the water level. The pump and inlet line must be primed before start-up. A check valve is recommended for non-flooded installations.
Maintenance Features - Cleaning the Varipump:
It is recommended to inspect and clean the Varipump once or twice per year. A QR code is provided in the manual for a cleaning video. Always turn off the power before removing the pump.
- Disconnect: Disconnect the pump from pipework or flexi-hose connections.
- Remove Strainer Basket: Remove the pump strainer basket (if applicable).
- Remove Base Plate: Remove the plate from underneath the pump.
- Unscrew Impeller Housing: Unscrew all four screws around the blue plastic impeller housing.
- Unscrew Handle: Unscrew the screw attached to the handle.
- Remove Handle: Remove the handle.
- Pull Impeller Housing: Carefully pull away the impeller housing.
- Clean Impeller: Use a brush to clean inside and around the impeller.
- Wipe Clean: Wipe clean to remove any excess dirt.
- Re-fit Impeller Housing: Re-fit the impeller housing, which can be positioned at multiple angles.
- Re-fit Handle: Re-fit the handle and tighten the screw.
- Re-fit Impeller Housing Screws: Re-fit all four screws around the impeller housing and tighten.
- Re-fit Base Plate: Re-fit the base plate.
- Clip Strainer Basket: Clip on the strainer basket (if applicable).
After cleaning, re-connect the inlet/outlet pipework and turn the power back on.
Troubleshooting - Control Box Fault Codes:
In case of an issue, a 3-digit fault code may appear on the control box screen. If digits are displayed but the pump is not working, pull out the power cord and restart.
- E01 (Pump is out of water): The pump is working without water.
- E02 (Over current): Abnormal load over current protection. Pull out the power plug and re-plug.
- E03 (Default phase): Bad contact or loose connection in the motor.
- E04 (Issue with power cable connecting pump to the control box): Check the cable for visible damage or loose connections inside the control box. Disconnect the pump from the mains, unscrew the control box, and check connections. If connections are fitted and the pump still doesn't work, the control box may be faulty and needs changing.
- E05 (Impeller stuck): Rotation clogging protection. If the pump still isn't working after three restarts, re-plug the power or clean the impeller.
- E06 (Over voltage): Over voltage protection when the working voltage is higher than the rated voltage.
- E07 (Under voltage): Low voltage protection when the working voltage is lower than the rated voltage.
Troubleshooting - General Symptoms:
- Insufficient Prime:
- Prime system with water and purge all air from suction piping.
- Wired incorrectly or an RCD has tripped.
- Pump has been switched off at the controller.
- No Flow:
- Ensure valves are open.
- Ensure plumbing is clear, including suction strainers, check valves, etc.
- Verify non-return valve orientation and direction of permitted flow.
- Clean out leaves or other debris from basket strainer (if applicable).
- Air leak: Fix air leaks at fittings, connections, strainer basket, etc. (typically on the intake side).
- System Incompatibility: Verify hydraulic compatibility (pump & pipe sized for the system).
- Cavitation: Verify airtight plumbing on suction plumbing (especially fittings), clean out leaves/debris from basket strainer, increase pipe size where possible, decrease suction pipe length, reduce number of elbows.
- Excessive Noise:
- Verify hydraulic compatibility (pump and pipe sized for the system).
- Wired incorrectly or an RCD has tripped.
- Pump has been switched off at the controller.
- Ensure valves are open.
- Ensure plumbing is clear, including suction strainers, check valves, etc.
- Verify non-return valve orientation and direction of permitted flow.
Guarantee:
This product comes with a two-year guarantee against defects in material and workmanship under normal usage from the date of purchase. The guarantee does not apply to improper use, negligence, lack of maintenance, or accidental damage. Moving parts or wearable parts, including the impeller, washers, and sealing rings, are not covered but are available to order. If the pump fails due to a manufacturing fault within this period, it will be repaired or replaced free of charge.
Should the product stop working, refer to troubleshooting first. If that doesn't help, return the product to the place of purchase. Liability is limited to replacement of the faulty product only; no other costs will be reimbursed. The guarantee is non-transferable and does not affect statutory rights. Tampering with or accessing electrical components inside the pump body will invalidate the warranty. The manufacturer or supplier is not responsible for damages caused by defective components, loss due to service interruption, or any consequential/incidental damages arising from the product's production, sale, use, or misuse. Any warranty claim requires a valid, dated proof of purchase. Evolution Aqua is not liable for loss of fish, plants, or livestock due to product failure or defect. Installation and use outside of recommendations in the manual may void the warranty.