16
Using eXact
®
reagent Standard liquid test procedure
Used for Cyanuric Acid (III)
1
, Fluoride
2
, Metals, and pH-BT
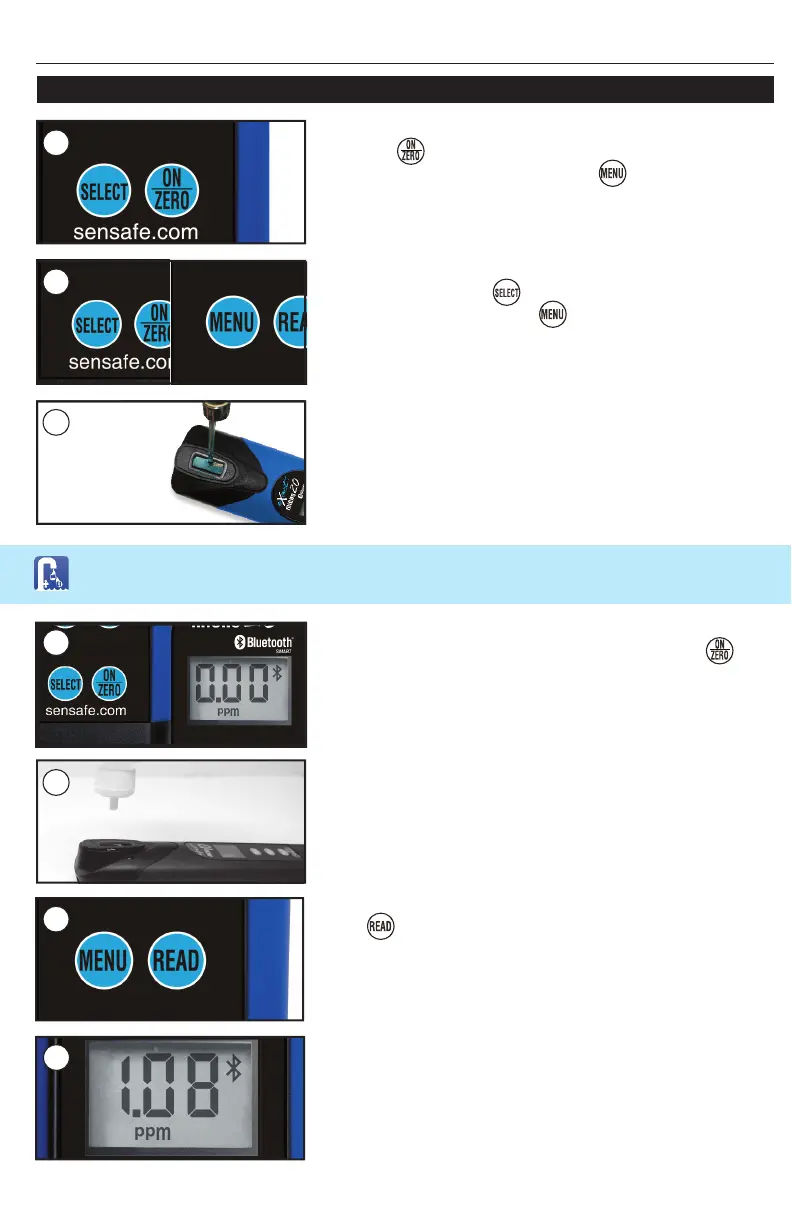
TURN METER ON
Press the button to power the meter on; the display will
show all annunciators, then the current
selection, followed
by the last reading.
RINSE CELL AND FILL WITH SAMPLE
Rinse the CELL at least 3 times with the water sample you
will be testing (rinsing minimizes the potential for cross–
contamination from a previous test). Finally, fi ll the CELL to
capacity with the water sample.
ZERO METER*
Cover the CELL with the CELL COVER and press the
button. The cursor will move across the display followed by a
display reading of 0.00 PPM. Tilt the meter to discard about
0.2mL water in order to leave room for liquid reagent. Sample
is ready for testing.
ADD DROPS
Remove the CELL COVER and, using the selected bottle of
reagent, add the required drops (see chart on pages 6–7) and
cover the CELL with the CELL COVER. Precaution: Ensure
that the bottle is straight when dispensing drops.
1
2
SELECT GROUP AND MENU
Press and re–press the button to Select your group.
Then, press and re–press the button to select the test
parameter (see chart on page 6–7).
3
4
PRESS READ & MIX
Press and a 20 second countdown begins. During this
time, turn the meter upside down repetitively. When the timer
displays ‘1’, place the Micro 20 on a fl at surface. Wait for
count– up time.
RECORD RESULT
The cursor will move across the display while the meter
prepares to measure the sample. Record the value displayed
for the respective parameter. This value is automatically stored
in its MENU and if using the eXact iDip
®
app, the result will
be saved in the app’s ‘RESULTS’. After testing, rinse cell
immediately and clean with brush.
6
7
5
Follow the steps to ‘SELECT CUSTOMER’ & ‘CONNECT DEVICE VIA BLUETOOTH’ before
proceeding (see page 12).
*For best accuracy, when testing outdoors in sunlight, place cap over cell cover