24
TURN METER ON
Press the button to power the meter on; the display will show annunciators, followed by
the current selection. It will then display the last reading.
3
High Range Chloride test procedure
This test requires a 1:20 dilution of the salt system sample – Mini Dilution Kit (Part No. 487202)
PREPARE SAMPLE FOR TESTING
Using the Mini Dilution Kit (Part No. 487202) and Distilled or Deionized (salt–free water)
prepare a 1 to 20 (1:20) dilution of your sample.
1
Follow the steps to ‘SELECT CUSTOMER’ & ‘CONNECT DEVICE VIA BLUETOOTH’ before
proceeding (see page 12).
PREPARE DILUTION SAMPLE
1. Rinse the syringe 3 times with salt system sample that you want to test by moving the plunger up and down.
2. Rinse 50 mL graduated conical tube with distilled or deionized (salt–free) water.
3. Rinse the 3.0 mL syringe with water sample to be tested. Fill the 3.0 mL syringe to the 2.0 mL line precisely
(plunger ring should line up at the 2.0 mL line and little or no air bubble should be present).
4. Add the syringe content (2.0 mL salt system sample) to the clean 50 mL graduated conical tube by pushing the
plunger all the way down to expel sample.
5. Fill the graduated conical tube to the 40 mL line with distilled or deionized (salt–free) water and place cap on top.
6. Mix content of graduated conical tube by turning upside down at least 3 times.
Sample is now ready for testing.
REMOVE STRIPS
Remove 1 eXact
®
Strip Micro Chloride Part No. 486757 from the bottle before beginning the
test. Set the strip in a dry, convenient place and recap the bottle immediately.
2
SELECT GROUP & MENU
Press and re–press the button to Select Group 3. Press and re–press the button to
select the CHH test parameter.
4
RINSE & FILL CELL WITH SAMPLE
Using the 1:20 Dilution Sample prepared above, rinse the CELL 3 times. Then fi ll the CELL
to capacity with the 1:20 Dilution Sample.
5
6
ZERO METER*
Press the button. The cursor will move across the display followed by 0.00 PPM. This will
indicate that the sample is ready for testing.
DIP STRIP & PRESS READ
Dip the Chloride III strip into the CELL, and immediately press . This starts a 20 second
countdown timer. During this time, move the strip in a gentle back and forth motion (approx.
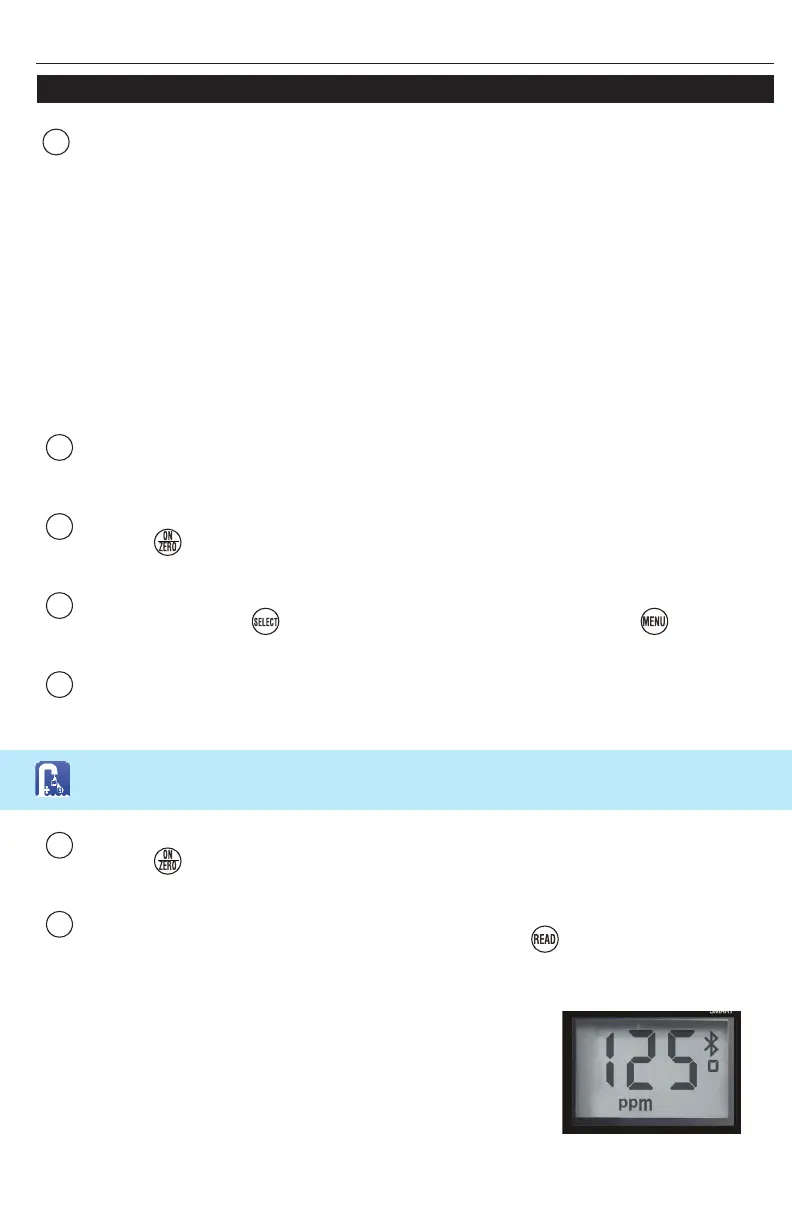
2 strokes/sec). Remove and discard the strip after ‘1’ on the display disappears.* The
cursor will move across the display, while the meter measures
the sample. Record the result displayed (this result is automatically
stored in CHH MENU and, if using the eXact iDip
®
app, will be
stored inthe app’s ‘RESULTS’). If result is greater than 999ppm
(ex. 1250ppm), a small “0” will appear at far right of the display. This
“0” represents the one’s digit (see image at right). After testing is
completed, rinse CELL immediately and clean with brush.
7
*For best accuracy, when testing outdoors in sunlight, place cap over cell cover