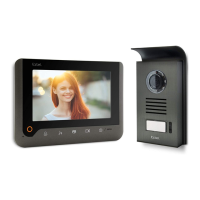
GB6
CFI EXTEL NOVA / NOVA WHITE / ICE - 11/2016
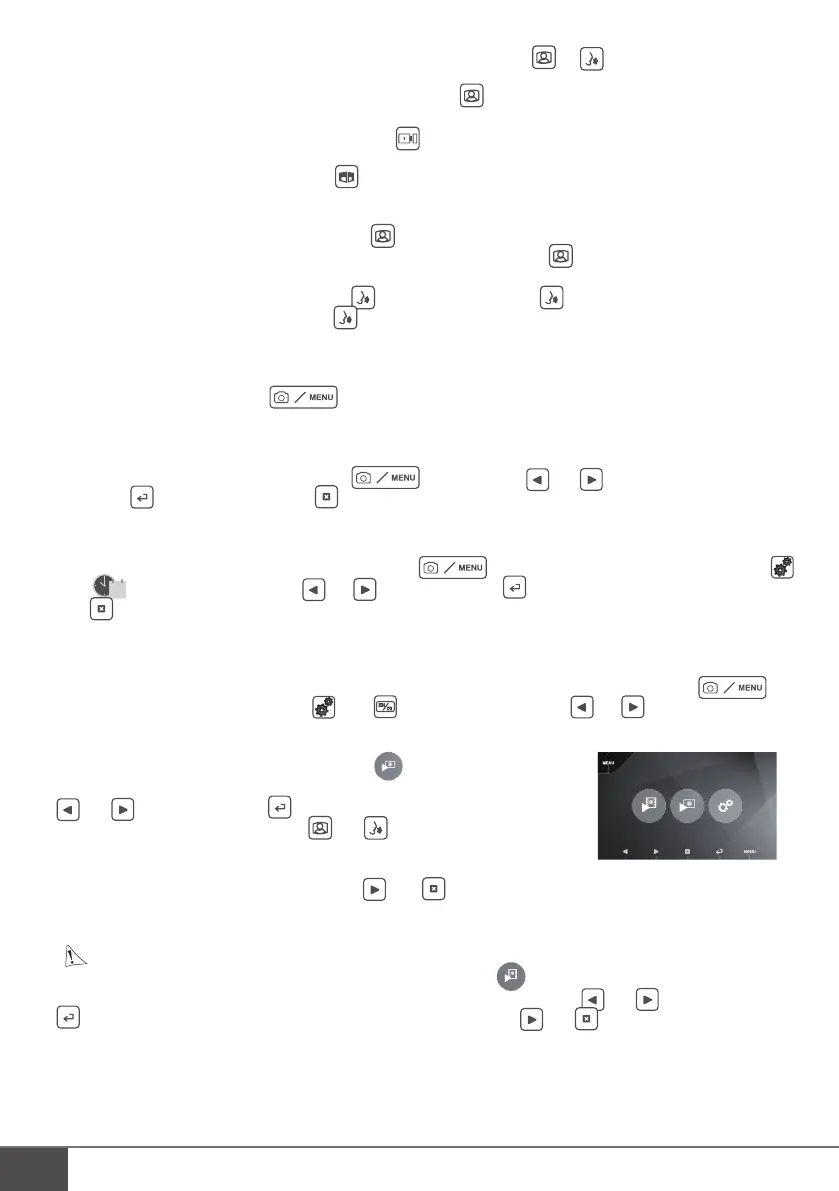
• When you have finished talking, wait for around 60 seconds or press the
or keys to turn the monitor off.
• Refreshing the picture:
To refresh the picture for an additional 60 seconds, press the key.
• Strike plate control:
The strike plate or the lock are activated when the key is pressed.
• Automatic opener control:
To control an automatic opener, press the key.
Note that the opener functions are only available when the screen is displaying the video
from outside.
• To activate the surveillance function, press the key.
• To view the additional camera (or the additional intercom panel) press the key again. Don’t forget to activate
the additional camera (or intercom panel) (see glossary 6 e.).
• To activate the intercom function, press the key. To answer, press the key on the monitor which receives
the call. To end the conversation, press the key again. Don’t forget to activate the additional monitor (see glos-
sary 6 e) to be able to call the other monitor through the intercom.
• Taking a photo or a video in manual mode. In monitoring mode, you can manually trigger the taking of one or
several photos (number of shots is adjustable) or the recording of a silent video (with the SD card, adjustable
length) by manually pressing the key.
e. Settings
• General information:
- To access the videophone’s menus, press the key and use the and cursors to move about in the
menus, the key to con rm and the key to exit.
- A call from the intercom panel turns the reading function off while the call is in progress. Then, the monitor
switches to “stand by” mode.
• Clock settings: To access the clock settings, press the key then select the “configurations” menu
then
18
whilst navigating with the and keys. Validate with , once the con guration is complete, exit
with
.
The clock will appear on the screen (in sleep mode) and the photos and videos generated by the videophone will
be labelled according to these dates and times.
• Settings in visitor recording (video or photo) mode: To access the appropriate menu, press the key
then select the “configurations” menu then whilst navigating with the and keys.
• Photo:
You can view your photos from the Photo menu .
- View them by going into the Photo menu and then choosing a photo using the
and keys then press the key.
- To navigate between photos, use the and keys.
If you have an SD card: the Photo menu only applies to photos on the SD card. The
photos on the internal memory are not accessible.
You can delete the selected photo by pressing and
.
Supported photo format: JPEG.
• Video:
The video function is only available if an SD card is inserted.
You can watch the recordings of your visitors from the Video menu .
- Watch your videos by going to the Video menu and choosing a video using the and keys, then press the
key to play the video. You can delete the selected video by pressing and
.
Supported video format: AVI.
Warning: Videos will only be recorded on your SD card.