6
•
Repeat punching and insert i n g
, as necessary, until all pages are in the comb. Then
insert the back cover.
•
Push the com b lev er
*
back to its original, horizontal position and lift out the bound
d o c u m e n t .
Pushing the machine beyond its punching capacity may cause it to jam. If this happens, the
green standby light
(
will turn red on the electric model, and with the manual model, you
will not be able to lower the arm to its horizontal position.
Do not tear out sheets
in an effort to clear the jam. This will clog the cutting area and most likely necessitate a
repair. Instead, follow the
jam-clearing pr o c e d u re
for your model :
•
M a n u a l
– Raise the punching bar
.
and lower it with as much strength as you can,
repeating this as many times as necessary to cut through all of the sheets.
•
E l e c t r i c
– Press, but do not hold, the start button
)
and wait for the motor to stop. If this
has cleared the jam, the standby light
(
will turn green again and you may continue, ide-
ally with fewer sheets. If it does not, repeat this process until it does, always waiting for the
motor to stop before pressing the button
)
the next time.
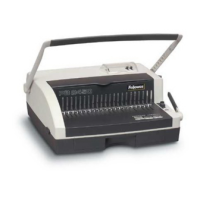
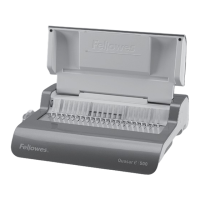
Ring Binder Punching
With the PB 2450 and the PB 2650E, you are also able to punch paper and covers for the
s t a n d a rd European (4 holes) or US (3 holes) ring binder
. Your machine has the same
heavy-duty punching capacity in this function as it does in comb punching, although its
total sheet capacity remains the same. If for some reasons you wish to use both functions
simultaneously, the combined number of sheets in both entries should therefore not exceed
the maximums listed in P roduct Pro f i l e and printed in the waste drawer
+
.
To use the
ring binder
punch:
•
Adjust for document size, if necessary
. Your machine is factory-set to punch holes in
the A4 or letter size format, depending on your geographic region, but if your sheets are
somewhat larger or smaller, you may need to improve the centering. Put the long side of a
sample sheet into the ring binder-punch entry
#
and punch it according to the standard
punching procedure (page 4). If the row of holes is not centered along the document edge,
turn the document wheel
%
a little in one direction or the other and retest.
• Punch sheets in batches
of no more than 25 (manual) or 30 pages (electric) using the
same procedure. As with comb punching, you may also punch 2 to 4 covers or similarly
heavy sheets, depending on the material.
If you have a European machine, for much smaller documents, such as A5, you can also
punch in a
2- hole
format:
• Fold a sample sheet in half (top to bottom), or draw a line through the middle
• Lay this “guide” on top of the batch you want to punch
• Place the stack into the entry
#
, lining it up with the center mark on the machine, and
• Punch according to standard punching procedures.