13
(1
:$51,1*
$OZD\VNHHSKDQGVDZD\IURPWKHFXWWLQJ
DUHD DQG GR QRW WU\ WR DSSURDFKLW ZKHQ
WKHPDFKLQHLVUXQQLQJ
,W LV VHYHUHO\ SURKLELWHG WR XVH WKH
PDFKLQHIRUFDUU\LQJRXWEOLQGFXWV
%HIRUHHDFKRSHUDWLRQDOZD\VFKHFNWKDW
DOOORFNLQJNQREVDQGOHYHUVDUHVHFXUHO\
WLJKWHQHG
,W LV VHYHUHO\ SURKLELWHG WR XVH WKH
PDFKLQH LI WKH SRZHU VZLWFK LV IDXOW\ LQ
DQ\ZD\
%HIRUH VWDUWLQJ WKH PDFKLQH DOZD\V
FKHFN WKDW DOO WKH JXDUGV DUH FRUUHFWO\
LQVWDOOHGDQGDGHTXDWHO\SURWHFWWKHEODGH
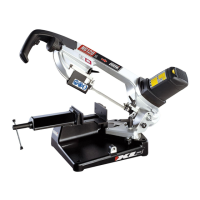
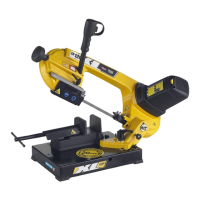
86($6$&877,1*2))0$&+,1(FXWWLQJ
RQWKHORZHUZRUNVXUIDFH)LJ
Release the head, by unscrew the block pin
.
Raise the machine head as far as possible.
Secure the work piece firmly against the angular
bearings
of the base with your left hand, thus
ensuring absolute immobility during cutting.
Put your right hand on the handgrip
and press the
button
in order to release the head.
Actuate the motor by pressing first the main switch
release device
and then the main switch start
button
on the handgrip.
Lower the head and gradually bring the blade into
contact with the work piece.
Complete cutting and raise the head to its original
position.
Turn off the motor by release the main switch button
.
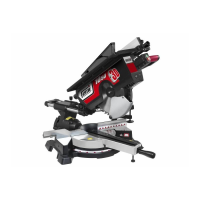
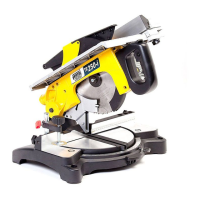
86($6$&,5&8/$56$:FXWWLQJRQWKH
XSSHUZRUNVXUIDFH)LJ
:$51,1* %HIRUH FRPPHQFLQJ DQ\
RSHUDWLRQRQWKHZRUNVXUIDFHFKHFNWKDWWKH
KHDG LV FRUUHFWO\ EORFNHG LQ WKH ORZHUHG
SRVLWLRQ
:$51,1* :KHQ ZRUNLQJ RQ WKH XSSHU
VXUIDFH LW LV DEVROXWHO\ QHFHVVDU\WR LQVWDOO
WKHORZHUVDIHW\JXDUGVXSSOLHG
:$51,1* 7KH PDFKLQH LV HTXLSSHGZLWK D
SXVKHU WKH GLPHQVLRQV DQG VKDSH RI ZKLFK
DUHLQFRPSOLDQFHZLWKWKH6DIHW\6WDQGDUGV
)LJ
:KHQ WKH PDFKLQH LV XVHG DV ',6. 6$:
WKXVXVLQJWKHXSSHUWDEOHIRUWKHPDFKLQLQJ
RSHUDWLRQVVXFKILWWLQJ 0867 DEVROXWHO\ EH
XVHG
+ROG SXVKHU IURP VLGH $ ZKLOH VLGH %
HTXLSSHG ZLWK GLIIHUHQW VWHSV WR PDWFK
GLIIHUHQW WKLFNQHVV VL]HV PXVW EH SXW LQ
FRQWDFWZLWKWKHSLHFHWR
WKHILJXUH7KHSLHFHWREHFXWFDQEHSXVKHG
E\PHDQVRIWKHSXVKHUZKLFKVLPXOWDQHRXVO\
GULYHVDQGUHVWLWRQVTXDUH&WKXVHQDEOLQJ
WR NHHS KDQGV DZD\ IURP WKH EODGH FXWWLQJ
DUHD
When the motor is off, lower the machine head and
block it by means of the block pin
.
Adjust the height of the upper work surface according
to the cutting height desired and adjust the bearing
bracket as described in the paragraph
"ADJUSTMENTS".
Check that the removable upper shield is not faulty:
after having lifted it slightly, it must return to its orginal
position, covering the blade completely.
Start the motor as described at point
, and lock the
main switch in “ON” position by means of the locking
device
in the lower zone of the handgrip.
piece to be cut on the work surface,
placing it laterally against the bracket and then move
the work piece slowly and gradually towards the blade.
&$87,21 7KH ZRUN SLHFH PXVW DOZD\V EH
KHOGILUPO\SD\LQJDWWHQWLRQQRWWRKROGLWQHDU
WKHFXWWLQJDUHD
to turn off the machine, push the start button
of the
main switch, automatically release the locking device
.
,167$//$7,21$1'255(3/$&(0(172)
7+(%/$'()LJ
:$51,1*
7KLV SURFHGXUH PXVW EH FDUULHG
RXWRQO\DIWHUKDYLQJWXUQ
PRWRUE\UHOHDVLQJWKHPDLQVZLWFKEXWWRQ
Release the movable shield
and simultaneously raising the shield so as to
uncover the blade.
Use the two Allen wrenches supplied: insert the one
for 6 mm. socket-head screws in the terminal
of
the driving shaft and the one for 8 mm. socket-head
screws in the blade’s fixing screw
; then loosen the
screw, taking in mind that the screw thread is left-
handed.
 Loading...