3) ENERGÍA SOLAR
1. Selector de Fuente de Energía Configure el en la posición de "Batería Li-ion"
Li-ion
2
Mientras más tiempo deje la unidad bajo
la luz solar directa más energía estará generando, y podrá escuchar la
radio por más tiempo (solamente recepción de radio).
.Ponga la unidad bajo la luz solar directa, asegurándose de que el panel
solar de la unidad se encuentre de cara al sol. Si la luz solar es lo
suficientemente fuerte, se encenderá el indicador de carga, lo cual indica
que la unidad se está cargando.
Nota: Si la batería se encuentra totalmente agotada (no funciona ni la pantalla
LCD del reloj ni la luz LED), podría ser necesario que la exponga más tiempo a
la luz directa del sol para cargar la batería utilizando el panel solar. Deberá
utilizar alguno de los otros métodos de energía que están disponibles si
necesita utilizar inmediatamente su radio.
4) Energía a través de USB
La unidad cuenta con un mini conector USB en el respaldo de la unidad
bajo la Cubierta de hule contra el polvo.
1
(no incluido), y conéctelo al puerto USB al respaldo de la unidad.
.Utilice el enchufe de un adaptador AC de 5V DC, 500mA para mini USB
2
y enchufe el adaptador AC a un tomacorriente doméstico de 120V AC, 60Hz.
.Coloque el Selector de Fuente de Energía en la posición de "Batería Li-ion "
Li-ion
Nota: El adaptador de alimentación USB (no incluido) se ha descrito anteriormente
es del mismo tipo comúnmente utilizado en smartphones. También es necesario
para cargar la unidad a través del mini jack USB situado en la parte posterior de la
unidad USB a mini cable USB (no incluido).
INDICADOR DE BATERÍA BAJA
Cuando utiliza energía por medio de baterías para operar esta unidad y la
potencia de la batería se debilita, aparecerá el ícono de batería baja
parpadeando en la pantalla LCD. Se recomienda que cargue la batería
recargable o que sustituyas las baterías secas agotadas de inmediato.
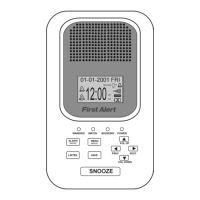
CONFIGURACIÓN DEL RELOJ
Cuando la unidad está en modalidad en espera:
Configuración de formato de12/24 horas
1
ingresar a la modalidad de configuración del reloj, y el formato de
12 horas (12 Hr) aparecerá parpadeando.
.Oprima y sostenga el botón de MODALIDAD durante 2 segundos para
2
12 horas (12Hr) o de 24 horas (24Hr), luego oprima el botón de MODALIDAD
para confirmar. Los dígitos de las horas aparecerán parpadeando esperando
ser configurados.
.Dé un toquecito al botón SINTONIZAR para seleccionar el formato de
8
Note: If the battery is completely drained (LCD clock display and LED
light do not work), it may require very long exposure to direct sunlight
in order to charge the battery using the solar panel. You should use one
of the other power modes available if you need to use the radio
immediately.
4) USB Power
The unit has a mini USB jack on the back of the unit under the Rubber
Dust Cover.
1
(not included), and connect it to the USB port on the back of the unit.
.Use the mini USB plug side of a 5V DC, 500mA output AC adaptor
2
the AC adaptor into an 120V AC, 60Hz household outlet.
.Set the Power Source Selector to "Li-ion Battery" position and plug
Li-ion
2
More power is
generated the longer you leave the unit in direct sunlight, and the
Radio listening time will be extended (Radio reception only).
.Put the unit in direct sunlight, making sure the solar panel of the unit is
facing towards the sun. If the sunlight is strong enough, the charging
Indicator will light indicating the unit is charging.
LOW BATTERY INDICATOR
When using battery power to operate this unit and the battery power
becomes weak, the low battery icon will appear & flashing on LCD
display. You are recommended to charge the rechargeable battery or
replace the exhausted dry cell batteries immediately.
Note: The USB power adaptor (not included) described above is the same
type commonly used with smartphones. A USB to mini USB cord
(not included) is also required for charging the unit via the mini USB jack
located on the back of the unit.
CLOCK SETTING
When the unit is in standby mode:
Setting 12/24 Hour format
1
mode, 12 hour format (12 Hr) flashing.
.Press and hold the MODE button for 2 seconds to enter clock setting
2
format, then press MODE button to confirm. Hour digits flashing to
prompt for input.
.Tap the TUNE button to select 12 hour (12Hr) or 24 hour (24Hr)
Setting Clock
3
hold the buttons to speed up the forward or reverse scanning of the digits.
.Tap the TUNE button repeatedly to set the hour value. Press and
Note: Make sure the hour is set so that the AM or PM indicators are
displayed correctly.
8
 Loading...