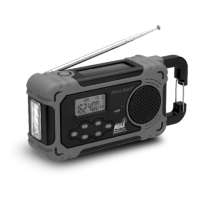
13.Antena Telescópica
15.Compartimiento de la batería
16 Cubierta de hule contra el polvo.
17. Cubierta de hule contra el polvo)Puerto Mini USB DC (ubicado bajo la
18. Cubierta de hule contra el polvo)Indicador de Carga (ubicado bajo la
19 Cubierta de hule contra el polvo).Puerto USB de carga (ubicado bajo la
20 Cubierta de hule contra el polvo).Conector para audífonos (ubicado bajo la
21 Cubierta de hule contra el polvo).Selector de fuente de energía (ubicado bajo la
22 Cubierta de hule contra el polvo).Botón para reiniciar (ubicado bajo la
23.Manivela de arranque
14.Gancho metálico
14
13
16
15
23
17 18 19 20 21 22
FUENTE DE CORRIENTE
Este radio está diseñado para operar con múltiples fuentes de energía.
5
IMPORTANTE: Si Saque la ficha de aislamiento para activar la batería
recargable interna y la pantalla no se enciende o la pantalla se enciende,
pero la radio y la linterna no funcionan, usted necesita restablecer la
unidad usando los siguientes procedimientos.
volver al funcionamiento normal. Por favor vea a "Restablecimiento de
la unidad" en la sección de cuidado y mantenimiento de este manual.
1.Presione el botón RESET en la parte posterior y el FA1160 deben
2.Si aparece el icono de batería baja en la pantalla, completamente
recargar la batería interna recargable o utilizar baterías "AAA".
13.Telescopic Antenna
15.Battery Compartment
16 Rubber Dust Cover.
17. Rubber Dust Cover)Mini USB DC Input Port (located under the
18. Rubber Dust Cover)Charging Indicator (located under the
19 Rubber Dust Cover).USB Charging Port (located under the
20.Headphone Jack (located under the Rubber Dust Cover)
21 Rubber Dust Cover).Power Source Selector (located under the
22 Rubber Dust Cover).Reset button (located under the
23.Crank Handle
14.Metal Hook
14
13
16
15
23
17 18 19 20 21 22
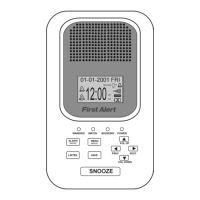
POWER SOURCE
This radio is designed to operate on multiple power sources.
IMPORTANT: If you pull the insulation tab out to activate the internal
rechargeable battery and the display does not turn on or the display comes
on, but the radio and flashlight do not work, you will need to reset the unit
using the following procedures.
normal operation. Please see “Resetting the Unit” under CARE AND
MAINTENANCE section of this manual.
1.Press the RESET button on the back and the FA1160 should return to
2
rechargeable battery or use fresh “AAA” batteries.
.If low battery icon appears on the display, fully recharge the internal
5