Instruction Manual
D102005X012
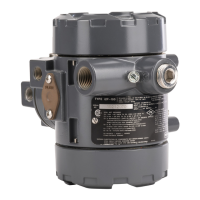
846 Transducer
June 2017
12
Figure 6. Typical Transducer Mounting with Universal Mounting Bracket (continued)
mm
(INCH)
30
(1.18)
23
(.89)
4 X 10 (0.375)
5 X 10 (0.375)
89
(3.50)
89
(3.50)
59
(2.312)
29
(1.16)
29
(1.13)
38
(1.50)
U‐BOLT SLOTS
19 (0.75)
29
(1.125
57
(2.25)
2 X 10 (0.375)
4 X 5 (0.188)
DETAIL “A” MOUNTING BRACKET
DETAIL “B” ADAPTER PLATE
FOR STAINLESS STEEL HOUSING,
ALIGN 4 HOLES WITH I/P HOUSING
FOR ALUMINUM HOUSING,
ALIGN 3 HOLES WITH I/P HOUSING
NOTES:
1. ATTACH THE BRACKET SHOWN IN DETAIL “A” TO THE TRANSDUCER
2. ATTACH THE ADAPTER PLATE SHOWN IN DETAIL “B” TO THE VALVE OR PIPE.
3. CONNECT THE TWO PIECES.
34B4990‐C
34B5000‐B
E0787
ADDITIONAL ADAPTOR PLATE (PART NUMBER 03311‐0318‐0001)
REQUIRED FOR I/P WITH STAINLESS STEEL HOUSING
38
(1.50)
U‐BOLT SLOTS
19 (0.75)
29
(1.125
57
(2.25)
2 X 10 (0.375)
4 X 5 (0.188)
03311-0318
The mounting boss for the air supply connection contains two 5/16‐18 UNC tapped holes that are 2‐1/4 inches apart.
The tapped holes allow direct connection (integral mount) of a 67CFR filter‐regulator, if desired. When the
filter‐regulator is factory mounted, the mounting hardware consists of two 5/16‐18 x 3‐1/2 inch stainless steel bolts
and one O‐ring. When the filter‐regulator is field mounted, the mounting hardware consists of two 5/16‐18 x 3‐1/2
inch stainless steel bolts, two spacers (which may or may not be required) and two O‐rings (of which only one will fit
correctly into the housing O‐ring groove and the other may be discarded). This is due to the fact that the current
housing has been slightly modified from its original design, hence, the additional hardware (if needed) when field
mounting the 67CFR filter‐regulator.