Instruction Manual
D102005X012
846 Transducer
June 2017
15
Connect the positive signal lead to the positive terminal, marked +. Connect the negative signal lead to the negative
terminal, marked -.
Note
Units with the Remote Pressure Reading (RPR) option may cause interference with the analog output signal from some
instrumentation systems. This problem may be solved by placing a 0.2 microfarad capacitor or a HART filter across the output
terminals.
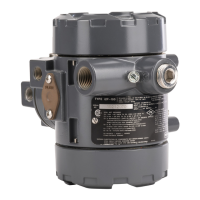
Venting Ports
WARNING
This unit will vent to the atmosphere through the stroke port in the module cover and the exhaust port, located under the
nameplate. Do not remote vent this unit.
Stroke Port
The constant bleed of supply medium from the pilot stage is directed out the stroke port, which is a screened hole
located at the center of the module cover. Figure 4 shows the location of the stroke port.
Before installing the transducer, ensure the stroke port is clear. Do not mount the transducer in a location where
foreign material may cover the stroke port. For information on using the stroke port, refer to the Troubleshooting
section.
Exhaust Port
The transducer exhausts through a screened port located beneath the instrument nameplate. Figure 4 shows the
location of the exhaust port. The nameplate holds the screen in place. Exhaust will occur with a reduction in output
pressure. The transducer should not be mounted in a location where foreign material may clog the exhaust port.
Signal Interruption
Upon loss of input current, or if input current decreases below 3.3 $0.3 mA, the output of the direct action unit will
decrease to less than 0.1 bar (1 psi).
In the same situation, the output of the reverse action unit will increase to near supply pressure.