Instruction Manual
D101554X012
Vee-Ball Valves
June 2017
13
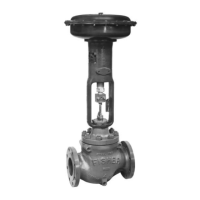
Figure 6. Typical Vee‐Ball Valve Showing Pry Bar
BALL
ACTUATOR SIDE
OF VALVE
58B2296‐B
E0739
THRUST AND BEARING SURFACE
PRY IN THIS DIRECTION
WARNING
Perform the steps in the WARNING at the beginning of the Maintenance section of this manual.
1. Remove line bolting, remove the control valve from the pipeline, and place the valve on a flat surface with the seal
protector ring facing up. Carefully rotate the ball to the open position.
2. Remove protector ring screws and washers (keys 21 and 22). Carefully remove the seal protector ring and gasket
(keys 3 and 15). (For flow ring constructions, go to step 4.)
a. For a Fisher TCM seal, remove the seal (key 11) from the valve body. For NPS 1, 1-1/2, and 2 valves, also remove
the backup ring (key 14, figure 8) from the valve body.
b. For a flat metal seal, remove the spring seal, seal, and shims (keys 13, 11, and 12). (Note: It may be necessary to
re‐use some of the original shims when reassembling the flat metal seal.)
c. For an HD ball seal or a high temperature HD ball seal, once the protector ring has been removed from the valve,
push the metal seal (key 11) out of the seal protector ring (key 3). Remove the wave spring (key 13), and on the
HD metal seal, the radial seal (key 37).
Note
The high temperature HD ball seal also has a piston ring (key 133) that will need to be removed. It will be in two pieces for the NPS
1, 1-1/2 and 2 valves, and one piece with a break in it for the NPS 3 through 12 valves.
CAUTION
Exercise care to avoid damaging components in the following procedure.
 Loading...