EasyManua.ls Logo

Floe 510-27400-00 - User Manual

Default Icon
20 pages
Print Icon
To Next Page IconTo Next Page
Loading...
SHEET 1 OF 20
FLOE QUICK ATTACH ROLL IN
DEEP WHEEL KIT
ASSEMBLY INSTRUCTIONS AND OWNERS MANUAL
4’, 5’, 6’ & 8’ WIDE DOCK SECTIONS
KIT P/N 510-27400-00, 510-27410-00
TOOLS REQUIRED
-(2) 9/16” SOCKETS/WRENCHES
-3/4” SOCKET/WRENCH
-CORDLESS DRILL WITH SOCKET
ADAPTER & 1-1/8” SOCKET OR
FLOE SPEED WRENCH
-TORQUE WRENCH
-TAPE MEASURE
-LEVEL
-BLOCKING MATERIAL
INSTRUCTION P/N: 610-27400-00
RELEASED 9/2/22
© Manufactured by:
Floe International Inc.
48473 State Hwy. 65
McGregor, MN 55760
www.floeintl.com
*DOCK NOT INCLUDED
NOTE:
FOR USE IN APPROXIMATELY
33”-61” OF WATER
WE RECOMMEND THAT THE
LOWER DOCK FRAME IS A
MINIMUM OF 8” ABOVE THE
WATER WHEN PROPERLY
ADJUSTED. HOWEVER, IF YOU
HAVE HIGH WAVE
CONDITIONS THAT
COMMONLY EXCEED 15”, WE
RECOMMEND THAT YOU RAISE
YOUR DOCK ACCORDINGLY.
NEVER ADJUST YOUR DOCK LEGS WITH
AN IMPACT WRENCH. NEVER ADJUST
YOUR DOCK LEGS WITH MORE THAN 15
FT-LBS OF FORCE. APPLYING TOO MUCH
FORCE TO YOUR DOCK LEGS WILL
DAMAGE THE MECHANISM.
Question and Answer IconNeed help?

Do you have a question about the Floe 510-27400-00 and is the answer not in the manual?

Summary

FLOE Quick Attach Roll In Deep Wheel Kit Assembly

Safety Warning: Dock Leg Adjustment Force

Never adjust dock legs with an impact wrench; excessive force can damage the mechanism.

Water Depth and Clearance Notes

Recommended water depth range and dock frame height above water.

Required Tools for Installation

List of tools needed for proper assembly and adjustment of the wheel kit.

Dock Leg Adjustment Guide

Water Depth and Clearance Requirements

Specifies water depth range and recommended dock frame height above water.

Critical Safety Warning: Leg Adjustment Force

Warning against using impact wrenches and exceeding force limits on dock legs.

Bill of Materials & Exploded View (Pair)

Parts List for QA Deep Wheel Kit (Pair)

List of main components and part numbers for the dual-wheel kit.

Fasteners for QA Deep Wheel Kit (Pair)

Detailed list of fasteners and their specifications for the dual-wheel kit.

Bill of Materials & Exploded View (Single)

Parts List for QA Deep Wheel Kit (Single)

List of main components and part numbers for the single-wheel kit.

Fasteners for QA Deep Wheel Kit (Single)

Detailed list of fasteners and their specifications for the single-wheel kit.

Sundeck Installation Overview

Wheel Orientation Note

Important note regarding the orientation of wheels during sundeck installation.

Assembly Step 1: Dock Preparation

Invert Dock and Protect Surface

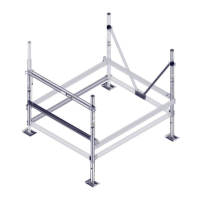
Turn the dock upside down and use blocking to protect the deck surface.

Attach Brackets to Dock Pockets

Install 1/2" bolts and nuts into dock pockets and slide brackets onto legs.

Assembly Step 1: Wheel Kit Mounting

Standard Wheel Kit Mounting

Mount wheel kits with spindles facing outwards for standard installation.

Alternative Mounting for Clearance

Option to turn wheel kits 180° for boat lift clearance, noting potential stability loss.

Torque Specification for 1;2 Bolt

Torque the 1/2" bolt to 20 ft-lbs for secure mounting.

Assembly Step 2: Brace Attachment

Attach Center Braces

Connect 26" center braces to the wheel kit leg bracket using specified hardware.

Attach Side Braces

Connect 26" side braces to the wheel kit bracket using specified hardware.

Assembly Step 2: Brace Connections

Secure Side Braces to Bracket

Attach 26" side braces to the side brace bracket with hardware.

Connect Center Braces to Dock

Attach center braces to the dock bracket, noting variations for single leg kits.

Install Side Brace Brackets

Place side brace brackets into the dock side for final attachment.

Assembly Step 2: Final Brace Fastening

Insert Bottom Bracket Bolts

Insert two 3/8" X 1" bolts into the bottom of the bracket.

Torque and Overtightening Warning

Torque to 6 ft-lbs; overtightening will crush braces.

Assembly Step 3: Wheel Installation

Mount Wheels and Washer on Spindle

Slide wheel onto spindle, then place a washer onto the spindle.

Secure Wheel with Spindle Clip

Insert spindle clip legs into spindle holes to secure the wheel.

Assembly Step 4: Dock Section Connection

Position Dock Upright

Turn the dock to its right side up for connection.

Attach Quick Connects

Install quick connects to the wheel kit end of the dock section.

Assembly Step 4: Side Dock Connections

Side-Mounted Quick Connect Placement

Position quick connects as shown for side-by-side dock connections.

Fasten Side Quick Connects

Attach side-mounted quick connects using a 3/8" X 1" bolt each.

Assembly Step 4: Dock Alignment and Securing

Space Quick Connects for Stability

Spread quick connects wide to prevent shifting of joined sections.

Use Installation;Removal Position

Utilize the installation/removal position for connecting/disconnecting sections.

Dock Height Adjustment and Leveling

Adjust Dock Frame Height

Set dock frame approximately 8" above water using adjustment nut.

Leveling Dock Surfaces

Use a level to ensure all dock surfaces are properly leveled.

Drill Usage Safety Warning

Caution regarding cordless drill clutch mode and corded drill use.

Impact Wrench Prohibition

Warning against using impact wrenches; do not force adjustment nuts.

FLOE Dock System Limited Warranty

Two-Year Parts and Labor Warranty

Covers parts and labor for the first two years post-purchase.

15-Year Dock Frame & Deck Warranty

Warranty for structural components of aluminum dock frame and deck.

Decking Material Warranty

Warranty terms for carpet and cedar dock decking materials.

Accessory and Float Warranty Details

10-Year Accessory and Wheel Kit Warranty

Pro-rated warranty for dock accessories and wheel kits.

12-Year Dock Float Warranty

Warranty for FLOE floating dock system floats against deterioration.

Warranty Exclusions and Owner Rights

Information on exclusions, unauthorized repairs, and customer rights.

Warranty Claim Submission Process

Steps for contacting dealer and submitting a warranty claim.

FLOE Product Warranty Registration

Online Registration Instructions

Guidance on registering FLOE products online for warranty validation.

Customer Information and Purchase Influences

Sections for registration details and reasons for product purchase.

Floe 510-27400-00 Specifications

General IconGeneral
BrandFloe
Model510-27400-00
CategoryBoating Equipment
LanguageEnglish

Related product manuals