1-8
Flowserve Corporation, Valtek Control Products, Tel. USA 801 489 8611
Tighten the stem clamp bolting. Proper tightness is
important since this adjustment secures the actua-
tor stem to the plug stem. Adjust the stroke plate so
the stem clamp points to the “closed” position.
12. If the valve has been taken out of the line, make sure
the flow arrow indicates proper flow direction upon
reinstallation.
Table III: Suggested Bonnet Bolting
Torque Values (ft-lbs / Nm, ±10 percent)
Bolt
Size Carbon Stainless
(inches) Steel Steel
5
/8 80 / 108 50 / 68
3
/4 140 / 190 90 / 122
7
/8 230 / 312 150 / 203
1 350 / 475 220 / 298
1
1
/8 510 / 690 330 / 447
1
1
/4 730 / 990 460 / 624
1
3
/8 990 / 1342 630 / 854
1
1
/2 1320 / 1790 840 / 1140
1
5
/8 1710 / 2318 1080 / 1484
1
3
/4 2170 / 2942 1400 / 1898
1
7
/8 2700 / 3660 1700 / 2305
2 3350 / 4542 2100 / 2847
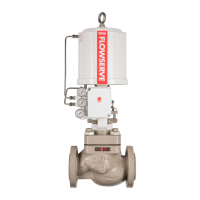
Disassembling the Actuator
With air-to-open valves, the actuator may be disas-
sembled while on the valve. With air-to-close valves,
the actuator must be removed from the valve prior to
disassembly. To disassemble the actuator, refer to
Figures 1, 3 and 5 then proceed as follows:
NOTE: Steps 1 through 4 apply to removing the actua-
tor from the valve. If disassembly is to take place with
the actuator still attached to the valve, go on to step 5.
1. Make sure the plug is neither seated on the seat ring
nor back-seated against the bonnet by attaching an
air hose on the appropriate side of the cylinder and
release the pressure on the opposite side.
CAUTION: Galling of critical surfaces may re-
sult if the plug is not positioned correctly be-
tween the seat ring and bonnet.
2. Loosen the stem clamp.
3. Remove packing box bolting and yoke clamps.
4. Completely turn the actuator off the plug and bon-
net without rotating the plug inside the bonnet.
CAUTION: Do not allow the plug to drop and
impact against the seat after turning the actua-
tor off the plug threads.
5. Disconnect tubing.
6. Remove the adjusting screw to relieve the spring
compression.
WARNING: The spring compression must be
relieved before further disassembly; other-
wise, serious personal injury can occur dur-
ing disassembly.
7. Remove the retaining ring from the groove at the
base of the cylinder by using two screwdrivers,
inserting them in the ring’s slot and prying the ring
from the groove.
8. Pull the cylinder off of yoke and piston. Some O-ring
resistance may be felt. Remove spring for cleaning
and inspection (air-to-open configuration only).
WARNING: Do not use air pressure to remove
cylinder. Serious personal injury can occur.
9. To remove the spring on air-to-close configura-
tions, remove the piston retaining nut and slide
piston off of the actuator stem. The spring may now
be removed.
NOTE: Step 10 can only be performed if the actua-
tor has been removed from the valve.
10. To inspect the actuator stem O-ring, remove the
stem clamp and bellows. Push the actuator stem
through the yoke, being careful not to gall the stem.
The O-ring may now be removed for replacement.
NOTE: The actuator stem bushings are pressed
into the yoke; it is not necessary to remove the
bushing to replace the actuator stem O-ring.
Reassembling the Actuator
To reassemble the actuator, refer to Figures 1, 3 and 5
then proceed as follows:
1. All O-rings should be replaced and the new ones
lubricated with a silicone lubricant (Dow Corning
55M or equivalent). Silicone O-rings must be lubri-
cated with Magnalube-G lubricant or equivalent. Do
not use a silicone lubricant on silicone O-rings.
2. Make sure all internal parts are thoroughly cleaned
and lubricated before beginning reassembly.
3. If the actuator stem has been removed, replace the
piston stem O-ring and reassemble the piston and
actuator spacer on the actuator stem according to
the proper air-action (refer to Figures 3 and 5.) Air-
to-close configurations require the spring button to
be inserted under the actuator stem retaining nut.
Tighten the retaining nut firmly.
4. For air-to-close configurations, place the spring
under the piston and insert the actuator stem
through the yoke, being careful to not gall the stem
Bolt/Stud Material