Adjust over flow tube height. Adjust height to
suit and turn the over flow tube to the left to
lock. Ensure top of overflow is 25mm below
the CL (Critical Level) line on the inlet valve.
This is to ensure the correct air gap.
9
A & B. To adjust full and half flush volume,
push below tab inwards. Slide tabs upwards
for less water and downwards for more water.
C. For added flexibility, the full flush setting can
be further adjusted using the small full flush
window. Slide (up) for less water. Slide (down)
for more water.
Button rods should almost touch the top of
the paddles. If too long, the valve may leak
water into the pan. Finely adjust the rods by
screwing up or down.
7
Button height can be established by
measuring height from inside bottom of tank
to outside of cistern lid. Deduct from the
measurement the height of the valve to top of
paddle. The difference is the length of the
button and rod. Adjust & trim rods as
required to almost touch top of paddle.
6
If the new button assembly is required, fit the
button assembly in the lid hole and align the
rods with the valve paddles. Ensure the half
flush button rod matches the half flush paddle.
Tighten locking nut.
5
Paddle diagrams indicate half and full flush.
Full circle indicates full flush and semi circle is
the half flush.
4
Ensure the rubber gasket is on the inside of
the cistern tank. Holding outlet valve in place,
thread large plastic locknut onto threads of
outlet valve. Hand-tighten locknut and use large
adjustable pliers to go 1/2 turn beyond hand
tight. DO NOT OVERTIGHTEN.
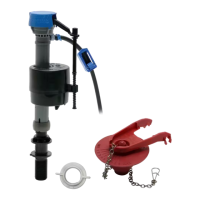
Once the old fitting is removed and the tank
has been cleaned, insert the Fluidmaster outlet
valve into position.
After turning the water off, remove the old
fitting by removing the locking nut under the
toilet tank.
1
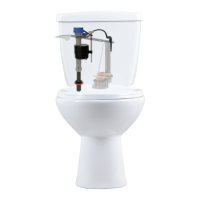
IMPORTANT: Prior to installation, turn the water off at the wall, flush cistern and mop up the residual water to avoid spillage before removing the old outlet
valve. After removing the old outlet valve, please clean the cistern tank of all dirt and grime, and ensure no debris is left in the tank.
WM-022481
FLUIDMASTER
®
560AU OUTLET VALVE
INSTALLATION INSTRUCTIONS
PART# 5-3309, Grev. 3, 08/17
(BLUE)
(G R AY )
2 3
3
2
1
FULL
FLUSH
FULL
FLUSH
HALF
FLUSH
13
1
16
1
A
B
C
8
B
A
C
File Name:
5-3309_Grev3_560AU_Instructions_080817
Printing & Finishing: 4/C Offset
Colors:
CMYK DIE
PMS Colors: