QuickStart: Fluke Ti90/95
100
110/125 TiR110/125
© 2014 The Snell Group / 322 N. Main Street / Suite 8 / Barre, VT 05641 / 800-636-9820 /
www.thesnellgroup.com
1
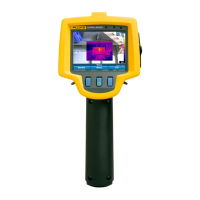
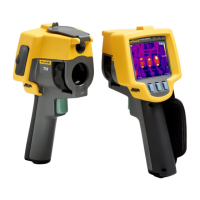
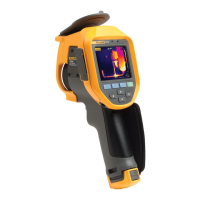
Microphone&Speaker
LensCover
PowerButton
VisualCamera
andLEDs
IRCameraLens
LaserPointer
Function
Keys
Arrow
Keys
Battery
ACInput,USB
&SDCardSlot
Primary
Trigger
(Pause)
IR‐OptiFlex
TM
Focus
Secondary
Trigger
(Laser&
LED)
(NotAvailableOn
90/95/100)
1.
MEMORY: Insert SD memory card into the slot under the rubber cover on the side of the camera.
2. POWER: Insert a fully charged battery into the base of the hand grip. The battery life is indicated in the upper
left corner of the LCD display. You can also press and hold the battery symbol on the side of the battery.
3. START: Press and hold the green power button (located above the LCD display screen) until you hear an
audible tone signaling camera startup.
Swing the attached lens cover up into the open position.
To turn the camera off, press the green power button until an audible tone signals it is powering down.
4. AUTO ADJUST: (Level and Span) The default start-up image adjustment mode will be the one that was
set prior to the power being shut off after its last use. Auto or Manual will be displayed in the upper right
corner of the LCD screen indicating which adjustment mode is currently set.
If the imager starts up in Manual Mode:
1) Hold down the F1 BUTTON for 1 second to switch back to Auto Mode Or…
2) Press the F3 BUTTON once for a one-time Auto Adjust. This will automatically
adjust the image, but the camera will remain in Manual Mode.