54
SLAT DECK BOAT ASSEMBLY INSTRUCTIONS
1. Clear a at space (making sure it is clean and free of sharp objects) to unfold your boat. Remove the hull from its box
and take it out of the boat bag. Unroll the hull so it laid out at.
2. Inate the boat with the high pressure foot pump to 90%. Start to pump up the boat on the tube section with the
overpressure security valve.
Note : Do not use an air compressor. Damage to your boat caused by over ination from an air compressor is not
covered by your warranty.
3. Install the aluminium seat by sliding the anges on the bottom of the seat onto the rails located on the side oaters.
4. Finish inating all hull chambers to 100%, or 0.25bar pressure. The boats main tube has a built in overpressure valve for
added security.
5. Secure the oars by clipping into the oar locks
AIRDECK BOAT ASSEMBLY INSTRUCTIONS
1. Clear a at space (making sure it is clean and free of sharp objects) to unfold your boat. Remove the hull
from its box and take it out of the boat bag. Unroll the hull so it laid out at.
2. Slightly inate the boat with the high pressure foot pump. Inate the three hull chambers to approximately
30% full in order to make oorboard insertion easier. Start to pump up the boat on the tube section with the
overpressure security valve.
Note : Do not use an air compressor. Damage to your boat caused by over ination from an air compressor is not
covered by your warranty.
3. Assemble the air-deck. Place the deated air-deck oor in the boat. Make sure the edge of the air-deck oor is tucked
fully between the oor of the boat and under the side tubes.
4. Place the keel valve through the hole of the air-deck oor.
5. Inate the air-deck oor tightly but no more than 1.00bar pressure.
6. Inate the keel until the air-deck oor is straightened out well. You may need to step on the air-deck oor to make
it straight.
7. Install the aluminium seat by sliding the anges on the bottom of the seat onto the rails located on the side oaters.
8. Finish inating all hull chambers to 100%, or 0.25bar pressure. The boats main tube has a built in overpressure valve for
added security.
9. Inate the keel to 80% of max pressure. The keel will plane better when it is 80% inated.
10. Secure the oars by clipping into the oar locks
ALUMINIUM DECK BOAT ASSEMBLY INSTRUCTIONS
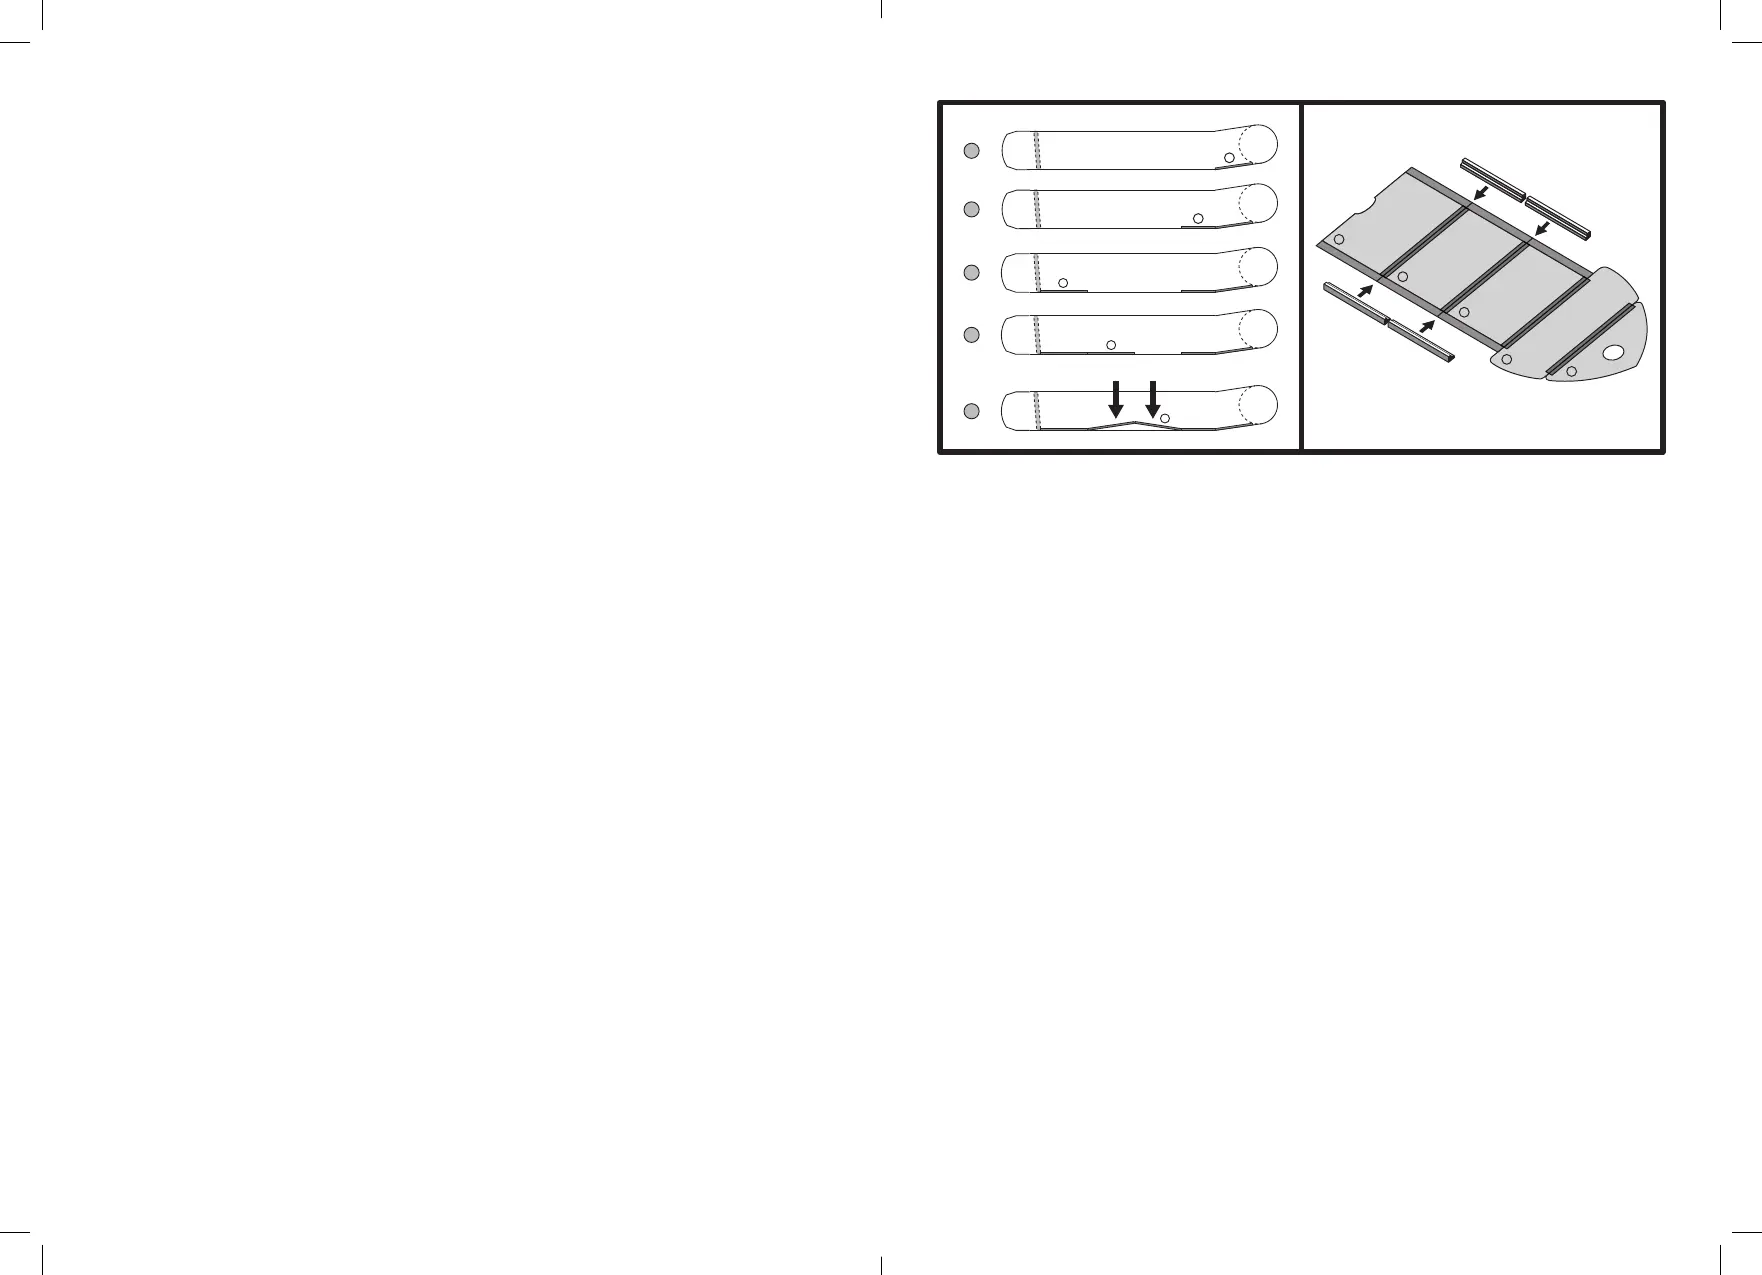
1. Clear a at space (making sure it is clean and free of sharp objects) to unfold your boat. Remove the hull from its box
and take it out of the boat bag. Unroll the hull so it is laid out at.
2. Slightly inate the boat with the high pressure foot pump. Inate the three hull chambers to approximately
30% full in order to make oorboard insertion easier. Start to pump up the boat on the tube section with the
overpressure security valve.
3. Place oor panel 1 into the front (bow) of the boat under the side tubes and ensure the keel valve is located at the centre
of the hole in the board.
4. Next t panel 2 pushing it tight up against panel 1.
5. Place panel 5 at the rear of the boat and push up against the transom boat.
6. Next t panel 4 pushing it tight up against panel 5.
7. Finally t panel 3 up against panel 2. To join panel 3 to panel 4 you will need to lift the join to get the edges to meet and
then push down until at.
8. To hold the oor rigid t the side rails along the side of the oor so that they overlap the joins.
9. Install the aluminium seat by sliding the anges on the bottom of the seat onto the rails located on the side oaters.
10. Finish inating all hull chambers to 100%, or 0.25bar pressure. The boats main tube has a built in overpressure valve for
added security.
Note : Do not use an air compressor. Damage to your boat caused by over ination from an air compressor is not
covered by your warranty.
11. Inate the keel to 80% of max pressure. The keel will plane better when it is 80% inated.
12. Secure the oars by clipping into the oar locks
DEFLATION
Remove the outer valve caps to expose the plastic stem on the inner valve. Press the stem in to release air pressure, and
turn it to lock the valve in the open position. Deate each hull chamber to 50-75% before completely deating any of the air
chambers. Remove and disassemble oorboards.
Note: Do not deate one chamber fully while others are fully inated. This could damage the bulkheads
of your boat.
MAINTENANCE & STORAGE
• To clean hose off sand and dirt and let dry before fully packing away. Most dirt can be removed with a garden hose,
a sponge and mild soap. Do not use harsh chemical cleaners.
• Never use polishing or cleaning products containing alcohol to clean your watercraft. Doing so may lead to the premature
drying out of the oater material.
• Store in a clean and dry place. Do not store in extreme temperatures (i.e. over 150F/below - 10F).
• If storing your boat for long periods folded up in the bag, ensure it is fully dry, do not sprinkle with talc or other
similar powders.
• Can be stored inated or deated.
• If left outside it is advisable to raise it up off the ground.
• If it is going to be in direct sunlight or exposed to leaves, berries or rain, cover it with a tarp.
• Hanging the boat is not recommended.
• If you leave the boat in the water, you will probably have to drain out rainwater at times. If you store it in a closet, basement
or garage, we suggest you pick a cool, dry spot, making sure the boat is clean and dry before you pack it up - or mold
can accumulate.
• Never store a boat with fuel in the tank in a room where the fuel vapours may reach a ame, spark or a strong source
of heat.
TROUBLESHOOTING
1. Leaks
After 2 or 3 days there may be a small decrease of pressure due to temperature change. If so, add a few pumps of air into
each chamber. If you are losing air pressure, and it isn’t due to colder temperatures, check the boat over for leaks, starting
with the valves. The best tool to nd leaks is soapy water in a spray bottle. A leaking valve is rare, but if you do nd a leak we
can send you a replacement valve. We recommend mixing soap and water in a spray bottle. Spray around the valve. If you
1
2
3
4
5
A
B
C
D
E
1
2
5
4
3

 Loading...